background image

Installation


Haier LED HDTV 

EN-8

Choose Your Connection

There are several ways to connect your television, 

depending on the components you want to connect 

and the quality of the signal you want to achieve.  The 

following are examples of some different ways to 

connect your TV with different input sources.

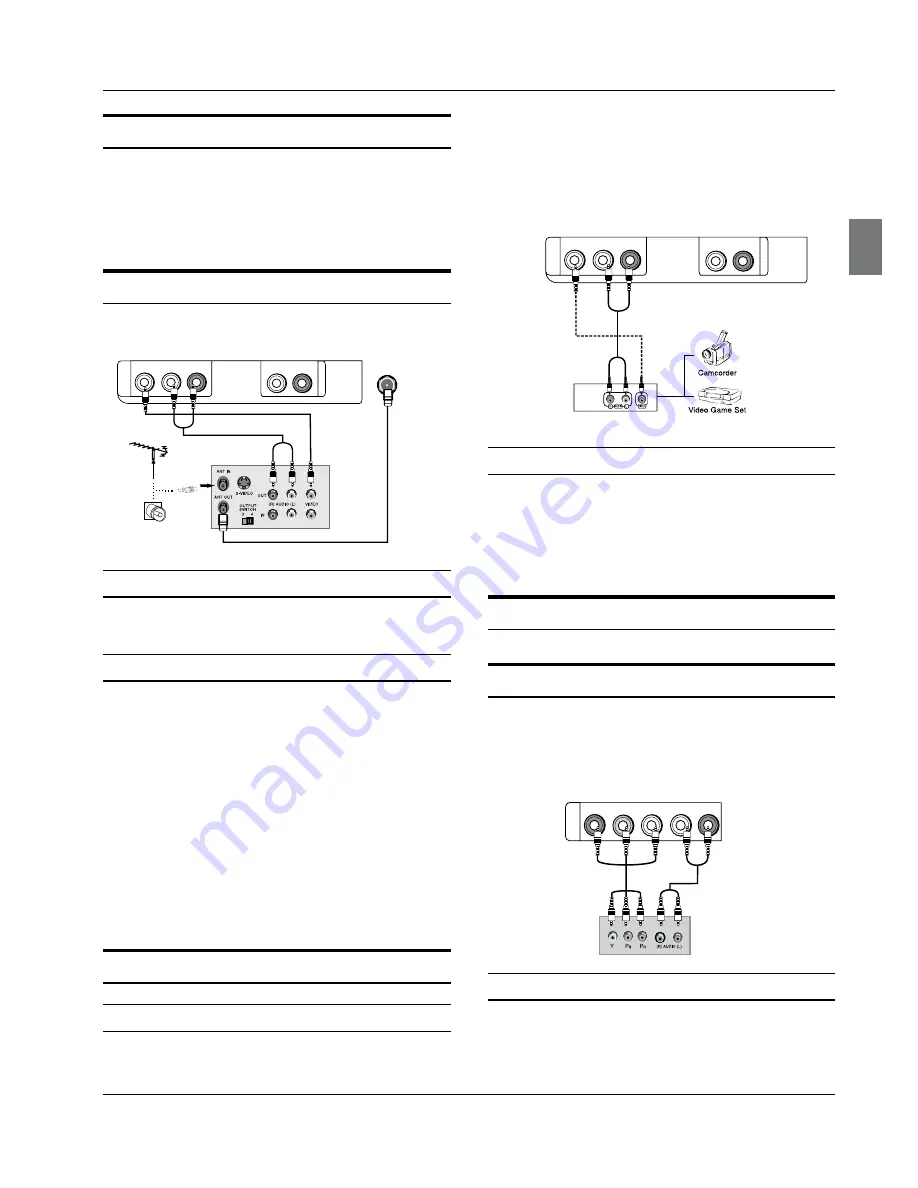
Connecting a VCR

To avoid picture noise (interference), leave an adequate 

distance between the VCR and TV.

VCR

VIDEO

AV

 IN

AUDIO OU

T

L                   R

L   -AUDIO-   R

ANT IN

Connection Option 1

Set VCR output switch to channel 3 or 4 and then tune 

the TV to the same channel number.

Connection Option 2

Connect the audio and video cables from the VCR’s 

output jacks to the TV input jacks, as shown in the 
figure. When connecting the TV to VCR, match the 
jack colors (Video = yellow, Audio Left = white, 
and Audio Right = red). compared to connecting a 
regular VCR to the Video input.

Insert a video tape into the VCR and press 

PLAY

 on 

the VCR. (Refer to the VCR owner’s manual.)

Select the input source with using the

 INPUT

 button 

on the remote control, and then press 

5

/

6

button 

to select the source, press 

ENTER

 button to confirm. 

External A/V Source Setup

How to connect

Connect the audio and video cables from the 

external equipment’s output jacks to the TV input 
jacks, as shown in the figure.

When connecting the TV to external equipment, 

match the jack colors (Video = yellow, Audio Left = 
white, and Audio Right = red).

VIDEO

AV

 IN

AUDIO OU

T

L                   R

L   -AUDIO-   R

How to use

Select the input source with using the 

INPUT

 button 

on the remote control.

Operate the corresponding external equipment.

Refer to external equipment operating guide.

Component Setup

How to connect

Connect the DVD video outputs (COMPONENT) to the 
Y Pb Pr jacks on the TV and connect the DVD audio 
outputs to the YPbPr Audio IN  jacks on the TV, as shown 
in the figure.

COMPONEN

T

 IN

Y                  Pb                 Pr

L   -AUDIO-   R

How to use

Turn on the DVD player, insert a DVD disc.

Use 

INPUT

 button on the remote control to select 

proper 

input.

Содержание HL24XSL2

Страница 1: ...re t l viseur conservez ce guide pour vous y reporter ult rieurement Se recomienda leer con atenci n este manual antes de poner en funcionamiento su televisor y conservarlo para consultas futuras HL19...

Страница 2: ...not use this apparatus near water 5 Clean only with dry cloth 6 Do not block any ventilation openings Install in accordance with the manufacturer s instructions 7 Do not install near any heat sources...

Страница 3: ...Environmental Protection Agency and the U S Department of Energy promoting energy efficiency SAVE THESE INSTRUCTIONS Thank you for purchasing the Haier product This easy to use manual will guide you...

Страница 4: ...res 19 To play music 19 To play video 20 Maintenance 21 Specification 21 Troubleshooting 21 Warranty 22 Warning 1 Safety Instructions 2 Introduction 4 Controls 4 Connection Options 5 Connecting a DC i...

Страница 5: ...ess the input source mode Press repeatedly to change the source to the one you want to watch In the MENU screen the INPUT button serves as the ENTER button 4 VOL Presstoadjustthevolume IntheMENUscreen...

Страница 6: ...eo signal from a video device to this jack 7 Component Input Connect a component video device to these jacks 8 AUDIO In Connect the audio L R cables from the video signal source to these jacks 9 AUDIO...

Страница 7: ...Previous Chapter Q CH LIST Open the channel list inTV R FAVORITE Open the favourite channel list inTV PICTURE CCD INPUT ARC MENU VOL EXIT USB PLAY PAUSE REV DISPLAY GUIDE MTS SAP CH CH VOL ENTER STOP...

Страница 8: ...nts Connect to wall antenna socket Wall Antenna Socket RF Coaxial Wire 75 ohm Single family Dwellings Houses Connect to wall jack for outdoor antenna Outdoor Antenna To improve the picture quality in...

Страница 9: ...nto the VCR and press B PLAY on the VCR Refer to the VCR owner s manual Select the input source with using the C INPUT button on the remote control and then press 5 6button to select the source press...

Страница 10: ...to another resolution change the refresh rate to another rate or adjust the brightness and contrast on the menu until the picture is clear If the refresh rate of the PC graphic card can not be changed...

Страница 11: ...remote control When finished using the TV press C POWER button on the remote control The TV reverts to standby mode If you intend to be away on vacation disconnect the D power plug from the wall powe...

Страница 12: ...Color Y Y Press CH button and VOL ENTER button to confirm then press VOL button to adjust the color saturation Tint Y Y Adjust the tone of the picture Sharpness Adjust the amount of the detail enhanc...

Страница 13: ...n to reveal the picture on the screen SAP Broadcasts Setup This TV can receive MTS stereo programs and SAP Secondary Audio Program that accompanies the stereo program if the station transmits an addit...

Страница 14: ...peed USB 2 0 drive with a minimum of 1GB capacity Time shift only supports FAT32 file system R R Time shift supports more than 4GB recording by R R using multi file storage Antenna or Cable Channel Sc...

Страница 15: ...VOL ENTER button to confirm and VOL button increase and decrease the level to adjust the selected option to your preference Repeat step 2 and step 3 until desired quality has D been achieved Function...

Страница 16: ...broadcasters supplying the signal Therefore closed captioning might not always be available and language availability will differ by broadcast Select CC1 for full translation of the primary language...

Страница 17: ...n Rating Block Unrated Select ENTER Enter Back EXIT Video Audio Channel Lock Function On On CH VOL Parental Lock Press VOL button to select On or Off Used to lock all the system following To set Off t...

Страница 18: ...7 This type of movie rating means no one 17 and under admitted X This type of movie rating means adults only CA Eng Rating Press VOL ENTER button to enter submenu as follows Press CH button to select...

Страница 19: ...ted option to your preference Repeat step 2 and step 3 until desired quality has D been achieved Video Audio Lock Function Video Mode Custom Brightness Contrast Color Temperature Advanced Video PC 50...

Страница 20: ...the remote to enter USB media system The system start up takes about 3 seconds Then insert the USB drive in the USB input Press B MENU button and the press CH to select Media Type Press ENTER and pre...

Страница 21: ...o confirm PLAY PAUSE REV STOP PREV REPEAT NEXT 1 2 3 4 5 6 7 1 Play or pause 2 Stop 3 Repeat 4 Fast reverse 5 Fast forward 6 Play previous music 7 Play next music Press F EXIT button to return to the...

Страница 22: ...ir dry before you turn on your TV Cleaning the Cabinet To remove dirt or dust wipe the cabinet with a soft dry lint free cloth Please be sure not to use a wet cloth Extended Absence If you expect to l...

Страница 23: ...ences on the date the item was purchased and the original purchase receipt must be presented to the authorized service center before warranty repairs are rendered The limited warranty described herein...

Отзывы: