Introduction
Haier LED HDTV
EN-6
1
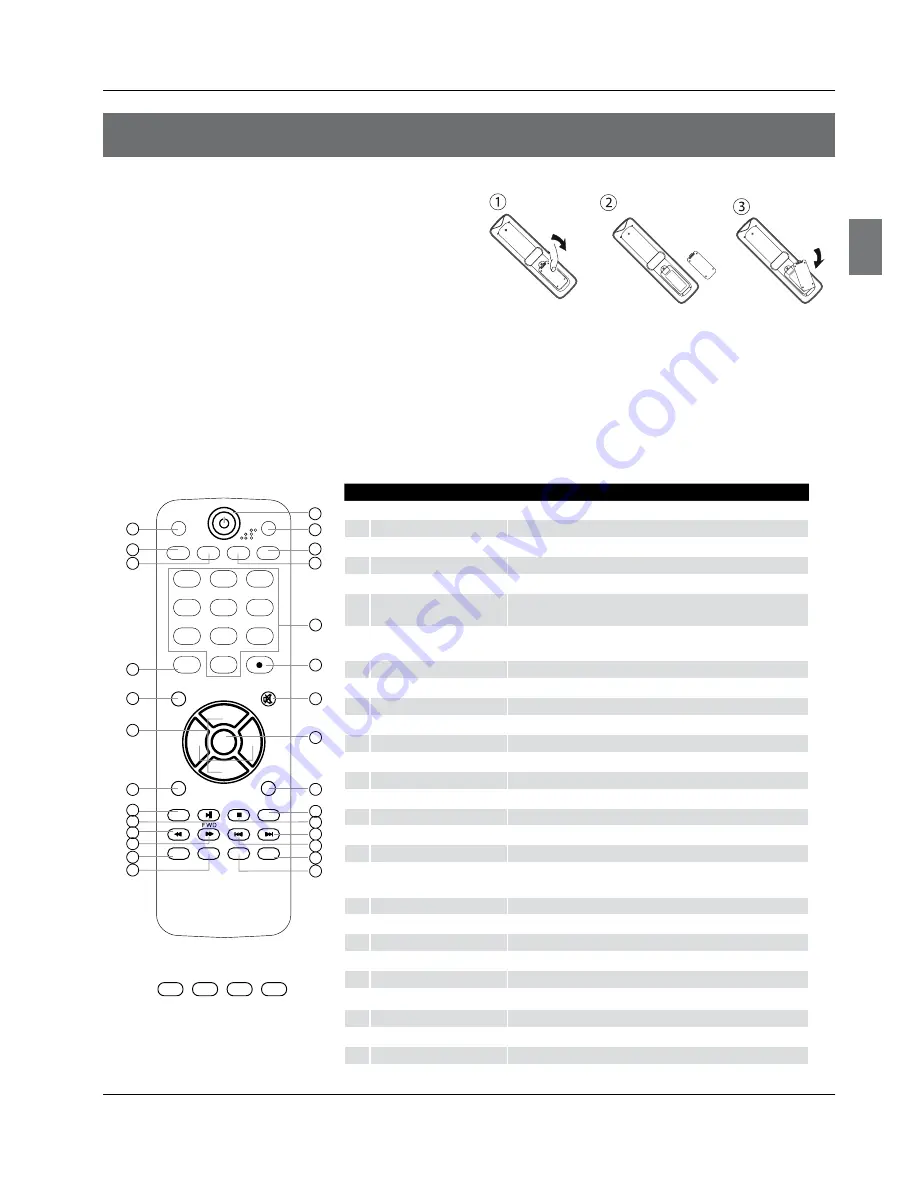
PICTURE
Press repeatedly to cycle through the available picture modes
2
ARC
Select the aspect ratio
3
CCD (closed caption)
Select a closed caption option
4
INPUT
Show the input source
5
MENU
Press to open the on-screen menu
6
Thumbstick (Up/Down/
Left/Right)
Volume/Channel Selection, Allows you to navigate the on-screen
menus and adjust the system settings to your preference.
7
EXIT
Clears all on-screen displays and returns to TV viewing from any
menu
8
USB
Press to switch input source to USB in
9
USB PLAY/PAUSE
0
USB fast reverse
A
USB fast forward
B
DISPLAY
Press to display the TV status information on the top of the TV screen
C
GUIDE
Display the guide when you are watching analog or digital channels
D
Power
Press to turn on and off the TV
E
AUDIO
Press to cycle through different sound settings
F
SLEEP button
Press to display the sleep timer option
G
MTS/SAP
Select MONO, STEREO, SAP in NTSC system
H
Number buttons
Press to change a channel
I
• button
Press to select digital channels. For example, to enter “54-3”,
press “54”, “• ” and “3”
J
MUTE
Switches the sound on or off
K
ENTER
Accesses the highlighted item in the on-screen menu
L
RECALL
Press to jump back and forth between two channels
M
USB REPEAT
N
USB STOP
O
USB Next Chapter
P
USB Previous Chapter
Q
CH.LIST
Open the channel list in TV
R
FAVORITE
Open the favourite channel list in TV
PICTURE
CCD
INPUT
ARC
MENU
VOL-
EXIT
USB
PLAY/PAUSE
REV
DISPLAY GUIDE
MTS/SAP
CH+
CH-
VOL+
ENTER
STOP
PREV
FAVORITE
AUDIO
SLEEP
REPEAT
NEXT
CH.LIST
MUTE
RECALL
1
2
3
4
5
6
7
8
9
10
11
12
13
14
15
16
17
18
19
20
21
22
23
24
25
26
27
28
Red
UP
DOWN LEFT
RIGHT
Green
Yellow
Blue
Color buttons
When functions are attached to the
color buttons, the color buttons are
shown on screen.
Remote control
The remote control cannot be operated unless the batteries are properly loaded.
When using the remote control, aim it at the remote sensor on the TV.
Remote Control
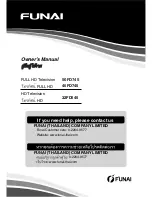
Battery loading
1. Slide open the cover of the battery compartment on
the back of the remote controller.
2. Load two (AAA) alkaline batteries in the compartment,
(plus and minus poles to respective mark)
3. Replace the cover of the battery compartment.
Precautions
1. As strong light may interfere the signals, change
your position to operate the remote controller if the
television cannot be turned on or off as you expect.
2. Keep the remote controller away from heat source or
humid area to ensure effective performance of the
remote controller.
3. Make sure that two AAA alkaline batteries are
loaded. The batteries must be of the same type. The
batteries must be located properly. The batteries are not
rechargeable.
4. Make sure that there is no obstacle between the
remote controller and television set.