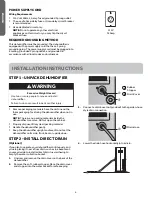
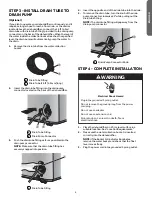
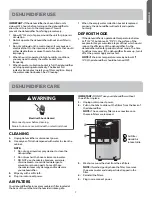
background image

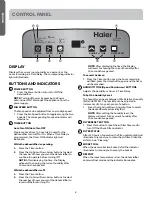
CONTROL PANEL

a

b

c

d

e

f

g

h

BUCKET
FULL

DEFROST

HIGH

LOW

ON

OFF

CHECK
FILTER

% RH

POWER

SPEED

TIMER

HUMIDITY / TIME

FILTER RESET

DISPLAY

Displays the current room humidity as a percent, or the

hours remaining in a Time Delay. The corresponding indicator

light will illuminate.

BUTTONS AND INDICATORS

A

POWER BUTTON

Press the Power button to turn On/Off the

dehumidifier.

NOTE: Turning off power by pressing the Power

button does NOT disconnect the appliance from the

power supply.

B

FAN SPEED BUTTON
The fan speed can be adjusted from Low to High speed.

Press the Fan Speed button to toggle among the two

speeds. The corresponding fan speed indicator will

illuminate.

C

TIMER BUTTON
Auto Turn ON/Auto Turn OFF
Program a time from (1-hour to 24-hours) for the

dehumidifier to turn Off or On. When a Time Delay is

programmed, the Timer ON indicator light will

illuminate.
While the dehumidifier is operating:
1. 
Press the Timer button.
2. Press the Up Arrow/Down Arrow buttons to select

the number of hours you want the dehumidifier to

continue to operate before turning Off.
NOTE: After displaying the time, the Display

will revert to showing the current humidity after

10 seconds have passed.

While the dehumidifier is off:
1. 
Press the Timer button.
2. Press the Up Arrow/Down Arrow buttons to select

the number of hours you want the dehumidifier to

remain off before turning On.

NOTE: After displaying the time, the Display

will revert to showing the current humidity after

10 seconds have passed.

To cancel the timer:

Press the Timer button once, the hours remaining

will flash, press the timer button again and the timer

will be cancelled.

D

HUMIDITY/TIME (Up and Down Arrow) BUTTONS
Adjusts the Humidity or Hours in Time Delay.
To Set the Humidity Level:
The humidity can be set between 30% Relative Humidity

(RH) and 90% RH. The humidity can be adjusted in

increments of 5% by each press of a button.

Press the Up Arrow/Down Arrow buttons to select

the desired Relative Humidity (RH).
NOTE: After setting the humidity level, the

display will revert to the current humidity after

10 seconds have passed.

E

FILTER RESET BUTTON

Press this button to reset the air filter timer and to

turn Off the Check Filter indicator.

F

FILTER STATUS
After 250 hours of operation, the filter indicator light will

illuminate to remind you to clean the air filter. Clean the

air filter. See “Cleaning.”

G

BUCKET FULL
When the water collection bucket is full the indicator

illuminates to remind you to empty the bucket. 

H

DEFROST
When the room temperature is low, the dehumidifier

enters defrost mode and the indicator illuminates.

6

ENGLISH

Содержание HEN70ETFP

Страница 1: ...Installation and User Manual Installation et guide de l utilisateur Manual de instalación y del usuario HEN70ETFP Dehumidifier Déshumidificateur Deshumidificador Part 0060522959 REV A ...

Страница 2: ......

Страница 3: ... 4 Step 1 Unpack Dehumidifier 4 Step 2 Install Direct Drain 4 Step 3 Install Drain Tube to Drain Pump 5 Step 4 Complete Installation 5 CONTROL PANEL 6 Display 6 Buttons and Indicators 6 DEHUMIDIFIER USE 7 Defrost Mode 7 DEHUMIDIFIER CARE 7 Cleaning 7 Air Filters 7 Water Collection Bucket 8 Storage 8 TROUBLESHOOTING 8 LIMITED WARRANTY 9 RECORD KEEPING 10 1 ENGLISH ...

Страница 4: ...o a grounded 3 prong outlet Do not remove ground prong Do not use an adapter Do not use an extension cord Do not operate the dehumidifier if it has a damaged cord or plug if it is not working properly or if it has been damaged or dropped The dehumidifier should be serviced only by qualified service personnel Call an authorized service company for examination repair or adjustment Disconnect power b...

Страница 5: ... cm Keep the dehumidifier free of any obstructions such as drapes curtains blinds etc Keep all windows and doors to the outside closed when operating the dehumidifier Humid air will increase the dehumidifier s workload Do not place the dehumidifier in an area where the temperature will fall below 38 F 3 C Lower temperatures may cause a layer of frost to accumulate which will decrease performance D...

Страница 6: ...ove packaging materials Save the carton and the foam packaging for storing the dehumidifier when not in use NOTE There are no packing materials inside the dehumidifier to remove Do Not open the cabinet Properly dispose of recycle all packing material Handle the dehumidifier gently Keep the dehumidifier upright and level Do not set the dehumidifier on its side front back or upside down STEP 2 INSTA...

Страница 7: ...nector NOTE Make sure that the drain tube fitting has securely snapped into position a A Drain Tube Fitting 4 Insert the opposite end of the drain tube into the drain 5 To remove the drain tube turn the knob of the drain pump connector clockwise 45 while pulling out the drain tube fitting NOTE The drain tube fitting will pop away from the drain pump connector a A Drain Pump Connector Knob STEP 4 C...

Страница 8: ...humidifier is off 1 Press the Timer button 2 Press the Up Arrow Down Arrow buttons to select the number of hours you want the dehumidifier to remain off before turning On NOTE After displaying the time the Display will revert to showing the current humidity after 10 seconds have passed To cancel the timer Press the Timer button once the hours remaining will flash press the timer button again and t...

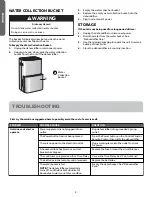
Страница 9: ...e to defrost may vary If the dehumidifier freezes up turn it off at the power supply and restart NOTE If the room temperature remains below 41 F 5 C the dehumidifier should be turned OFF DEHUMIDIFIER CARE WARNING Electrical Shock Hazard Disconnect power before cleaning Failure to do so can result in death or electrical shock CLEANING 1 Unplug dehumidifier or disconnect power 2 Use only a soft clot...

Страница 10: ...st or dirt 4 Store the dehumidifier in a cool dry location TROUBLESHOOTING First try the solutions suggested here to possibly avoid the cost of a service call PROBLEM POSSIBLE CAUSE SOLUTION Unit does not start or operate Power supply cord is not plugged into an outlet Plug dehumidifier into a grounded 3 prong outlet The Power button has not been pressed Press the Power button on the Control Panel...

Страница 11: ... number of the nearest authorized service center please call 1 877 337 3639 Before calling please have available the following information Model number and serial number of your appliance The name and address of the dealer you purchased the unit from and the date of purchase A clear description of the problem A proof of purchase sales receipt This warranty covers home appliance services within the...

Страница 12: ...yne NJ 07470 RECORD KEEPING Thank you for purchasing this Haier product This user manual will help you get the best performance from your new dehumidifier For future reference record the model and serial number located on the label on the side of your dehumidifier and the date of purchase Staple your proof of purchase to this manual to aid in obtaining warranty service if needed __________________...

Страница 13: ...ape 2 Installation du système de vidange directe 14 Étape 3 Raccordement du tuyau d écoulement à la pompe de vidange 15 Étape 4 Fin de l installation 16 TABLEAU DE COMMANDE 16 Affichage 16 Boutons et témoins 16 UTILISATION DU DÉSHUMIDIFICATEUR 17 Mode de dégivrage 17 ENTRETIEN DU DÉSHUMIDIFICATEUR 18 Nettoyage 18 Filtres à air 18 Bac de récupération d eau 18 Rangement 19 DÉPANNAGE 19 GARANTIE LIMI...

Страница 14: ...précautions fondamentales notamment Lire toutes les instructions avant d utiliser ce déshumidificateur Brancher sur une prise à 3 alvéoles reliée à la terre Ne pas enlever la prise de liaison à la terre Ne pas utiliser d adaptateur Ne pas utiliser un câble de rallonge Ne pas faire fonctionner le déshumidificateur si la prise ou le câble est endommagé e si l appareil ne fonctionne pas correctement ...

Страница 15: ... dégagement de 8 20 cm au minimum autour du déshumidificateur pour permettre à la chaleur de se dissiper correctement 20 51 cm 20 51 cm 20 51 cm 20 51 cm Ne pas obstruer le déshumidificateur de quelque manière que ce soit rideaux stores etc Maintenir fermées toutes les fenêtres et les portes donnant vers l extérieur lorsque le déshumidificateur est en marche L air humide augmente la charge de trav...

Страница 16: ...EUR Risque du poids excessif Utiliser deux ou plus de personnes pour déplacer et installer le déshumidificateur Le non respect de cette instruction peut causer une blessure au dos ou d autres blessures AVERTISSEMENT Enlever les matériaux d emballage Conserver le carton et le polystyrène d emballage pour entreposer le déshumidificateur lorsqu il n est pas utilisé REMARQUE Il n y a AUCUN matériau d e...

Страница 17: ...écoulement du bac du déshumidificateur a b A Raccord du tuyau d écoulement B Tuyau d écoulement 16 pi 4 9 mm de long 2 Insérer l adaptateur du tuyau d écoulement dans le raccord de la pompe de vidange situé à l arrière du déshumidificateur a b A Raccord du tuyau d écoulement B Connecteur de la pompe de vidange 3 Enfoncer le raccord du tuyau d écoulement aussi loin que possible dans le raccord de l...

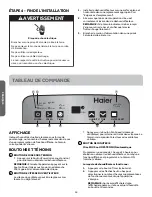
Страница 18: ... heures restantes dans le cas d une programmation de fonction différée Le témoin correspondant s allume BOUTONS ET TÉMOINS A BOUTON DE MISE SOUS TENSION Appuyer sur le bouton Power mise sous tension pour allumer ou éteindre le déshumidificateur REMARQUE Éteindre l appareil en appuyant sur le bouton Power mise sous tension ne débranche PAS l appareil de l alimentation électrique B BOUTON DE VITESSE...

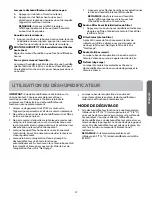
Страница 19: ...le déshumidificateur entre en mode de dégivrage et le témoin s allume UTILISATION DU DÉSHUMIDIFICATEUR IMPORTANT Si le déshumidificateur a été incliné sur le côté patienter 24 heures avant de le remettre en marche pour laisser le temps à l huile de rejoindre le compresseur Cela évitera au déshumidificateur de tomber en panne prématurément Laisser un dégagement de 20 51 cm autour de l appareil pour...

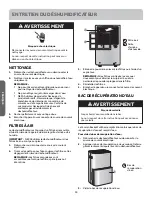
Страница 20: ...éshumidificateur si les filtres à air ne sont pas en place 1 Débrancher ou déconnecter la source de courant électrique 2 Tirer sur les pattes pour faire coulisser les filtres et les dégager de l arrière du déshumidificateur REMARQUE Les filtres secondaires sont accessibles une fois que les filtres principaux ont été retirés b a A Filtre à air B Grille d arrivée d air humide 3 Éliminer la poussière...

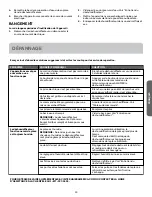
Страница 21: ...emplacer le fusible ou réenclencher le disjoncteur La commande a été programmée pour une mise en marche différée Annuler la mise en marche différée Voir Tableau de commande Les piles de la télécommande sont épuisées Remplacer les piles Le bac à eau est rempli REMARQUE Le déshumidificateur s éteint automatiquement et le témoin Bucket Full bac rempli s allume pour vous avertir Vider le bac à eau Voi...

Страница 22: ...pannage non identifiés comme étant normaux tel un dépannage dans une zone ou une tranche horaire normale Les dommages liés à l expédition Les dommages liés à une installation ou un entretien inadapté Les dommages causés par l un des éléments suivants Mauvaise utilisation utilisation abusive accident incendie ou catastrophe naturelle Les dommages résultant d un dépannage fourni par une entité autre...

Страница 23: ...e plaque signalétique et la date d achat La plaque signalétique est située sur une étiquette sur le côté de votre le déshumidificateur Pour faciliter l obtention d un service sous garantie agrafer la preuve de la date d achat à ce manuel _______________________________________ Numéro de modèle _______________________________________ Numéro de série _______________________________________ Date d ac...

Страница 24: ...n del desagüe directo 25 Paso 3 Instale el tubo de desagüe a la bomba de desagüe 26 Paso 4 Complete la instalación 27 PANEL DE CONTROL 27 Pantalla 27 Botones y indicadoras 27 USO DEL DESHUMIDIFICADOR 28 Modo Defrost Descongelación 28 CUIDADO DEL DESHUMIDIFICADOR 29 Limpieza 29 Filtros de aire 29 Recipiente de recolección de agua 29 Almacenamiento 30 SOLUCIÓN DE PROBLEMAS 30 GARANTÍA LIMITADA 31 IN...

Страница 25: ...el deshumidificador siga precauciones básicas incluyendo las siguientes Lea todas las instrucciones antes de usar este deshumidificador Conecte a un contacto de pared de conexión a tierra de 3 terminales No quite el terminal de conexión a tierra No use un adaptador No use un cable eléctrico de extensión No ponga a funcionar el deshumidificador si tiene un cable o enchufe dañado si no funciona corr...

Страница 26: ...eno de agua Mantenga un espacio mínimo de 8 20 cm alrededor del deshumidificador para disipar el calor de manera correcta 20 51 cm 20 51 cm 20 51 cm 20 51 cm Mantenga el deshumidificador libre de obstrucciones como cortinas con pliegues cortinas persianas etc Mantenga todas las puertas y ventanas hacia el exterior cerradas cuando el deshumidificador esté en funcionamiento El aire húmedo aumentará ...

Страница 27: ...STALACIÓN PASO 1 DESEMPAQUE EL DESHUMIDIFICADOR Peligro de Peso Excesivo Use dos o más personas para mover e instalar el acondicionador de aire No seguir esta instrucción puede ocasionar una lesión en la espalda u otro tipo de lesiones ADVERTENCIA Quite los materiales de empaque Guarde la caja y el empaque de espuma para almacenar el deshumidificador cuando no esté en uso NOTA NO hay materiales de...

Страница 28: ...l recipiente de recolección de agua a b A Conector de la bomba de desagüe B Tubo de desagüe 16 pies 4 9 m de largo 2 Inserte el accesorio del tubo de desagüe en el conector de la bomba de desagüe ubicado en la parte posterior del deshumidificador a b A Conector de la bomba de desagüe B Accesorio del tubo de desagüe 3 Empuje el accesorio del tubo de desagüe tanto como sea posible dentro del conecto...

Страница 29: ...oras restantes en la función Time Delay Tiempo diferido La luz indicadora correspondiente se encenderá BOTONES Y INDICADORAS A BOTÓN POWER ENCENDIDO Presione el botón Power Encendido Apagado para encender o apagar el deshumidificador NOTA Si apaga la unidad presionando el botón Power Encendido Apagado esto NO desconecta el electrodoméstico del suministro de energía B BOTÓN FAN SPEED VELOCIDAD DEL ...

Страница 30: ...ecordarle que debe vaciarlo H Defrost Descongelación Cuando la temperatura ambiente es baja el deshumidificador ingresa a modo de descongelación y se ilumina el indicador USO DEL DESHUMIDIFICADOR IMPORTANTE Si el deshumidificador se ha inclinado hacia un lado espere 24 horas antes de encender el deshumidificador a fin de permitir que el aceite vuelva al compresor Esto evitará que el deshumidificad...

Страница 31: ...ros de aire no están colocados en su lugar 1 Desenchufe o desconecte el suministro de energía 2 Jale de las lengüetas para deslizar los filtros de la parte posterior del deshumidificador NOTA Los filtros secundarios son accesibles una vez que se quitan los filtros principales b a A Filtro de aire B Rejilla de toma de aire húmedo 3 Lave o aspire el polvo de los filtros de aire NOTA Si se lavan agit...

Страница 32: ...rtacircuitos El control fue programado para un tiempo diferido Cancele el tiempo diferido Vea Panel de control Las pilas del control remoto están agotadas Reemplace las pilas El recipiente de agua está lleno NOTA El deshumidificador se apaga automáticamente y el indicador Bucket Full Recipiente lleno se ilumina para avisarle acerca de esta condición Vacíe el recipiente de agua Vea Cuidado del desh...

Страница 33: ...por servicio que no haya sido identificado específicamente como servicio normal como puede ser el área o las horas de servicio Daños ocurridos durante el transporte Daños ocasionados por la instalación o el mantenimiento inadecuados Daños por el uso incorrecto abuso accidente incendio inundación o fenómenos de la naturaleza Daños debidos al servicio efectuado por un distribuidor o centro de servic...

Страница 34: ...ncia futura anote el modelo y número de serie en la etiqueta en el lado de su deshumidificador y la fecha de compra Engrape la prueba de compra a este manual para asistirle cuando necesite obtener servicio bajo la garantía _______________________________________ Número de modelo _______________________________________ Número de serie _______________________________________ Fecha de compra 32 ESPAÑ...

Страница 35: ......

Страница 36: ...mmateurs Haier Customer Satisfaction Center au 1 877 337 3639 UNE PREUVE D ACHAT DATEE EST REQUISE POUR BENEFICIER DE LA GARANTIE IMPORTANTE No regrese este producto a la tienda Si tiene algún problema con este producto por favor contacte el Centro de Servicio al Consumidor de Haier al 1 877 337 3639 Válido solo en E U A NECESITA UNA PRUEBA DE COMPRA FECHADA NÚMERO DE MODELO Y DE SERIE PARA EL SER...

Отзывы: