background image

16

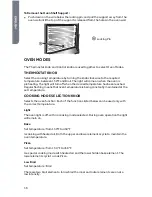
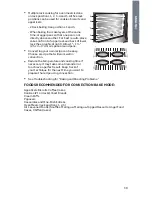
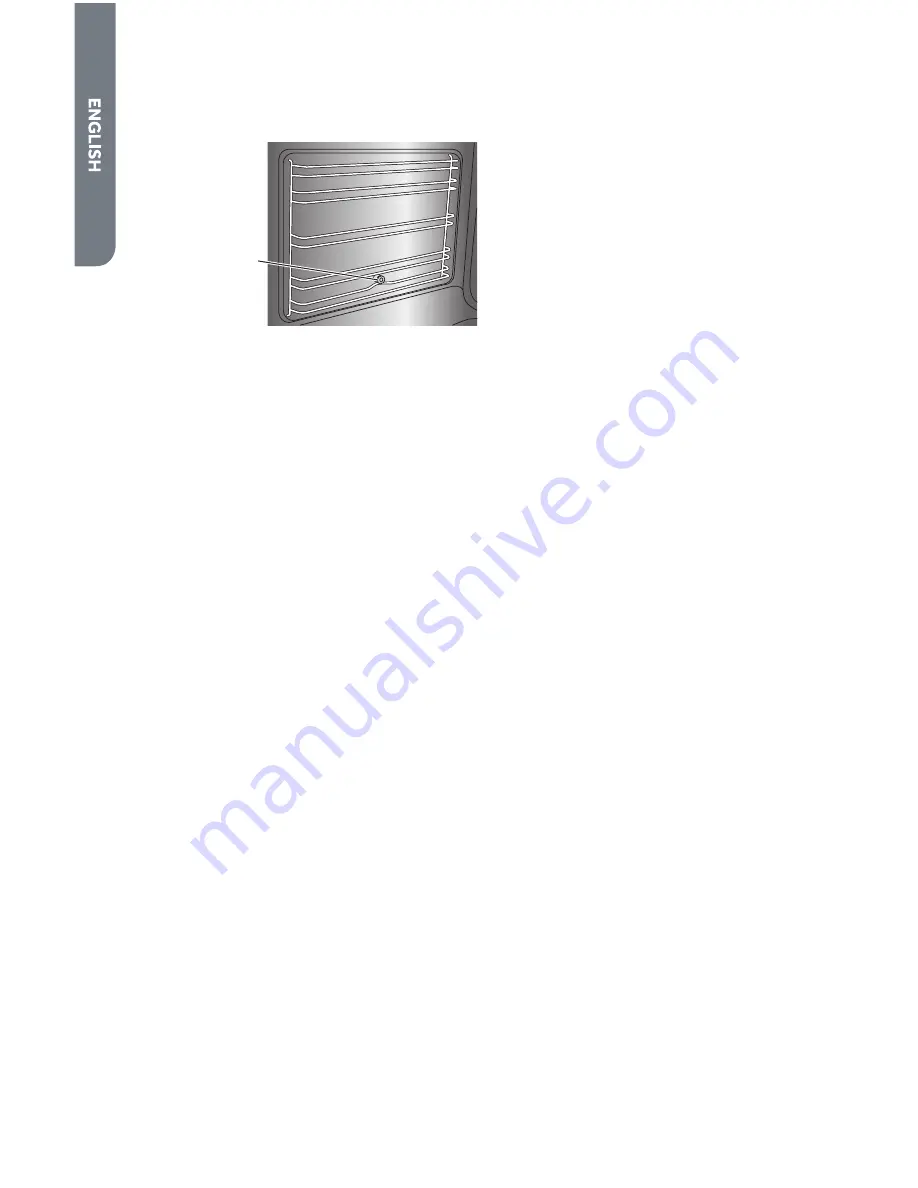
To Remove the Oven Shelf Support:

• 

Push down on the wire below the locking pin, and pull the support away from the 

oven wall until the top of the support is released from the holes in the oven wall. 

a

Locking Pin

OVEN MODES

The Thermostat knob and Control knob are used together to select Oven Modes. 

THERMOSTAT KNOB

Select the cooking temperature by turning the knob clockwise to the required 

temperature, between 150°F and Broil. The light will come on when the oven is 

preheating. The light will turn off when the desired temperature has been reached. 

Regular flashing means that oven temperature is being constantly maintained at the 

set temperature. 

COOKING MODE SELECTION KNOB

Selects the oven function. Each of the functions listed below can be used only with 

the correct temperature.

Light 
The oven light is off, with no cooking mode selected. During oven operation the light 

will remain on.

Bake
Set temperature: from 150°F to 450°F 

Is cooking with heated air. Both the upper and lower elements cycle to maintain the 

oven temperature. 

Pizza
Set temperature: from 150 °F to 450 °F

Is a special cooking mode with heated air and the lower hidden bake element. The 

lower elements cycle to cook Pizza.

Low Broil 
Set temperature: Broil 

There are two broil elements. In low broil the inner and outer elements are on at a 

low intensity.  

Содержание HCR2250AES

Страница 1: ...ric Free Standing Range Cuisini re lectrique autoportante de 24 Estufa independiente para el ctrica de 24 User Manual Guide de l utilisateur Manual del usuario HCR2250AES HCR2250ACS F o Part 057000076...
Страница 2: ......

Страница 3: ...roil Tips and Techniques 22 RANGE CARE 23 Cleaning 23 OVEN DOOR REMOVAL 25 Replacing an Oven Light 27 TROUBLESHOOTING 28 Baking and Roasting Problems 28 Cooktop 29 Oven 30 LIMITED WARRANTY 31 RECORD K...

Страница 4: ...afety alert symbol and either the word DANGER WARNING or CAUTION These words mean An imminently hazardous situation You could be killed or seriously injured if you don t immediately follow instruction...

Страница 5: ...the range is moved See the installation instructions for details Failure to follow these instructions can result in death or serious burns to children and adults Making sure the anti tip bracket is i...

Страница 6: ...isoning Aluminum foil linings may also trap heat causing a fire hazard CAUTION Do not store items of interest to children in cabinets above a range or on the back guard of a range children climbing on...

Страница 7: ...turned inward and does not extend over adjacent surface units Clean Cooktop With Caution If a wet sponge or cloth is used to wipe spills on a hot cooking area be careful to avoid steam burn Some clea...

Страница 8: ...liance doors or drawers such as stepping leaning or sitting on the doors or drawers Maintenance Keep range area clear and free from combustible materials gasoline and other flammable vapors and liquid...

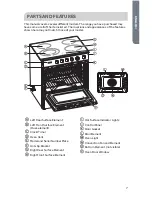
Страница 9: ...el d f e j k p o m l n HO T SU RFAC ES a b c g h i a Left Rear Surface Element b Left Front Surface Element Dual element c Clock Timer d Oven Vent e Model and Serial Number Plate f Anti tip Bracket g...

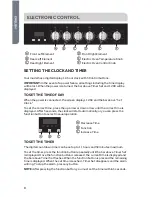
Страница 10: ...connected the screen displays 12 00 and the bar above Set Clock To set the correct time press the up arrow or down arrow until the correct time is displayed After 5 seconds the clock will start autom...

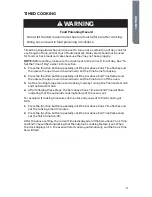
Страница 11: ...the bar above End Time flashes and then press the up arrow or down arrow to set the time to turn off the oven 3 Set the cooking temperature and cooking mode by turning the Thermostat knob and the Sel...

Страница 12: ...mperature or any temperature in between DUAL RADIANT ELEMENT The dual element consists of two radiant ribbon elements within the same element Either the small inner element or both inner and outer ele...

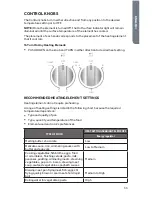
Страница 13: ...elements do not require preheating A range of heating settings is listed in the following chart because the required temperature depends on Type and quality of pan Type quantity and temperature of th...

Страница 14: ...after the elements have been turned off COOKWARE The choice of pan directly affects the cooking performance speed and uniformity For best results select pans with the following features GENERAL The g...

Страница 15: ...lass cooktop heats and cools slowly but retains heat and cooks evenly Copper tin heats and cools quickly Gourmet cooking wine sauces egg dishes Enamel ware response depends on base metal Not recommend...

Страница 16: ...foods other than water Most syrup or sauce mixtures and all types of frying cook at temperatures much higher than boiling water Such temperatures could eventually harm the glass cooktop surfaces Be su...

Страница 17: ...E USING THE OVEN 1 Turn the Temperature Control to the highest setting 2 Turn the Cooking Mode Selection control to a cooking mode 3 Allow the oven to operate for 30 minutes with the door closed and n...

Страница 18: ...flashing means that oven temperature is being constantly maintained at the set temperature COOKING MODE SELECTION KNOB Selects the oven function Each of the functions listed below can be used only wi...

Страница 19: ...time and rack position Baking time will vary with the temperature of ingredients and the size shape and finish of the baking utensil General Guidelines For best results bake food on a single rack wit...

Страница 20: ...e baking temperatures by 25 F 15 C For best results foods should be cooked uncovered in low sided pans to take advantage of the forced air circulation Use shiny aluminum pans for best results unless o...

Страница 21: ...own recipe can be easy Choose a recipe that will work well in convection Reduce the temperature and cooking time if necessary It may take some trial and error to achieve a perfect result Keep track o...

Страница 22: ...26 15 18 CONVECTION ROAST TIPS AND TECHNIQUES Do not preheat for Convection Roast Roast in a low sided uncovered pan When roasting whole chickens or turkey tuck wings behind back and loosely tie legs...

Страница 23: ...5 160 2 16 20 18 22 145 63 medium rare 160 71 medium Rib Eye Roast boneless 4 6 325 160 2 16 20 18 22 145 63 medium rare 160 71 medium Rump Eye Tip Sirloin boneless 3 6 325 160 2 16 20 18 22 145 63 me...

Страница 24: ...broil chart Thicker cuts and unevenly shaped pieces of meat fish and poultry may cook better at lower broiling temperatures CONVECTION BROIL CHART CONVECTION CAVITY FOOD AND THICKNESS RACK POSITION BR...

Страница 25: ...m steel wool pads gritty washcloths or some paper towels Damage may occur even with one time or limited use Rub in direction of grain to avoid damaging Cleaning Methods Liquid detergent or all purpose...

Страница 26: ...eaners steel wool pads gritty washcloths or some paper towels Damage may occur OVEN CAVITY Food spills should be cleaned when oven cools At high temperatures foods react with porcelain so staining etc...

Страница 27: ...or front is glass To avoid oven door glass breakage use both hands and grasp only the sides of the oven door to remove Be sure that both levers are securely in place before removing the door Do not fo...

Страница 28: ...ated on the two hinges 3 Grasp the door by its two outer edges and then close it slowly but not completely 4 Unlock the door by pressing on the clamps a a Clamps 5 Pull the door toward you pulling it...

Страница 29: ...th electric shock cuts or burns IMPORTANT The light bulb in your oven is Type E 14 220 240V and 25W You must replace this bulb with an appliance bulb of the same type voltage and wattage To Replace th...

Страница 30: ...en walls Food too brown on bottom Oven not preheated Using glass dull or darkened metal pans Incorrect rack position Pans touching each other or oven walls Food is dry or has shrunk excessively Oven t...

Страница 31: ...kware is being used Select proper cookware See Cookware If the problem continues call for service Heating elements cycle off even when elements are turned to their highest settings Heating element tem...

Страница 32: ...tly Oven light is not working properly Light bulb loose or burned out Reinsert or replace the light bulb Touching the bulb with fingers may cause the bulb to burn out Oven light stays on Door is not c...

Страница 33: ...repair of household fuses circuit breakers wiring or plumbing A product whose original serial number has been removed or altered Any service charges not specifically identified as normal such as norm...

Страница 34: ...hniques de r tissage convection 54 Conseils et techniques pour le gril convection 56 ENTRETIEN DU FOUR 57 Nettoyage 57 RETRAIT DE LA PORTE DU FOUR 60 Remplacement de la lampe du four 62 D PANNAGE 63 R...

Страница 35: ...ou de blessures graves si vous ne suivez pas imm diatement les instructions Une situation potentiellement dangereuse qui si vous ne l vitez pas peut provoquer la mort ou des blessures graves Une situa...

Страница 36: ...US SENTEZ UNE ODEUR DE GAZ Ne pas essayer d allumer un appareil Ne pas toucher d interrupteur lectrique Ne pas utiliser de t l phone dans votre b timent Faire vacuer tous les occupants de la pi ce du...

Страница 37: ...ac e Voir d tails dans les instructions d installation Le non respect de ces instructions peut causer un d c s ou des br lures graves aux enfants et aux adultes Assurez vous qu une bride antibasculeme...

Страница 38: ...ntra ner une intoxication au monoxyde de carbone et une surchauffe du four AVERTISSEMENT NE JAMAIS couvrir les fentes trous ou passages d air au fond du four ou couvrir enti rement une grille avec des...

Страница 39: ...MENTS DE SURFACE OU L ESPACE PR S DES L MENTS Les l ments de surface peuvent tre chauds m me lorsqu ils ont une teinte fonc e Les endroits pr s des l ments de surface peuvent devenir assez chauds pour...

Страница 40: ...r des contenants ferm s L accumulation de pression peut causer une explosion du contenant et des blessures Ne jamais obstruer les ouvertures des vents Positionnement des grilles du four Toujours place...

Страница 41: ...r la source de courant lectrique avant d intervenir sur l appareil Des blessures peuvent r sulter d un mauvais usage des portes ou tiroirs de l appareil par exemple marcher s appuyer ou s asseoir sur...

Страница 42: ...RFAC ES a b c g h i a l ment de surface arri re gauche b l ment de surface avant gauche l ment double c Horloge minuterie d Conduit d vacuation du four e Plaque signal tique des num ros de mod le et...

Страница 43: ...essus de Set Clock r gler l horloge Pour r gler l heure exacte appuyer sur la fl che vers le haut ou la fl che vers le bas jusqu ce que l heure exacte s affiche Au bout de 5 secondes l horloge d marre...

Страница 44: ...heure de fin clignote puis appuyer sur la fl che vers le haut ou vers la bas pour r gler l heure d arr t du four 3 Pour r gler la temp rature de cuisson et le mode de cuisson tourner le bouton de ther...

Страница 45: ...itu sous la surface en verre qui fournit la chaleur n cessaire la cuisson Le limiteur de temp rature allume et teint l l ment par intermittence Tourner le bouton rotatif de la position de temp rature...

Страница 46: ...s refroidi L emplacement de chaque bouton correspond l emplacement de l l ment chauffant qu il commande Pour allumer n importe quel l ment chauffant ENFONCER le bouton et le TOURNER dans n importe que...

Страница 47: ...la surface en verre Il est recommand de nettoyer soigneusement avec un nettoyant pour surface en verre Cela ne prend qu une minute et donne un fini net et brillant la surface en verre avant sa premi r...

Страница 48: ...stensiles de cuisson en fonte sur la table de cuisson en verre n est pas recommand La fonte retient la chaleur et pourrait occasionner des dommages la table de cuisson Les aliments emball s dans de l...

Страница 49: ...qu une fermeture totalement herm tique des bocaux Lors de la pr paration de conserves au bain marie il convient de maintenir une bullition douce et r guli re pendant la dur e requise Lors de la pr par...

Страница 50: ...de vapeur Pour viter les br lures dues la vapeur ou la chaleur proc der la mise en conserve avec pr cautions Comme il est imp ratif de chauffer les bocaux de mise en conserve durant la dur e requise...

Страница 51: ...endommager l mail 1 Placer le ou les ustensile s de cuisson contenant les aliments sur l une ou les deux grilles fournies avec le four 2 Tourner le bouton rotatif de mode de cuisson pour s lectionner...

Страница 52: ...allum e Bake Cuisson au Four R glage de temp rature from de 50 C 120 F 250 C 485 F position pr r gl e 210 C 410 F Permet de cuire au four avec de l air chaud Les l ments sup rieur et inf rieur travai...

Страница 53: ...siner les aliments cuisinez sur une simple grille avec au moins 1 1 2 5 3 cm d espace entre les plats et les parois de four N utilisez qu une grille lorsque vous choisissez le mode cuisson V rifiez la...

Страница 54: ...eilleurs r sultats il faut cuire les aliments non couverts dans des plats bord bas pour mieux profiter de la circulation d air forc Utilisez des plats en aluminium brillant pour de meilleurs r sultats...

Страница 55: ...pace d a ration de 1 1 2 5 cm 3 cm autour des plats Convertir vos propres recettes peut tre facile Choisissez une recette qui marche bien en convection 1 2 3 4 5 Grille 1 Grille 3 R duisez la temp rat...

Страница 56: ...grilles Surgel e Fra che 2 2 375 425 190 220 450 232 23 26 15 18 CONSEILSETTECHNIQUESDER TISSAGE CONVECTION Ne pr chauffez pas lors du r tissage convection Effectuez le r tissage dans un plat peu pro...

Страница 57: ...ABLEAU DE R TISSAGE CONVECTION CAVIT DE CONVECTION VIANDES POIDS lb kg TEMP FOUR C F POSITION DE LA GRILLE TEMPS DE R TISSAGE Min TEMP INTERNE C F Boeuf C te de boeuf 4 6 325 160 2 16 20 18 22 145 63...

Страница 58: ...ur le four Utilisez le plat de r tissage 2 pi ces Tourner les viandes une fois mi cuisson du temps de cuisson recommand voir le tableau de gril convection Les morceaux pais et de forme irr guli re de...

Страница 59: ...EXT RIEURES MAILL ES Les renversements d aliments contenant des produits acides tels que vinaigre et tomates doivent tre nettoy s d s que l appareil a refroidi Ces salissures peuvent endommager le fi...

Страница 60: ...pour four de d tachant ou de tampon r curer en laine d acier TRACES LAISS ES PAR DES USTENSILES DE CUISSON FOND EN ALUMINIUM M thode de nettoyage Chiffon impr gn de vinaigre BOUTONS DE COMMANDE DE LA...

Страница 61: ...T DE R TISSAGE M thode de nettoyage Tampon en laine d acier L CHEFRITE 2 PI CES M thode de nettoyage Produit de nettoyage l g rement abrasif Frotter avec un tampon r curer mouill Solution de 1 tasse 1...

Страница 62: ...e et l avant de la porte est en verre Pour viter de briser le verre de la porte utiliser les deux mains et agripper la porte du four uniquement par les c t s pour la retirer S assurer que les deux lev...

Страница 63: ...charni res 3 Agripper la porte par ses deux rebords ext rieurs puis la fermer lentement mais pas compl tement 4 D verrouiller la porte en appuyant sur les attaches a a Attaches 5 Tirer la porte vers s...

Страница 64: ...res AVERTISSEMENT IMPORTANT L ampoule de votre four est de type E 14 220 240 V et 25 W S assurer de faire le remplacement par une ampoule de type de voltage et de puissance semblables Pour remplacer l...

Страница 65: ...Aliment sec ou ayant excessivement r tr ci Temp rature du four trop lev e Temps de cuisson trop long Porte du four trop souvent ouverte Plat trop grand Aliment cuisant ou r tissant trop lentement Tem...

Страница 66: ...ents sont au r glage le plus lev Les limiteurs de temp rature des l ments chauffants teignent temporairement les l ments lorsque ceux ci d passent la temp rature maximale autoris e Ceci est une condit...

Страница 67: ...n la touche avec les doigts La lampe du four reste allum e La porte ne se ferme pas compl tement V rifier si la porte du four est obstru e V rifier si la charni re est tordue ou si le contacteur de la...

Страница 68: ...disjoncteurs duc blageouducircuitde plomberiedudomicile Unproduitdontlenum rodes ried originea t enlev oumodifi Tousfraisded pannagenonidentifi scomme tantnormauxtelund pannagedansune zoneouunetranche...

Страница 69: ...y T cnicas del Asado por Convecci n 92 CUIDADO DEL HORNO 93 Limpieza 93 C MO QUITAR LA PUERTA DEL HORNO 95 C mo reemplazar la luz del horno 97 SOLUCI N DE PROBLEMAS 98 Resoluci n de los Problemas de...

Страница 70: ...a situaci n de peligro inminente Si no sigue las instrucciones de inmediato usted puede morir o sufrir una lesi n grave Se trata de una situaci n posiblemente peligrosa que de no evitarse podr a causa...

Страница 71: ...SI PERCIBE OLOR A GAS No intente encender ning n electrodom stico No toque ning n interruptor el ctrico No use ning n tel fono dentro del edi cio Desaloje a todos los ocupantes del cuarto edi cio o r...

Страница 72: ...lte las instrucciones de instalaci n para m s detalles No seguir estas instrucciones puede ocasionar la muerte o quemaduras graves en ni os y adultos Aseg rese de que el soporte anti vuelco haya sido...

Страница 73: ...cubra toda una rejilla con materiales tales como papel de aluminio Si lo hace bloquear el flujo de aire en el horno y puede causar intoxicaci n por mon xido de carbono Los forros de papel de aluminio...

Страница 74: ...s cuales pueden encenderse Si derrama l quido sobre un elemento podr a encenderse todo o parte de la llama o afectar el encendido de chispa Utensilios de cocina vidriados Solo algunos tipos de utensil...

Страница 75: ...anscurrido tiempo suficiente para que se enfr en Otras superficies del electrodom stico pueden calentarse lo suficiente como para causar quemaduras entre esas superficies est n los orificios de ventil...

Страница 76: ...des con campanas de ventilaci n Limpie las campanas de ventilaci n con frecuencia No se debe permiter que la grasa se acumule en la campana o en el filtro Al flamear alimentos debajo de la campana enc...

Страница 77: ...a Elemento de superficie trasero izquierdo b Elemento de superficie delantero izquierdo Elemento dual c Reloj Temporizador d Ducto de escape del horno e Placa con el n mero de modelo y de serie f Sop...

Страница 78: ...de Set Clock Fijar el reloj Para fijar la hora correcta presione la flecha hacia arriba o la flecha hacia abajo hasta que aparezca la hora correcta Despu s de 5 segundos el reloj se iniciar autom tic...

Страница 79: ...ci n destelle y a continuaci n presione el bot n con la flecha hacia arriba o hacia abajo para fijar la hora en la que se deber apagar el horno 3 Fije la temperatura de cocci n y el modo de cocci n gi...

Страница 80: ...la superficie de vidrio para proporcionar el calor para cocinar El limitador de temperatura alternar el encendido y el apagado del elemento Gire la perilla desde la temperatura LO Bajo a la HI Alto o...

Страница 81: ...eado o a la posici n OFF Apagado NOTA Una vez que el elemento est apagado la luz indicadora de superficie caliente permanecer iluminada hasta que la temperatura de la superficie del elemento se haya e...

Страница 82: ...ficie de cocci n 2 Limpie la parte superior de vidrio Se recomienda una limpieza a fondo con un limpiador para la parte superior de vidrio Solo lleva un minuto y deja una capa limpia y brillante en la...

Страница 83: ...i n ya que esto puede rayar el vidrio No se recomienda el uso de utensilios de cocina de hierro fundido sobre la superficie de cocci n de vidrio El hierro fundido retiene el calor y puede causar da os...

Страница 84: ...de vidrio calienta y enfr a lentamente pero conserva el calor y cocina de forma uniforme Cobre la hojalata calienta y enfr a r pidamente Cocina tipo Gourmet salsas de vino platos con huevos Utensilio...

Страница 85: ...as de salsas o de alm bares y todo tipo de frituras cocine a temperaturas mucho m s altas que el agua hirviendo Tales temperaturas podr an eventualmente da ar las superficies de cocci n de vidrio Aseg...

Страница 86: ...erduras No requiere utensilios para hornear especializados Asar a la parrilla por convecci n permite un asado extraordinario con cortes m s gruesos de alimentos ANTES DE USAR EL HORNO 1 Gire el contro...

Страница 87: ...a temperatura de cocci n girando la perilla en el sentido de las agujas del reloj hasta la temperatura requerida entre 150 F 66 C y Broil Asar a la parrilla La luz se encender cuando el horno est prec...

Страница 88: ...C a 480 F 250 C posici n preestablecida en 375 F 190 C El horneado por convecci n cocina con aire que proviene de tercer elementos que se encuentra detr s de la pared trasera del homo Este calo circul...

Страница 89: ...l horno Las hojas son un excelente aislante de calor y el calor quedar atrapado por debajo Esto alterar el rendimiento de la cocci n y podr da ar el acabado del horno Evite el uso de la puerta se abri...

Страница 90: ...n estos alimentos utilice el modo de horneado normal La cocci n con m ltiples parrillas para comidas al horno se hace en las posiciones de parrilla 1 2 3 4 y 5 Las cinco posiciones de parrilla se pued...

Страница 91: ...F 15 C para el horneado por convecci n La temperaturas se han reducido en esta tabla CAVIDAD DE CONVECCI N ALIMENTO POSICI N DE REJILLA TEMP F C HORNO PRECALENTADO TIEMPO Min Pastel Glaseado Pastel B...

Страница 92: ...lleno de las aves es de 165 F 75 C Despu s de extraer el art culo del horno cubrir sin demasiada fuerza con papel de aluminio durante 10 o 15 minutos antes de cortar en el caso de que fuera necesario...

Страница 93: ...175 2 16 20 160 71 medio Hombro 3 6 350 175 2 20 25 160 71 medio Aves Pollo Entero sin relleno 3 4 375 190 2 18 21 180 82 Pavo sin ralleno 12 15 325 160 1 10 14 180 82 Pavo sin ralleno 16 20 325 160 1...

Страница 94: ...ras m s bajas para asar a la parrilla TABLA DE ASADO POR CONVECCI N CAVIDAD DE CONVECCI N ALIMIENTO Y GROSOR POSICI N DE REJILLA CONFIG URACI N DEASADO POSICI N DE ASADO F C TIEMPO LADO 1 MIN TIEMPO L...

Страница 95: ...pajos de lana de acero pa os speros o toallas de papel abrasivas Podr an ocasionar da os aun si solo se usan una vez o en forma limitada Frote en la direcci n de la veta para evitar que se da e M todo...

Страница 96: ...wool pads gritty washcloths or some paper towels Damage may occur CAVIDAD DEL HORNO Los derrames de alimentos deber n limpiarse cuando el horno se enfr e A altas temperaturas la reacci n qu mica de lo...

Страница 97: ...e la puerta es de vidrio Para evitar la rotura del vidrio de la puerta del horno utilice ambas manos y tome solo los lados de la puerta del horno para quitarla Aseg rese de que ambas palancas est n fi...

Страница 98: ...las dos bisagras 3 Tome la puerta de los dos lados externos y luego ci rrela lentamente pero no completamente 4 Destrabe la puerta presionando las abrazaderas a a Abrazaderas 5 Tire la puerta hacia us...

Страница 99: ...ADVERTENCIA IMPORTANTE El foco en su horno es Tipo E 14 220 240 V y 25 W Debe reemplazar este foco con uno para electrodom sticos del mismo tipo voltaje y vataje Para reemplazar el foco 1 Aseg rese d...

Страница 100: ...Papel de aluminio en la rejilla o fondo del horno Utensilios de hornear son demasiado grandes Los moldes tienen contacto o tocan la pared Alimentos demasiado marr n en la parte inferior El horno no e...

Страница 101: ...o se dispar el cortacircuitos No hay electricidad en la superficie de cocci n Reemplace el fusible o reposicione el cortacircuitos Si el problema contin a llame a un electricista Haga que un electrici...

Страница 102: ...ceta en 25 F 15 C cuando hornee en el modo Convection Bake Hornear por convecci n La pantalla del horno permanece apagada Corte de energ a Apague la electricidad desde el suministro principal de energ...

Страница 103: ...l horno Los modos Convection Bake Hornear por convecci n y Convection Roast Asar por convecci n eliminar n la humedad en el horno Desporti lladuras en la porcelana El interior de porcelana se golpea c...

Страница 104: ...cableado o plomer a Un producto cuyo n mero de serie original haya sido removido o alterado Cualquier cargo por servicio que no haya sido identificado espec ficamente como servicio normal como puede s...

Страница 105: ...103...

Страница 106: ......

Страница 107: ......

Страница 108: ...omer Satisfaction Center au 1 877 337 3639 PREUVE D ACHAT D T E NUM RO DE MOD LE ET LE NUM RO DE S RIE REQUIS POUR LE SERVICE DE GARANTIE IMPORTANTE No regrese este producto a la tienda Si tiene alg n...

Отзывы: