background image

Page 2 

1.


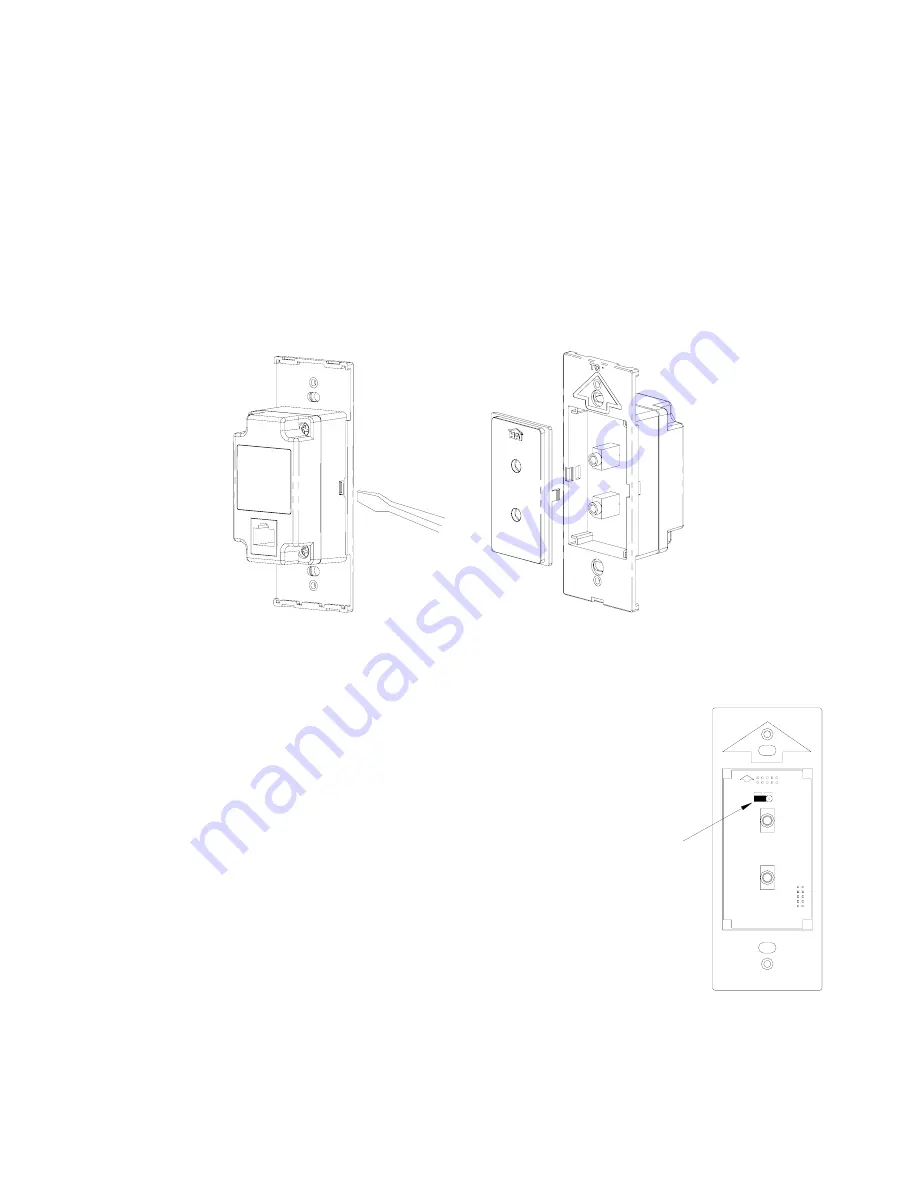
Remove the faceplate. 

 
2.


The insert attaches to the RIM with one latch on the right and one on the left.  Using a small-bladed 
screwdriver, gently depress the latch on one side while lifting up on the insert.  Once the latches are 
released on one side, remove the insert from the other side. 

 
3.


Align the latches of the new insert to the openings on the RIM and gently snap into place. 

 
4.


Attach the new faceplate. 


Setting the Frequency of the IR Output 

 
When using the RIM to send IR data to source equipment, there are 
two different IR carrier frequencies in which the RIM can transmit 
the IR signal.  The default setting of 38 kHz is used for most audio 
sources.  However, most cable and satellite converter boxes operate 
at a higher IR carrier frequency closer to 56 kHz.  Each RIM has a 
jumper that allows you to change the frequency of the IR output 
when using such devices. 
 
To change the frequency setting, remove the faceplate and insert 
from the RIM as described under “Changing the Color of the RIM”. 


Once The Insert Has Been Removed, Move The Frequency Jumper 
(CN1) From The “38khz” Position To The “56khz” Position. 


38KHz 56KHz

CN1

TOP

FREQUENCY 

JUMPER

Содержание Hi-Fi 62A12-1

Страница 1: ...62A12 1 Hi Fi Expansion Kit Installation Manual Document Number 62I12 1 Rev A October 2006...

Страница 2: ...Copyright 2006 Home Automation Inc All Rights Reserved...

Страница 3: ...s Remote Input Modules connect directly to the Hi Fi Main Assembly using Cat 5 unshielded twisted pair UTP for communications Each end of the wire is terminated with an RJ45 connector The correct wiri...

Страница 4: ...to send IR data to source equipment there are two different IR carrier frequencies in which the RIM can transmit the IR signal The default setting of 38 kHz is used for most audio sources However most...

Страница 5: ...n IR receiver that allows you to remotely control the Hi Fi system and or audio sources from any zone in the house Volume Source Control VSC Units connect directly to the Hi Fi Main Assembly using Cat...

Страница 6: ...side while lifting up on the insert Once the latches are released on one side remove the insert from the other side 3 Align the latches of the new insert to the openings on the RIM and gently snap int...

Страница 7: ...peaker connection Typically when using two conductor speaker wire the red wire indicates positive and black wire indicates negative Another indication of positive is a dark line running through the in...

Страница 8: ...one Amplifier Card 1 Power down the Hi Fi system by unplugging both Power Supply units if applicable from the inputs labeled Power on the Hi Fi Main Assemble 2 Pull upward on each of the 4 plungers un...

Страница 9: ...the Zone Amplifier Card directly over the connector and gently but firmly pushing down on both sides of the card until the top and bottom are securely seated into the connector 5 Replace the cover by...

Страница 10: ...l illuminate The Hi Fi system will start Follow the instructions in the User s Guide for operation 3 Insert the connector for the Power Supply into the Power jack marked PJ2 jack to the right under th...

Страница 11: ...Input Overload 3V RMS Emitter Outputs Output Drive Current 100mA Output Drive Voltage 5V System System On 5V 50mA Ring Ground Page Mute input Normally open close to activate Power Requirements Power...

Страница 12: ...HAI New Orleans LA U S A...

Отзывы: