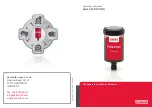
Replacement Instructions
1. Remove the entire filter system from your shower pipe by turning
the chrome swivel collar counter-clockwise.
(FIGURE A)
2. Remove the shower head from the filter system.
3. Remove the lower filter cartridge by turning it counter-clockwise.
(FIGURE B)
4. Unwrap the new replacement cartridge and remove the yellow label
and yellow plastic shipping cap from the top end of the cartridge.
5. Install the new cartridge by turning it clockwise.
• Tighten firmly by hand — if the filter is not tightened firmly it will leak around the seam
between the upper filter housing and the cartridge.
6. Re-attach the filter sustem to your shower pipe by turning the
chrome swivel collar clockwise.
• Make sure that the white washer is still in place inside the chrome swivel collar.
7. Before re-attaching the shower head, turn on the water to flush and
activate the filter until water runs clear.
• Use cold water for the initial flushing.
• Wait 30 seconds for temperature change.
• Run water until clear and then turn off and back on several times.
• Repeat this procedure until the initial surge of water is clear.
FIGURE A
FIGURE B
Note: do not remove the
filter cartridge while the
filter is still attached
to the shower pipe, this
may cause damage
to the filter where it
connects to the shower
pipe, or to the pipe
connection behind the
shower wall.
The initial surge of water will be
discolored with carbon fines and may
soil your shower stall. This carbonized
water is beneficial to plants and the
environment. It can be discarded in a
plant bed or down the drain.