background image

HAGOR Products GmbH | Oberbecksener Straße 97 | D-32547 Bad Oeynhausen | Telefon: +49(0)57 31-7 55 07-0 | Mail: [email protected]

3

4

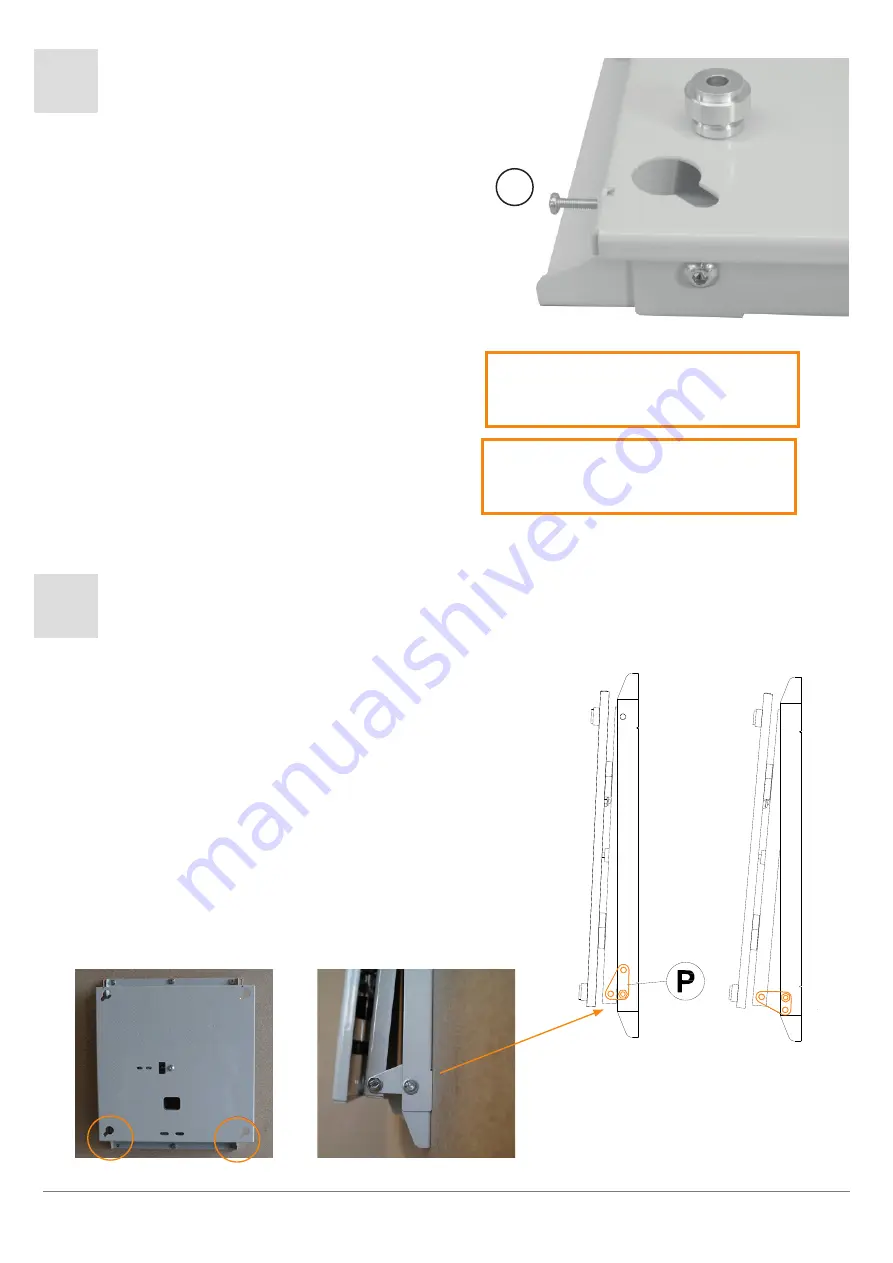
Bildschirm und Halterung verbinden

Positionieren Sie den Bildschirm über 

der Halterung und lassen Sie die Bol-

zen in die Schlüssellochbohrung glei-

ten. Schieben Sie die Bolzen in die 

Sicherungsposition. Fixieren Sie die 

Bolzen mit den seitlichen Sicherungs-

schrauben (S).

Connect screen and bracket

Position the screen over the bracket 

and slide the bolts into the keyhole. 

Slide the bolts into the safety position. 

Fix the bolts with the laterally locking 

screws (S).

Sicherungsschrauben anziehen!  

Bildschirm kann sonst beim  

Drehen der Halterung herunterfallen.

Tighten locking screws!

Otherwise, the screen may fall down 

while rotating the bracket.

Neigungseinstellung

Bei Bedarf ist es möglich, die Halterung mit zwei 

unterschiedlichen Neigungen zu montieren: 2,5° 

und 5°. 
Montieren Sie die Kippplatten (P) an der Unterseite 

der Halterung.

Tilt setting

If necessary, it is possible to assemble the bracket 

with two different inclinations: 2.5° and 5°.

Mount the tilt plates (P) on the bottom of the bracket.

2,5°

S

Содержание WH SA Flip

Страница 1: ...7 31 7 55 07 0 Mail hagor hagor de Installationsanleitung WH SA Flip Art Nr 5690 DE Installationsanleitung ES Guía de instalación GB Installation manual FR Guide d installation SE Installationsanvisning TR Yükleme Rehberi RU инструкция по установке NL Installatievoorschrift CN 安装指南 ...

Страница 2: ...rsetzen Sie diese bei Bedarf durch geeignete Materialien Falls Sie Bezüglich der Installation des Produkts unsicher sind oder noch Fra gen haben wenden Sie sich an uns oder anderes ausgebildetes Fachpersonal Caution Technical devices are of considerable value You should therefore handle the components carefully during installation and protect them if necessary If necessary the installation area sh...

Страница 3: ... __ rac e 1xmg Mount the bracket G on the wall see holes indicated in red using fixings suitable for the purpose and type of wall and check the tightness of the anchors used 2 Ring and bolts on monitor installation 2 1 Assemble the adjustable ring R with the threaded bolt B 2 2 Mount on the back of monitor the agjustable ring R Threaded bolt B with the screw 5 r s Fixing screw i fl 1 1 1 t fl fl 1...

Страница 4: ...d slide the bolts into the keyhole Slide the bolts into the safety position Fix the bolts with the laterally locking screws S Sicherungsschrauben anziehen Bildschirm kann sonst beim Drehen der Halterung herunterfallen Tighten locking screws Otherwise the screen may fall down while rotating the bracket Neigungseinstellung Bei Bedarf ist es möglich die Halterung mit zwei unterschiedlichen Neigungen ...

Страница 5: ...efon 49 0 57 31 7 55 07 0 Mail hagor hagor de 5 HINWEIS Montage 65 Version Bitte montieren Sie den beigelegten Adapter auf der 2 5 Position bevor Sie das SAMSUNG WM65R einhängen NOTE Assembly 65 version Mount the adapter within the tilt position 2 5 before you mount the SAMSUNG WM65R ...

Страница 6: ...rbecksener Straße 97 D 32547 Bad Oeynhausen Telefon 49 0 57 31 7 55 07 0 Mail hagor hagor de Neigung 0 Neigung 0 Neigung 2 5 5 Traglast max 45 kg max load 45 kg Montage bitte in Portrait Ausrichtung ausführen Please assemble in portrait orientation ...

Страница 7: ...HAGOR Products GmbH Oberbecksener Straße 97 D 32547 Bad Oeynhausen Telefon 49 0 57 31 7 55 07 0 Mail hagor hagor de ...

Страница 8: ...HAGOR Products GmbH Oberbecksener Straße 97 D 32547 Bad Oeynhausen Telefon 49 0 57 31 7 55 07 0 Mail hagor hagor de ...

Отзывы: