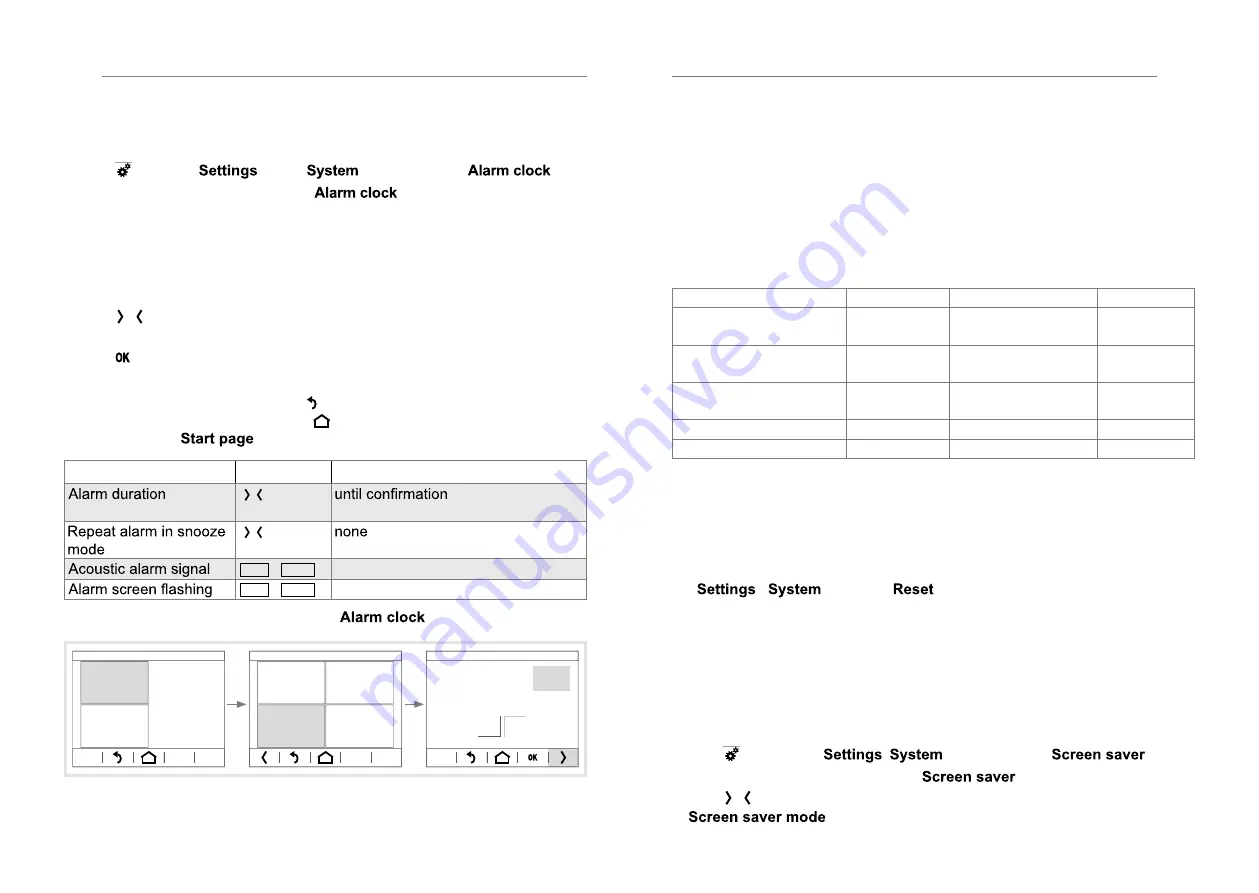
Setting the alarm (Figure 7)
Press the time display in the top display row (9).
Or:
With
Mo. 30.06.14
07:22
Seite 5
Seite 6
Seite 7
enter the
menu,
and then select
.
The display changes to the menu
.
Press the display surface for hours, then the display surface for minutes in
succession.
The display area of the activated value is framed by a light border at the
bottom and to the right.
With
–
+
07 : 45
Weckzeit
EIN
Wecker
Einstellungen System
Wecker
/
–
+
07 : 45
Weckzeit
EIN
Wecker
Einstellungen System
Wecker
decrease/increase the respective setpoint.
With
Tastenton
Bildschirm
Sprache der
editierbaren Texte
Sprache
System
Einstellungen
System
/
Tastenton
Bildschirm
Sprache der
editierbaren Texte
Sprache
System
Einstellungen
System
go to the next/previous setting parameter, and in this way, set all
parameters for the alarm time (Table 2).
With
Tastenton
Bildschirm
Sprache der
editierbaren Texte
Sprache
System
Einstellungen
System
confirm the entry.
The display returns to the previous menu level.
If the entries are not confirmed, with
Tastenton
Bildschirm
Sprache der
editierbaren Texte
Sprache
System
Einstellungen
System
the display returns to the previous
menu level without saving. Using
Tastenton
Bildschirm
Sprache der
editierbaren Texte
Sprache
System
Einstellungen
System
the display returns to a page preset
previously as
without saving.
Parameters
Actions
Settings
Tastenton
Bildschirm
Sprache der
editierbaren Texte
Sprache
System
Einstellungen
System
/
Tastenton
Bildschirm
Sprache der
editierbaren Texte
Sprache
System
Einstellungen
System
, after 5 s … 2 h
(gradual)
Tastenton
Bildschirm
Sprache der
editierbaren Texte
Sprache
System
Einstellungen
System
/
Tastenton
Bildschirm
Sprache der
editierbaren Texte
Sprache
System
Einstellungen
System
, after 1 min, 2 min, …
ON
/
OFF
ON
/
OFF
Table 2: Settings in the
menu
Cleaning mode
System
Settings
Service
Alarm clock
Timer
Alarm
Settings
System
–
+
07 : 00
Alarm time
ON
Alarm clock
Settings System
Alarm clock
Figure7: Setting of the alarm time
Using individual pictures/graphics
A large library of graphics is available at the factory for designing operating
and display pages for applications in light, blind and HVAC control technology
as well as multimedia and safety technology, which is stored in the device.
Additionally, you can load your own graphics for icons or control knobs, pic-
tures or picture sequences into the device. These have to be saved on a micro
SD card at the topmost level in a defined resolution and specific file format.
When doing so, it is essential to use the predefined folder names (Table 3).
Moreover, the image files must be named with a 4-digit numerical sequence -
(
0001 … 9999
) - in order to be retrievable in the ETS or in the display menu.
Pictures/graphics for:
Resolution
File format
Folder name
Slideshow as screen-
saver
320 x 240 px jpg (RGB colour
space)
diashow
Single picture display as
screensaver
320 x 240 px jpg (RGB colour
space)
diafix
Still picture display
1)
320 x 240 px jpg (RGB colour
space)
festbilder
small icon
1)
48 x 48 px png
icons
Control knob
1)
158 x 158 px png
icons
1)
only configurable over the ETS, not directly selectable on the screen
Table 3: My pictures/graphics on micro SD card
The device is connected, but not yet mounted, so that the slot for Micro SD
Card (3) is accessible. The system has not yet started up. Pictures/graphics
are stored on a micro SD card.
If the system already started up before inserting the micro SD card, in menu
-
execute a
. The device is restarted.
Insert micro SD card into the slot (3) until it snaps into place. When doing
so, make sure that the contacts of the card are facing up towards the dis-
play.
Switch on auxiliary voltage.
The device starts up.
In the display menu, an individual screen saver can be set with image data
from the Micro SD Card.
With
Mo. 30.06.14
07:22
Seite 5
Seite 6
Seite 7
enter menu
,
and then select
.
The display changes to the menu
.
With
Tastenton
Bildschirm
Sprache der
editierbaren Texte
Sprache
System
Einstellungen
System
/
Tastenton
Bildschirm
Sprache der
editierbaren Texte
Sprache
System
Einstellungen
System
scroll in the bottom display row (10) to the setting parameter
and select.
z
z
35
34
Содержание WDT030
Страница 58: ......
Страница 59: ...www hager com 11 2018 6LE000450C ...


