

EQ34 GRADE 1 CYLINDRICAL LOCK
INSTALLATION INSTRUCTIONS
I
-
LS02688
Rev 1, Rev Date: 01/12/2023
[27390107]
Page
4
of
7
Hager Companies 139 Victor Street, St. Louis, MO 63104 (800) 325
-
9995 www.hagerco.com
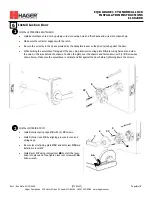
5
•
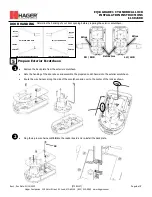
Remove the back plate from the exterior escutcheon.
•
Note the handing of the door above and assemble the prepared Lock Chassis into the exterior escutcheon.
•
Route the wire harness along the side of the escutcheon and over to the center of the lock as shown.
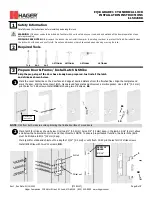
Prepare Exterior Escutcheon
1
INSIDE
OUTSIDE
INSIDE
OUTSIDE
INSIDE
OUTSIDE
INSIDE
OUTSIDE
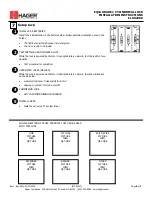
RH—RIGHT HAND DOOR
RHR—RIGHT HAND REVERSE DOOR
LH—LEFT HAND DOOR
LHR—LEFT HAND REVERSE DOOR
DOOR HANDING
Determine the handing of your door opening before preparing the exterior escutcheon.
RH / RHR
LH / LHR
Wires
Wires
Retractors
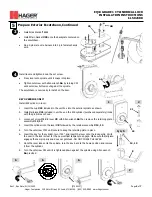
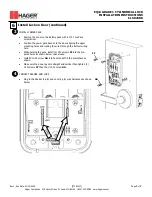
•
Plug the 6
-
pin wire harness
#18
into the reader board and re
-
install the back plate.
2
18


