background image


Date : 20/09/2012 

6T 8205-02a


User manual 

USE 


2.3  Sequences view 


This  view  is  used  to  visualise  the  various 
sequences  programmed  on  your  system  by  your 
installer. 

In  the  adjacent  example,  we  have  programmed  a 
simple  sequence  (Leave  on  holiday)  and  an 
automatic sequence (Leave for Work) 

A sequence is a list of  actions to be carried out on 
one or more items in your electrical installation.  

These  actions  can  be  carried  out  in  response  to 
various events, such as a date, exertion of pressure 
on your touch screen or a KNX bus event. 

The ‘Leave for Work’ example sequence 


Action to take: Turn off all the lights and close all the shutters and blinds. 


Trigger: Manual button push or automatic start-up, depending on the programming. 


Automation: Start the sequence at 09:00 every day, except Saturday and Sunday. 

All of these parameters have been programmed by your installer during commissioning. 

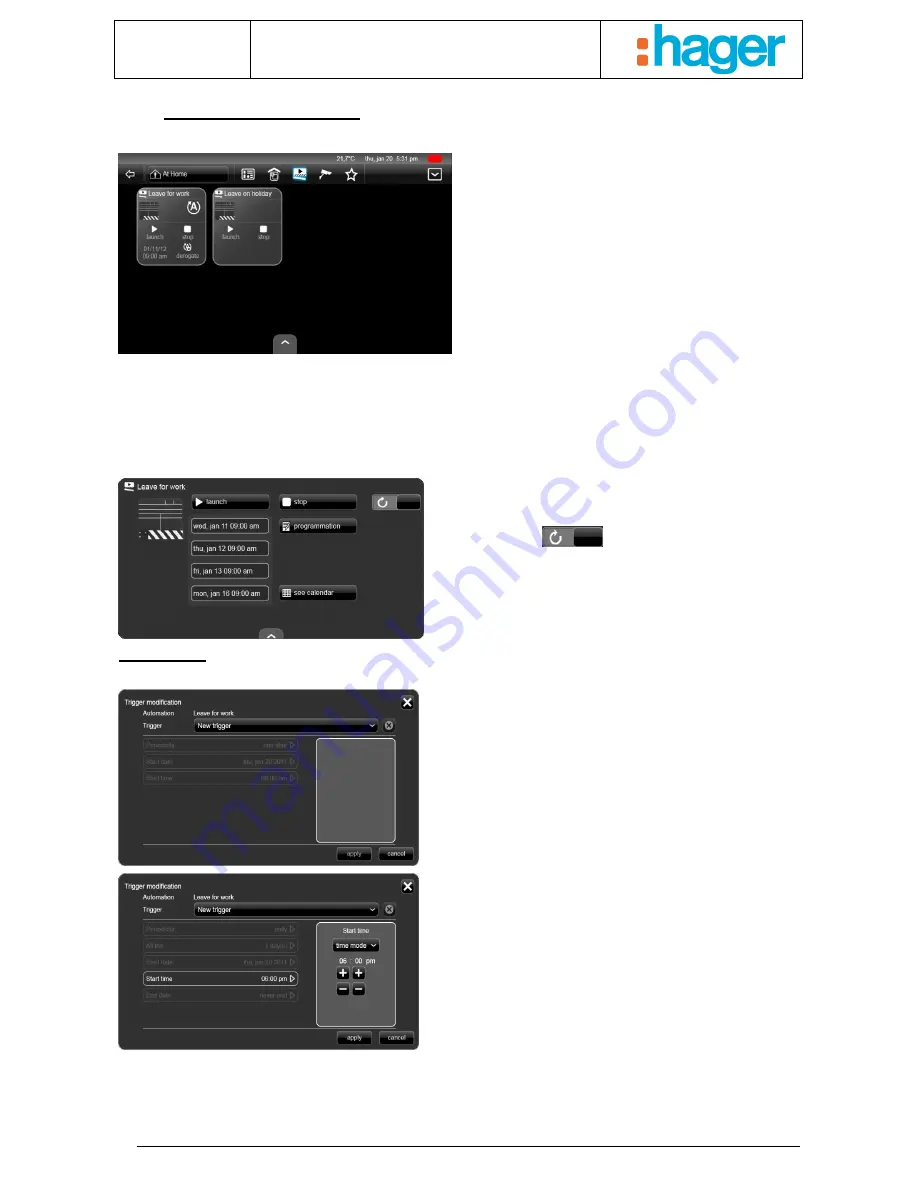
By clicking on the device you will obtain the view below. 


You  can  start  the  scenario  manually  or  stop  it  during 
execution using the 'launch' and 'stop' buttons. 

You can visualise the next events in the sequence and 

inhibit the trigger (

). This inhibition will remain 

active until automatic mode is restored. 

Programming:  

By clicking on the ‘Programmation’ button, you can modify the existing timer triggers or add new ones. 


To  modify  an  existing  trigger,  click  in  the  trigger 
selection  box  (New  Programmation)  and  select  the 
previously created trigger. 


You will see the characteristic elements of the trigger. 

You can, for example, modify the ‘Start time’ object, by 
adjusting the desired time. 

Click on 'apply' to confirm the changes. 

Содержание domovea

Страница 1: ...tebis domovea touch panel...

Страница 2: ...2 3 SEQUENCES VIEW 9 2 4 CAMERAS VIEW 10 2 5 FAVORITES VIEW 10 2 6 DISPLAY AND FILTER 10 2 7 FAVORITES 11 3 CUSTOMISATION AND PARAMETER SETTING 12 3 1 STANDBY MODE 12 3 2 PARAMETERS 12 3 2 1 Configura...

Страница 3: ...el surface 2 Loudspeaker 3 Microphone 4 Movement sensor 5 Indicator LED 6 USB port 7 Reset 8 On Off 9 Temperature sensor 1 3 Safety instructions The device must only be installed by a qualified electr...

Страница 4: ...view is used to Select the domovea server to which you wish to connect see below Access the parameter setting menu by clicking on see section 3 Select the language by clicking on Switch off the system...

Страница 5: ...automatic daylight saving time adjustment and synchronise the clock with a time server Connection indicator LED If your domovea touch panel loses its connection with the KNX bus this indicator LED swi...

Страница 6: ...ON 6 Access to the parameter setting menu Quick links to the views Select dashboard view Select sequences view Select devices view Select cameras view Select favorites view The dashboard functions wil...

Страница 7: ...d blinds in your installation Displays all of the shutter and blind devices in your installation Selecting the heating mode Displays all of the heating and air conditioning thermostat devices in your...

Страница 8: ...utters with a single command The icon designates a group of devices By clicking on a group without sending a command a detailed view of all the devices in that group can be accessed This view contains...

Страница 9: ...ding on the programming Automation Start the sequence at 09 00 every day except Saturday and Sunday All of these parameters have been programmed by your installer during commissioning By clicking on t...

Страница 10: ...full screen display of the image captures an image of the screen 2 5 Favorites view This view displays all of your favorite devices See section 2 7 for parameter setting of the favorites 2 6 Display a...

Страница 11: ...on the view displayed you can classify the devices by type lighting shutters etc Comment in camera view instead of Filter the Archives icon is displayed allowing access to images stored by screen capt...

Страница 12: ...ol at the top right of the screen to access the parameter setting bar Select the icon to access the chosen function Standby function Cleaning function Settings menu Device shutdown menu 3 1 Standby mo...

Страница 13: ...ed enable detection is activated disable detection is disabled Threshold wake up display defines the distance below which the screen must leave standby mode There are six adjustable thresholds from 0...

Страница 14: ...us screen Setting the LED Used to adjust the indicator LED function always off The indicator LED on the front panel is always turned off on The indicator LED on the front panel is turned on You can ad...

Страница 15: ...On client startup for when the system starts up On settings access for when the settings are modified To leave default group for when the view changes Moreover you have the possibility of authorising...

Страница 16: ...ptions Dashboard Groups Sequences Cameras Favorites Settings Click on apply to confirm or cancel to return to the previous screen 3 2 5 Journal Used to consult the various events on the domovea server...

Страница 17: ...mask same as for the IP address Default gateway same as for the IP address DNS server addresses Used to enter the settings for the domain server DNS Automatic DNS servers YES the network server automa...

Страница 18: ...function An hourglass appears in the middle of the screen indicating the number of seconds remaining until the screen is enabled again After this timed period the screen goes back to the initial view...

Отзывы: