background image

4

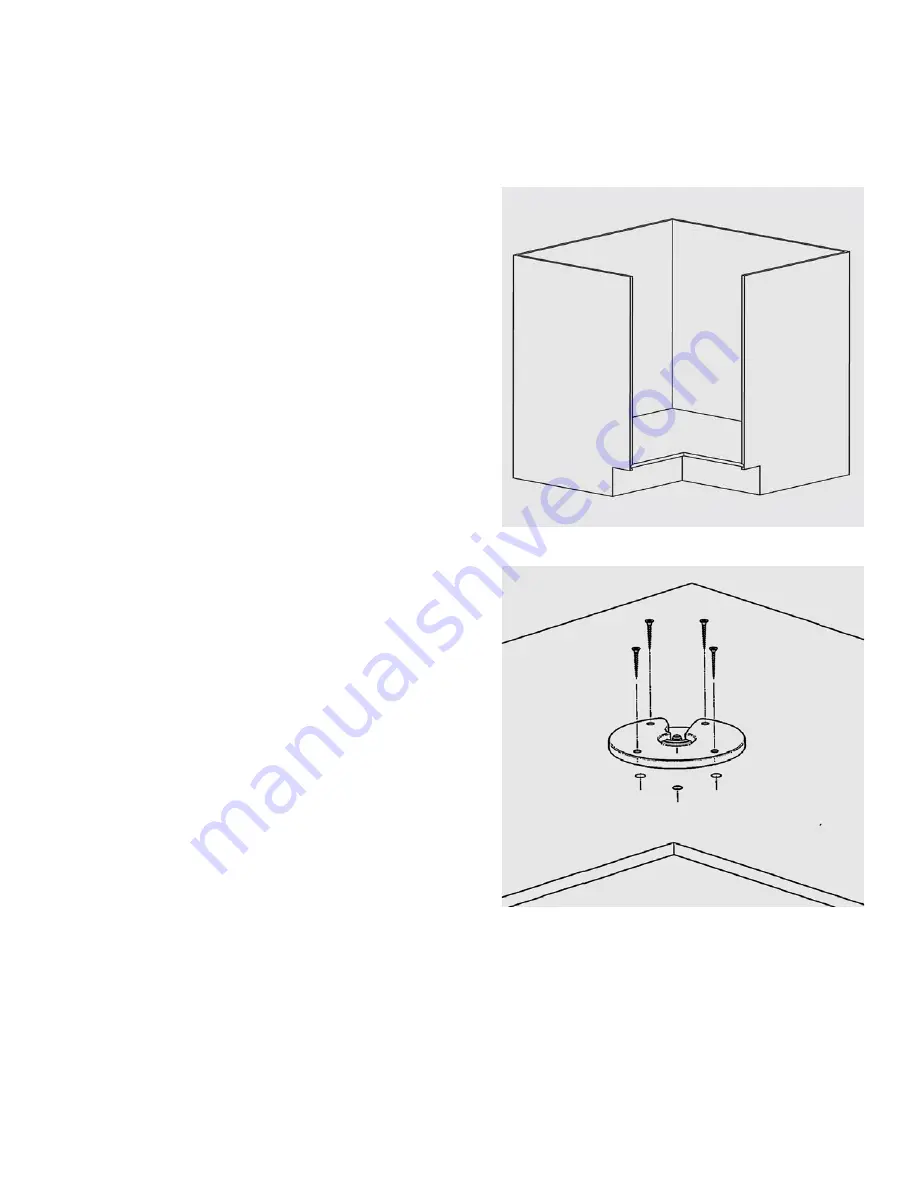
2. Assembling side panels and cam plate

Assembling side panels

After having drilled all holes, assemble the 
side panels.

Mounting of cam plate

Press the cam plate into the drilled holes
in the bottom of cabinet interior and 
fasten with four 3.5 x 30 mm (#6 x 1 1/8’’)
flat head screws (customer supplied).

Содержание Suzie-Q 541.35.420

Страница 1: ...Revolving Corner Unit Item No 541 35 520 521 522 420 421 422 MountingInstructions ...

Страница 2: ...ns where the individual drilling dimensions for the cabinet bottom cabinet top side walls and cabinet doors are specified These instructions also indicate if additional adjustments to the cabinet design are neces sary Please contact your Häfele Hardware Consultant if fitting specifications are neces sary Top mounting bracket if specified Upper pole bearing Distance plates spacers are specified Upp...

Страница 3: ...cification Document Drill two holes 12 mm deep with 5 mm bit into side walls see drilling dimensions in fitting instructions Drill one 10 mm hole into the cabinet top according to the illustration included in the fitting instructions If a top mounting bracket is specified mainly frameless cabinets For cabinets with cabinet top EXAM PLE EXAM PLE Specification Document EXAM PLE EXAM PLE Specificatio...

Страница 4: ...ling side panels After having drilled all holes assemble the side panels Mounting of cam plate Press the cam plate into the drilled holes in the bottom of cabinet interior and fasten with four 3 5 x 30 mm 6 x 1 1 8 flat head screws customer supplied ...

Страница 5: ...o step 4 Installation of fitting page 6 mainly face frame cabinets Please refer to your fitting instructions if the use of 3 mm spacers is specified If the spacers are specified please mount them between the top mounting bracket and the side wall This assures the correct position of the upper pole bearing Fasten top mounting bracket with 6 2 x 10 5 mm Euro flange head screws customer supplied ...

Страница 6: ...ter edge of the cam plate and the axle firmly clicks into position This prevents lifting of the pole out of the cam plate Connecting the upper pole bearing Now connect the upper pole bearing to either the top mounting bracket frameless cabinets with specified top mounting bracket or to the cabinet top face frame cabinet without specified top mounting bracket and fasten with screws customer supplie...

Страница 7: ...s First screw the lower door brackets unhanded and then the upper door brackets left and right onto the doors customer supplied You can identify the left and the right upper door bracket as the upper and lower door brackets have to be vertically aligned at each door The lower door brackets are the same for left and right side EXAM PLE EXAM PLE Specification Document ...

Страница 8: ...oor holder and lower door holders with the locating pins Clip the connecting rods into the bottom door bracket Securing the door To avoid unintended unhinging of the door attach securing caps onto lower locating pin NOTE Securing caps are permanent Install after final adjustment ...

Страница 9: ...th the shelves Wooden shelves If you use your own wooden shelves you need shelf supports supplied by Häfele Fasten the wooden shelves with screws to the supports and attach the support to the pole Transport Lock Insert transport securing pin through the upper pole bearing directly above the pole This is to prevent damage during shipping Important Remove securing pin prior to operation ...

Страница 10: ...e Please put a support device i e socket foot extended toe kick underneath the cabinet bottom pole in order to avoid a sagging of the bottom under the weight of the trays which may cause a malfunction of the fitting If you use a top mounting bracket Do not suspend the cabinet from the top mounting bracket Do not bend the top mounting bracket Do not put weight on the top mounting bracket i e do not...

Страница 11: ...uld be paid to adjusting the middle foot for support of the pole weight When adjusting first correctly align the right door following the steps illustrated below Then adjust the left door in the same sequence 1 Depth adjustment Depth adjustment aligns the doors to the cabinet face 2 Side adjustment Side adjustment adjusts the door overlay 3 Height adjustment Height adjustment adjusts the distance ...

Страница 12: ...tions A 1 B 2 to the strongest spring force of A 2 The tension spring can only be repositioned when the fitting is removed Closing Speed of Doors You can adjust the closing speed of the doors without removing the fitting Turn adjustment screw clockwise for quicker door closing For slower door closing turn adjustment screw counterclockwise 3901 Cheyenne Drive P O Box 4000 Archdale NC 27263 1 800 42...

Отзывы: