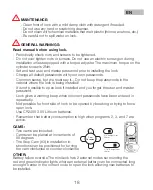
MAINTENANCE:
- Clean front of lock with a mild damp cloth with detergent if needed.
- Do not use any hard or scratching cleanser.
- Do not clean with chemical materials that melt plastic (thinner, acetone, etc.)
- Be careful not to spill water on lock.
GENERAL WARNINGS:
Read manual before using lock.
- Periodically check nuts and screws to be tightened.
- Do not over-tighten nuts or screws. Do not use an electric screw gun during
installation unless equipped with a torque adjuster. The maximum torque on the
cylinder screw is 2Nm.
- Set and test user and master password prior to installing the lock
- Change all default passwords with your own passwords.
- Common sense, but we must say it... Do not keep the passwords in the
cabinet where the lock is being installed!
- It is not possible to open lock if installed and you forget the user and master
password.
- Lock gives a warning beep when incorrect passwords have been entered in
repeatedly.
- Not possible for front side of lock to be opened by breaking or trying to force
open lock.
- Use CR2450 3.0V Lithium batteries.
- Remember that battery consumption is high when programs 2, 3, and 7 are
active.
CAMS:
- Two cams are included-
- Cams can be placed at increments of
90 degrees
- The Stop Cam (#3) in installation in-
structions can be positioned for turning
the cam clockwise or counter-clockwise
OTHER:
Battery failure override The miniLock has 2 external nodes surrounding the
red and green indicator lights where an external battery can be connected long
enough to enter in the correct code to open the lock allowing new batteries to
be installed.
Cam
Placement
7/8" Straight Cam
22 mm
1-1/2" Straight Cam
38 mm
EN
18


