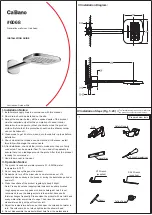
3
7
Water Inlet Hose
2
6
Lock Screw
2
5
Lock Nut
1
4
SUS Gasket
1
3
Rubber Gasket
1
2
Tall spacer
1
1
Body Group
1
NO. NAME
QTY
2. Product Installation
3. Cleaning and Maintenance
1. Rotate counter clockwise (5) to separate (5) (4) (3) from (1);
2. Install (1) and (2) from the installation table from top to bottom;
3. Confirm the expected installation angle of (1), and install (3) (4) (5) on the thread.
Turn (5) clockwise to the fastening position,lock (6) clockwise with cross screwdriver
so that the body group and the installation table are firmly installed;
4. Install (7) to the two inlet holes respectively to the fastening position;
5. Lock the inlet water pipe (7) nut clockwise to the thread of the cold and hot water
outlet. Lock it with a wrench, open the cold and hot water inlet valve, and check that
there is no water leakage at the connection of each thread;
6. Ensure that the hot and cold inlet pipes are properly connected. If standing in front
of the faucet, connect the hot water pipe on the left and the cold water pipe on the
right .
1. Rinse with clean water and dry with a soft cloth
2. If there is dirt, clean it with soft liquid or clear glass cleaner
3. Do not use acidic detergent, granular detergent which does not break down easily
or soap
4. If there is a need, the aerator can be rotated down to be rinsed.


