Hafco Metalmaster BS-152 Скачать руководство пользователя страница 11

11

OPERATION MANUAL

4.1 UNPACKING

This machine was carefully packaged for safe transport. When unpacking, separate all enclosed

items from packaging materials and inspect them for shipping damage. If items are damaged,

please contact your distributor.

NOTE: Save all the packaging materials until you are completely satisfied with the machine and

have resolved any issues with the distributor, or the shipping agent.

When unpacking, check the packing list to make sure that all parts shown are included. If any 

parts are missing or broken, please contact the your distributor.

4 SETUP

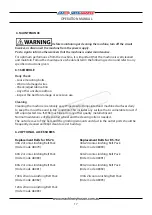
The unpainted surfaces of the machine have been coated with a waxy oil to protect them from 

corrosion during shipment. Remove the protective coating with a solvent cleaner or a citrus 

based degreaser.

Optimum performance from your machine will be achieved when you clean all moving parts or 

sliding contact surfaces that are coated with rust prevented products.

It is advised to avoid chlorine based solvents, such as acetone or brake parts cleaner, as they 

will damage painted surfaces and strip metal should they come in contact. Always follow the 

manufacturer’s instructions when using any type of cleaning product.

4.2 CLEAN - UP

4.3 SITE PREPARATION

When selecting the site for the machine, consider the largest size of workpiece that will be 

processed through the machine and provide enough space around the machine for operat-

ing the machine safely. Consideration should be given to the installation of auxiliary equip-

ment. Leave enough space around the machine to open or remove doors/covers as required 

for the maintenance and service as described in this manual.

It is recommended that the machine is anchored to the floor to prevent tipping or shifting.  It 

also reduces vibration that may occur during operation. 

4.4 LIFTING INSTRUCTIONS

On the day that the machine arrives, make sure that a forklift or lifting device, with sufficient 

capacity is available to unload the machine from the vehicle. Ensure access to the chosen site 

is clear and that doors and ceilings are sufficiently high and wide enough to receive the 

machine. 


 This machine is extremely heavy. 

Serious personal injury may occur if safe moving methods are not 

followed. To be safe, you will need assistance and power equip-

ment when moving the shipping crate and removing the machine 

from the crate.


Содержание BS-152

Страница 1: ...OPERATION MANUAL Edition No BS 76 152 1 Date of Issue 07 2021 Models BS 76 BS 152 Order Code L119 Order Code L120 BELT LINISHER SANDER ...

Страница 2: ...co nz MACHINE DETAILS NOTE This manual is only for your reference At the time of the compiling of this manual every effort to be exact with the instructions specifications drawings and photographs of the machine was taken Owing to the continuous improvement of the HAFCO METALMASTER machine changes may be made at any time without obligation or notice Please ensure the local voltage is the same as l...

Страница 3: ...uirements 10 3 2 Full Load Current 10 4 SETUP 4 1 Unpacking 11 4 2 Clean Up 11 4 3 Site Preparation 11 4 4 Lifting Instructions 11 4 5 Anchoring To The Floor 12 4 6 Machine Leveling 12 4 7 Assembly 13 4 8 Test Run 14 5 OPERATION 5 1 Grinding Tips 15 5 2 Belt Tracking 15 5 3 Changing the Belt 16 5 4 Angle Adjustment 16 5 5 Work Rest 16 6 MAINTENANCE 6 1 Schedule 17 6 2 Optional Accessories 17 6 3 T...

Страница 4: ... Belt Speed fpm mpm 2850 5700 870 1740 2850 5700 870 1740 Belt Size mm 75 x 2000 150 x 2000 Motor Speed rpm 1420 2840 1420 2840 Motor Power kW hp 2 2 3 2 8 3 7 Voltage V 415 415 Dimensions L x W x H 70 x 48 x 113 70 x 53 x 113 Shipping Dimensions L x W x H cm 71 x 49 x 116 71 x 54 x 116 Nett Weight kg 93 99 1 2 ACCESSORIES INCLUDED Stand Front and Rear Chute Instruction Manual Belt ...

Страница 5: ...ON A Motor G Emergency Stop Button B Belt Guard H Tilting Lever C Work Tool Rests I ON OFF Button D Eye Shield J Two Speed Motor Switch E Spark Arrester K Belt Release Lever F Belt Tracking Knob L Contact Wheel A B C D C E F H I J G K L ...

Страница 6: ...ective equipment The manufacturer will not be held liable for injury or property damage from negligence improper training machine modifications or misuse WARNING 2 1 GENERAL METALWORKING MACHINE SAFETY Always wear safety glasses or goggles Wear appropriate safety footwear Wear respiratory protection where required Gloves should never be worn while operating the machine and only worn when handling ...

Страница 7: ...und the machine to do the job safely Obtain first aid immediately for all injuries Understand that the health and fire hazards can vary from material to material Make sure all appropriate precautions are taken Clean machines and the surrounding area when the operation is finished Use proper lock out procedures when servicing or cleaning the machines or power tools DO NOT Do not distract an operato...

Страница 8: ... etc Biological contamination and waste Soft tissue injuries for example to the hands arms shoulders back or neck resulting from repetitive motion awkward posture extended lifting and pressure grip Other Hazards Slips and falls from and around machinery during maintenance Unstable equipment that is not secured against falling over Safe access to from machines access egress Fire or explosion Pressu...

Страница 9: ...VER attempt to sand small items or try to sharpen small metal tools without a jig P Never leave the machine while it is running P Before making adjustments switch off and bring the machine to a complete standstill DON T O DO NOT operate equipment without wearing appropriate PPE O DO NOT use the wrong type of belt or disc for the operation O DO NOT attempt to sand very small items or use heavy pres...

Страница 10: ... the risk of these hazards avoid overloading the machine during operation and make sure it is connected to a power supply circuit that meets the requirements 3 2 FULL LOAD CURRENT RATING Place the machine near an existing power source Make sure all power cords are protected from traffic material handling moisture chemicals or other hazards Make sure there is access to a means of disconnecting the ...

Страница 11: ... metal should they come in contact Always follow the manufacturer s instructions when using any type of cleaning product 4 2 CLEAN UP 4 3 SITE PREPARATION When selecting the site for the machine consider the largest size of workpiece that will be processed through the machine and provide enough space around the machine for operat ing the machine safely Consideration should be given to the installa...

Страница 12: ... flush with the floor surface making it easy to unbolt and move the machine later if needed Fig 4 1 4 5 ANCHORING TO THE FLOOR To set your machine up so that it operates to optimum performance apply the following procedure After your machine has been anchored to a concrete slab floor it then needs to be leveled Loosen the hold down bolts and place a level on the surface of the working table Metal ...

Страница 13: ...oke 3 With the appropriate lifting equipment lift the sander spread the yoke on the sander slightly and set onto the base Fig 4 4 4 Slide the hex bolt and fender washers through the sleeve and then screw the angle adjustment lever on to the bolt and tighten the Linisher head in position EYE SHIELD SPARK TRAP AND WORK REST All of these accessories must be assembled before operating the machine Fig ...

Страница 14: ...the machine has been setup correctly 3 Make sure all tools and objects used during set up have been cleared away from the machine 4 Turn the machine ON 5 Make sure that the belt is traveling in the correct direction 6 Listen to and watch for abnormal noises or actions The machine should run smoothly with little or no vibration or rubbing noises 7 Any strange or unusual noises should be investigate...

Страница 15: ...er to avoid overloading 2 Hold the material firmly against stops or on the table before applying pressure on abrasive belt 3 Keep fingers and hands clear of the linishing belt while sanding 4 NEVER attempt to sand small items or try to sharpen small metal items without a jig 5 The workpiece will get hot as you continue to grind Cool the workpiece frequently by quenching in water or another approve...

Страница 16: ...to check the belt tracking Adjust if necessary See Belt Tracking Page 15 7 Close and latch the side cover and close the belt guard 5 4 ANGLE ADJUSTMENT The Linisher can be tilted up and down to meet different operations Fig 5 2 Before adjusting DISCONNECT THE LINISHER FROM THE POWER SUPPLY Use the angle adjustment clamp lever shown in Fig 5 3 to lock the Linisher at the angle that is required Tigh...

Страница 17: ...rust free and in top condition This includes any surface that is vulnerable to rust if left unprotected Use ISO 68 machine oil or any other quality metal lubricant Normal maintenance of the contact wheel and the steering roller is needed The outside cover of the belt and the grinding remnants and dust in the outlet ports should be frequently cleaned and kept clean to resist build up 6 2 OPTIONAL A...

Страница 18: ...oper length cord The Belt does not come up to speed 2 Motor is not wired for proper voltage 2 Refer to motor junction box for proper wiring 3 Low current 3 Contact a qualified electrician Machine vibrates excessively 1 Stand on uneven floor 1 Adjust base so that it rests evenly on the floor 2 Motor mounts are loose 2 Tighten motor mount bolts 3 Tension spring is worn or broken 3 Replace spring Abr...

Страница 19: ...e of manufacture on hand these can be found on the specification plate mounted on the machine 2 A scanned copy of your parts list diagram with required spare part s identified 3 Go to www machineryhouse com au contactus and fill out the inquiry form attaching a copy of scanned parts list CONTENTS Wiring Diagram 20 BS 76 Spare Parts Diagram 21 BS 76 Spare Parts List 22 BS 152 Spare Parts Diagram 23...

Страница 20: ...20 OPERATION MANUAL WIRING DIAGAM FOR BS 76 BS 152 ...

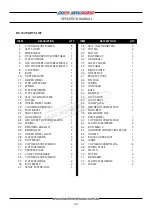
Страница 21: ...21 OPERATION MANUAL BS 76 PARTS DIAGRAM ...

Страница 22: ...LT M8X25 CUP HEAD SCREW M4X10 FLAT WASHER Φ4 PERSPEX PLATE COLLECTING BOARD CUP HEAD SCREW M6X50 FLAT WASHER Φ6 BOLT M8X12 FENCE EXTENSIONS 8 1 1 1 1 2 4 1 1 1 1 3 2 2 6 2 2 1 1 4 1 1 1 1 2 2 1 5 2 2 2 1 2 1 2 2 1 38 39 40 41 42 43 44 45 46 47 48 49 50 51 52 53 54 55 56 57 58 59 60 61 62 63 64 65 66 67 68 69 70 71 72 73 SELF LOCKINGNUTM6 NUT M4 MOTOR BOLT M8X25 HAND BALL SAFETY COVER TOP TABLE RIG...

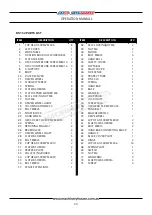
Страница 23: ...23 OPERATION MANUAL BS 152 PARTS DIAGRAM ...

Страница 24: ...8 BOLT M8X25 CUP HEAD SCREW M4X10 FLAT WASHER Φ4 PERSPEX PLATE COLLECTING BOARD CUP HEAD SCREW M6X50 FLAT WASHER Φ6 BOLT M8X12 FENCE EXTENSIONS 8 1 1 1 1 2 4 1 1 1 1 3 2 2 6 2 2 1 1 4 1 1 1 1 2 2 1 5 2 2 2 1 2 1 2 2 1 38 39 40 41 42 43 44 45 46 47 48 49 50 51 52 53 54 55 56 57 58 59 60 61 62 63 64 65 66 67 68 69 70 71 72 73 SELF LOCKINGNUTM6 NUT M4 MOTOR BOLT M8X25 HAND BALL SAFETY COVER TOP TABLE...

Страница 25: ...n the off position before re connecting 14 Use correct amperage extension cords Undersized extension cords overheat and lose power Replace extension cords if they become damaged 15 Keep machine well maintained Keep blades sharp and clean for best and safest performance Follow instructions when lubricating and changing accessories 16 Keep machine well guarded Make sure guards on machine are in plac...

Страница 26: ... persons in the area and know what is going on around the area to ensure unintended accidents 11 Workpiece Handling Never hold small workpieces with your fingers during a cut Always support feed the workpiece with push stick table support vice or some sort of clamping fixture 12 Hearing protection and hazards Always wear hearing protection as noise generated from sander and workpiece vibration can...

Страница 27: ...ontrol Strategies Recommended for Purchase Buyer User Isolate power to machine prior to any checks or maintenance being carried out Eliminate avoid loose clothing Long hair etc Make sure all guard are secured shut when machine is on Wear safety glasses Always keep gap between table and disc to a minimum DUST MEDIUM Remove all loose objects around moving parts Always sand on the down stroke of the ...

Отзывы: