background image

English 

inside a pocket, purse or other container with metal objects.

 Do 

not replace or charge batteries in a potentially explosive 
atmosphere. Contact sparking may occur while installing or 
removing batteries and cause an explosion.


3.3 Personal 

Safety 


Use in cars: do not place your device in the area over an air bag 
or in the air bag deployment area. Air bags inflate with great 
force. If a communicator is placed in the bag deployment area 
and the air bag inflates, the communicator may be propelled with 
great force and cause serious injury to the occupants of the 
vehicle.


Keep the radio at least 15 centimetres away from a pacemaker.


Turn your radio OFF as soon as interference is taking place with 
medical equipment.


Do not replace batteries in a potentially explosive atmosphere. 
Contact sparking may occur while installing or removing 
batteries and cause an explosion.


Turn your communicator off when in any area with a potentially 
explosive atmosphere. Sparks in such areas could cause an 
explosion or fire resulting in bodily injury or even death. 


Never throw batteries in fire as they may explode.


3.4 Poisoning 

Danger 

  Keep the batteries away from small children. 

3.5 Legal 

  In some countries it is prohibited to use your PMR while driving a 

vehicle. In this case leave the road before using the device. 

  Turn your unit OFF when on board an aircraft when instructed to 

do so. Any use of the unit must be in accordance with airline 
regulations or crew instructions. 

Содержание Xplorer FX-31

Страница 1: ...EN User Manual P Manual de Utilização Model Xplorer FX 31 PMR 2 Way Rádio Emissor Receptor PMR ...

Страница 2: ...publicadas sob reserva de modificações The CE Symbol indicates that the unit complies with the essential requirements of the R TTE directive O símbolo CE indica que esta unidade cumpre com os requisitos essenciais da Directiva R TTE For use Para uso em AT BE CH CY CZ DE DK EE GR E FI FR GB HU IRL I LT LU LV MT NL PL PT SE SK SI ...

Страница 3: ...t Clip 5 7 4 Battery Installation 5 8 OPERATION 6 8 1 Turning the Unit ON OFF 6 8 2 Transmitting sending 7 8 3 Receiving a Call 7 8 4 Adjusting the Speaker volume 7 8 5 Transmitting end of call Tone Roger Beep 8 8 6 Selecting a Channels 8 8 7 Calling Paging Tone 8 8 8 Monitoring the current channel 9 9 AUXILIARY FEATURES 9 9 1 Power Saving 9 9 2 Low Battery Meter Indicator 9 10 SPECIFICATIONS 10 1...

Страница 4: ... Clipe para cinto 17 7 4 Colocação das pilhas 17 8 OPERAÇÃO 19 8 1 Ligar Desligar a unidade 19 8 2 Transmitir enviar 19 8 3 Receber uma chamada 20 8 4 Ajustar o Volume do altifalante 20 8 5 Tom de fim de chamada Roger Bip 20 8 6 Mudança de Canais 20 8 7 Tonalidade de Chamada Paging 21 8 8 Monitorar o canal actual 21 9 FUNÇÕES AUXILIARES 21 9 1 Poupança de Energia 21 9 2 Indicador de Bateria Fraca ...

Страница 5: ...de etc Restriction Check the local regulations before using it outside the country where it was purchased The standard may be prohibited in this country 3 SAFETY INSTRUCTIONS 3 1 General Please read carefully through the following information concerning safety and proper use Make yourself familiar with all functions of the device Keep this manual on a safe place for future use 3 2 Burning Injuries...

Страница 6: ...maker Turn your radio OFF as soon as interference is taking place with medical equipment Do not replace batteries in a potentially explosive atmosphere Contact sparking may occur while installing or removing batteries and cause an explosion Turn your communicator off when in any area with a potentially explosive atmosphere Sparks in such areas could cause an explosion or fire resulting in bodily i...

Страница 7: ...2 x Xplorer FX 31 User manual with service card 5 CLEANING AND MAINTENANCE To clean the unit wipe with a soft cloth dampened with water Don t use a cleaner or solvents on the unit they can damage the case and leak inside causing permanent damage Battery contacts may be wiped with a dry lint free cloth If the unit gets wet turn it off and remove the batteries immediately Dry the battery compartment...

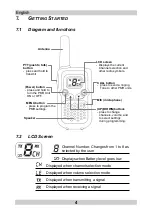
Страница 8: ...mitting a signal Displayed when receiving a signal Antenna PTT push to talk button press and hold to transmit Power button press and hold to turn the PMR Unit ON or OFF UP DOWN buttons press to change channels volume and to select settings during programming MENU button press to program the PMR settings LCD screen Displays the current Channel selection and other radio symbols CALL button press to ...

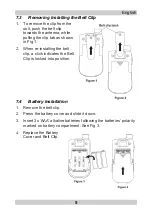
Страница 9: ...as shown in Fig 1 2 When re installing the belt clip a click indicates the Belt Clip is locked into position 7 4 Battery Installation 1 Remove the belt clip 2 Press the battery cover and slide it down 3 Insert 3x AAA alkaline batteries following the batteries polarity marked on battery compartment See Fig 3 4 Replace the Battery Cover and Belt Clip ...

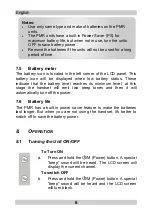
Страница 10: ...ndicate that the battery level reaches its minimum level at this stage the handset will emit two beep tones and then it will automatically turn off the power 7 6 Battery life The PMR has a built in power saver feature to make the batteries last longer But when you are not using the handset it s better to switch off to save the battery power 8 OPERATION 8 1 Turning the Unit ON OFF To Turn ON a Pres...

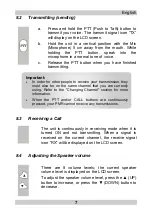
Страница 11: ...ust also be on the same channel that you are currently using Refer to the Changing Channel section for more information When the PTT and or CALL buttons are continuously pressed your PMR cannot receive any transmissions 8 3 Receiving a Call The unit is continuously in receiving mode when it is turned ON and not transmitting When a signal is received on the current channel the receive signal icon R...

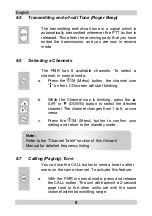
Страница 12: ...art blinking b While the Channel icon is blinking press the UP or DOWN button to select the desired channel The channel changes from 1 to 8 or vice versa c Press the M Menu button to confirm your setting and return to the standby mode Note Refer to the Channel Table section of this Owner s Manual for detailed frequency listing 8 7 Calling Paging Tone You can use the CALL button to send a tone to o...

Страница 13: ...ecial circuitry designed to extend the life of your battery When the unit is not used for 4 seconds it will automatically switch into a low power mode The Power Saving feature does not affect the PMR ability to receive transmissions When a signal is detected it automatically returns to full power mode 9 2 Low Battery Meter Indicator The PMR can detect the low battery level when battery voltage goe...

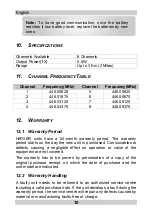
Страница 14: ...ave a 24 month warranty period The warranty period starts on the day the new unit is purchased Consumables or defects causing a negligible effect on operation or value of the equipment are not covered The warranty has to be proven by presentation of a copy of the original purchase receipt on which the date of purchase and the unit model are indicated 12 2 Warranty Handling A faulty unit needs to b...

Страница 15: ...not cover damage caused by outside factors such as lightning water and fire or any damage caused during transportation No warranty can be claimed if the serial number on the unit has been changed removed or rendered illegal 13 CE CONFORMITY DECLARATION We HaegerTec s a Praceta Cidade de Londres 1 Parque Industrial do Arneiro 2660 314 S Julião do Tojal Portugal declare that the following product 2 ...

Страница 16: ...English 12 ...

Страница 17: ...a manter contacto durante viagens entre 2 ou mais automóveis ciclismo actividades de ski Este pode ser utilizado para manter contacto com as crianças quando estão fora de casa a brincar etc Restrições Consulte as leis locais antes de utilizar este dispositivo fora do país aonde foi adquirido A norma pode estar proibida nesse país 3 INSTRUÇÕES DE SEGURANÇA 3 1 Geral Leia por favor atentamente todas...

Страница 18: ...mofada é insuflada poderá ser projectado com extrema força e ocasionar lesões aos ocupantes do veículo Mantenha o PMR afastado pelo menos 15 centímetros de estimuladores cardíacos DESLIGUE o PMR se verificar que existe interferências com equipamentos médicos Não substitua pilhas em ambientes onde possam ocorrer explosões A formação de faíscas por contacto pode ocorrer quando colocar ou remover as ...

Страница 19: ...ransmissões isto poderá afectar o alcance da mesma Retire as pilhas se o dispositivo não for utilizado durante um longo período de tempo 4 CONTEÚDO DO PACOTE 2 x unidades PMR Xplorer FX 31 Manual de Instruções 5 MANUTENÇÃO E LIMPEZA Para limpar o aparelho utilize um pano macio humedecido em água Não utilize produtos de limpeza ou solventes pois podem danificar a carcaça e provocar infiltrações cau...

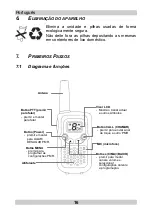
Страница 20: ...e funções Antena Botão PTT premir para falar premir e manter para falar Botão Power premir e manter para LIGAR DESLIGAR PMR Botões CIMA BAIXO premir para mudar canais volume e seleccionar configurações durante a programação Botão MENU premir para programar as configurações PMR Visor LCD Mostra o Canal actual e outros símbolos Botão CALL CHAMAR premir para enviar sinal de toque a outro PMR MIC micr...

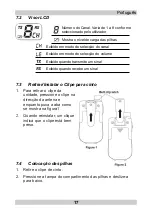
Страница 21: ...ibido quando transmite um sinal Exibido quando recebe um sinal 7 3 Retirar Instalar o Clipe para cinto 1 Para retirar o clipe da unidade pressione o clipe na direcção da antena e enquanto puxa a aba como se mostra na figura1 2 Quando reinstalar um clique indica que o clipe está bem preso 7 4 Colocação das pilhas 1 Retire o clipe de cinto 2 Pressione a tampa do compartimento das pilhas e deslize a ...

Страница 22: ...etire as pilhas se o aparelho não for usado por longos períodos de tempo 7 5 Indicação de Pilhas Fracas O símbolo de pilha está localizado no canto esquerdo no visor LCD Este símbolo é exibido quando as pilhas estão fracas Significa isto que a carga das pilhas atingiu o seu nível mínimo Neste estado o terminal emite dois tons de bip e em seguida desliga se automaticamente 7 6 Economia de Energia O...

Страница 23: ...ra falar O símbolo de transmissão de sinal TX será exibido no ecrã b Mantenha a unidade na posição vertical com o microfone MIC a 5 cm da sua boca Enquanto mantém o botão PTT pressionado fale para o microfone com um tom de voz normal c Liberte o botão PTT quando tiver terminado a transmissão Importante Para que as outras pessoas possam receber a sua transmissão eles deverão também estar no mesmo c...

Страница 24: ...a aumentar ou BAIXO para diminuir 8 5 Tom de fim de chamada Roger Bip O tom de fim de chamada é um sinal que é enviado automaticamente quando o botão PTT é libertado indicando que acabou de falar e que está agora no modo de recepção 8 6 Mudança de Canais O seu PMR tem 8 canais disponíveis Para escolher um canal em modo normal a Prima M Menu O símbolo do canal actual começa a cintilar no visor b En...

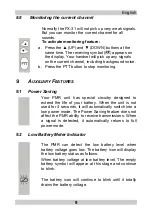
Страница 25: ... Normalmente o FX 31 não capta sinais fracos Pode no entanto monitorar todos os sons no canal actual Para activar a função a Pressione ao mesmo tempo os botões CIMA e BAIXO O símbolo de recepção aparece no visor O seu terminal irá monitorar qualquer sinal no canal actual incluindo os ruídos de fundo b Para parar a função pressione o botão PTT 9 FUNÇÕES AUXILIARES 9 1 Poupança de Energia A sua unid...

Страница 26: ...vel baixo aparece o símbolo de bateria descarregada a piscar O símbolo continuará a piscar até descarregar totalmente Nota Para ter uma boa comunicação utilize sempre pilhas carregadas Quando aparecer a indicação de pilhas descarregadas substitua as por novas 10 ESPECIFICAÇÕES Canais Disponíveis 8 Canais Potência TX 0 5W Alcance Até 3 Km 11 TABELA DE FREQUÊNCIAS Canal Frequência MHz Canal Frequênc...

Страница 27: ...vado de material ou falhas de fabricação sem qualquer custo adicional A HÆGER de acordo com o seu próprio critério cumprirá com as obrigações de garantia reparando ou trocando as unidades defeituosas No caso de substituição a cor e modelo poderão ser diferentes da cor da unidade inicialmente adquirida A data inicial de compra determinará o início do período de garantia O período de garantia não se...

Страница 28: ...amos que o seguinte produto Emissor Receptor PMR Modelo Xplorer FX 31 Marca HAEGER está em conformidade com as seguintes normas Protecção da saúde e segurança do utilizador EN60950 1 2002 Exigências EMC Compatibilidade Electromagnética EN301489 5 v1 3 1 2002 08 EN301 489 1 V1 8 1 2008 04 Exigências Rádio EN300296 2 v 1 1 1 2001 03 e satisfaz as exigências essenciais aplicáveis da Directiva R TTE 1...

Страница 29: ...____ ____ ___ Otheres Outros ____________________________________________________________ Vendor data Dados do estabelecimento vendedor Vendor Estabelecimento ____________________________________________________________ Address Endereço ____________________________________________________________ ____________________________________________________________ Stamp Carimbo Este certificado deverá aco...

Страница 30: ......

Страница 31: ......

Страница 32: ...l do Arneiro Fax 351 21 949 8325 2660 456 São Julião do Tojal e mail suporte tec haeger pt Portugal http www haeger pt Any reprint of this documentation is prohibited without the prior express consent of HÆGERTEC Proibida a reprodução total ou parcial deste manual sem autorização expressa de HÆGERTEC ...

Отзывы: