background image


Anleitung / Manual Para-RC Cloud 1.5 Komplett-Set 

© 2021 Hacker Motor GmbH 


Seite / 

page 


Anleinen des Gleitschirms, der Schirm ist 
voreingestellt, es muss nichts geknotet oder 
abgeschnitten werden!  Die zwei Haupttragegurte 
mit den kleinen Stahlwirbeln werden in den 
schwarzen Karabinern eingehängt. Die Bremsleinen 
links und rechts werden mit den kleinen 
Edelstahlkarabinern in den Steuerarmen 
eingehängt. 

Achtung, die Bremsleinen laufen innen 

an den Tragegurten vorbei!


Leash the paraglider, the paraglider is preset, nothing has to be knotted or cut off! The two main risers 
with the small steel swivels are attached to the black carabiners. The brake lines on the left and right 
are attached to the control arms with the small stainless-steel carabiners. 

Attention: the brake lines 

run past the risers on the inside! 


Einstellen und Einfliegen / 

Adjustments and first flight


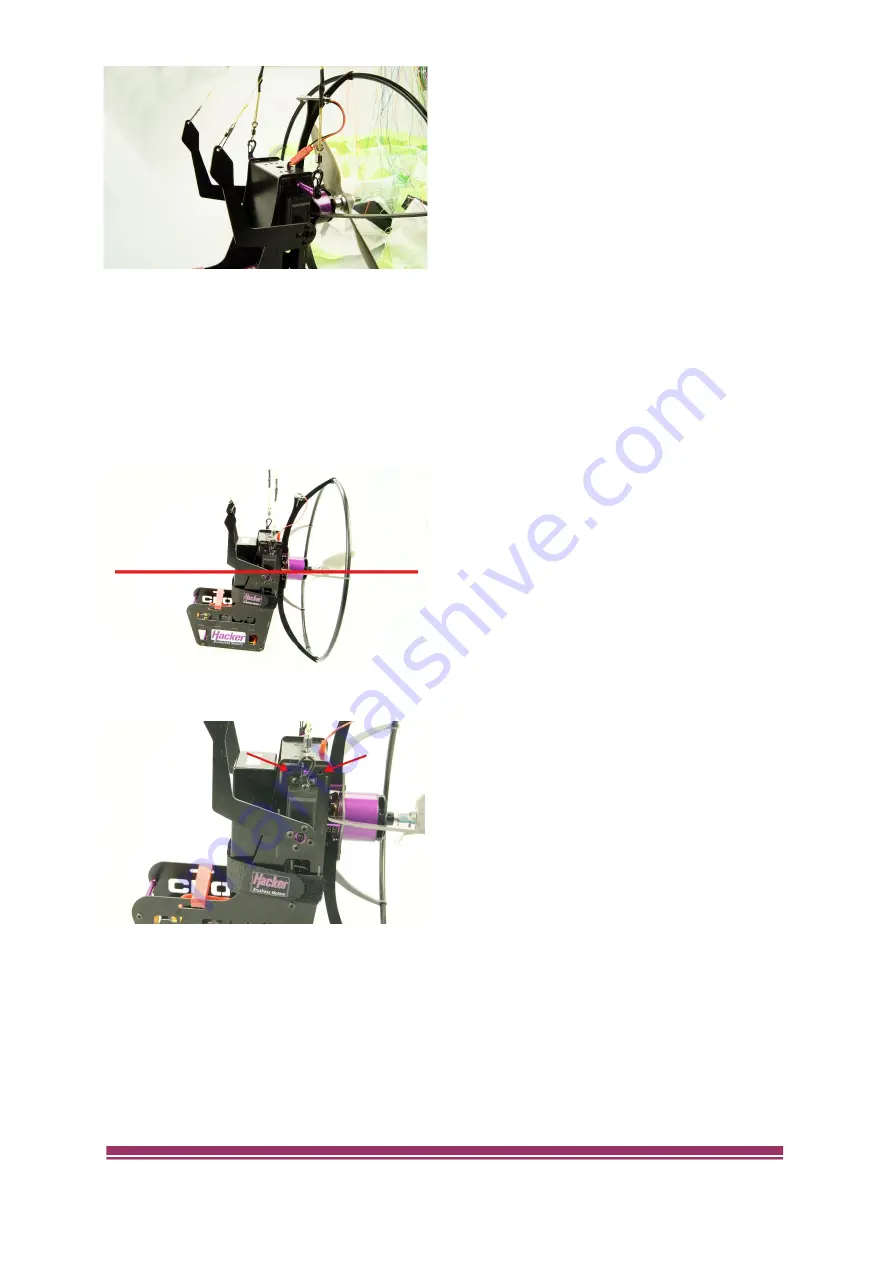
Die Montage ist  nun  abgeschlossen.  Bevor  das 
Modell das erste Mal gestartet werden kann, 
müssen noch der Schwerpunkt und die Servoarme 
kontrolliert werden. Die Propellerachse sollte 
waagerecht oder ganz leicht nach unten zeigen. Es 
kann entweder der Akku verschoben,  oder die 
Hauptaufhängung nach vorne oder nach hinten 
gesetzt werden. In der Gondel sind drei 
Befestigungslöcher bereits vorgesehen.  Zeigt der 

Propeller zu weit nach oben, muss der Akku nach 
hinten oder die Aufhängung nach vorne. Zeigt der 
Propeller zu weit nach unten, muss der Akku nach 
vorne oder die Aufhängung nach hinten. Passt der 
Schwerpunkt, ist das Modell flugbereit.  


The assembly  is  completed  now.  Before the model 
can be started for the first time, the center of gravity 
and the servo arms must be checked. The propeller 
axis should point horizontally or slightly downwards. 

Either the battery can be moved or the main suspension can be attached to the front or back holes. 
There are already three mounting holes in the nacelle. If the propeller is pointing too far up, the battery 
must be moved backwards or the suspension moved towards the front. If the propeller points too far 
down, the battery must be moved forward or the suspension must be moved backward. Once the center 
of gravity is properly adjusted, the model is ready to fly. 


Содержание Para-RC Cloud 1.5

Страница 1: ...odell flugfertig zu machen benötigen Sie noch einen Antriebsakku und eine Fernsteuerung mit Empfänger Tipps finden Sie auch in unserem Shop www hacker motor shop com unter Para RC Thank you for purchasing a quality product from the Hacker Para RC series The Para RC Cloud 1 5 complete set ARF is almost completely assembled and the paraglider is preset All that has to be done is to mount the motor h...

Страница 2: ... Safety instructions Seite 3 4 Lieferumfang Delivery contents Seite 4 Technische Daten Technical data Seite 4 Montage des Motorträgers Assembly of the motor mount Seite 5 6 Überprüfen der Steuerfunktionen Control functions Seite 6 7 Einstellen und Einfliegen Adjustments and first flight Seite 8 10 Garantieinformationen Warranty information Seite 11 Kontaktinformationen Contact information Seite 12...

Страница 3: ...Wind In der Nähe von Straßen Bäumen oder sonstigen Hindernissen In der Nähe von Hochspannungsleitungen In Bereichen mit hoher Bevölkerungsdichte oder in der Nähe von Flugplätzen Trennen Sie bitte nach der Landung immer das Akku Pack vom Regler This model is not a toy Suitable for ages 14 and up Abuse may result in severe injury Beware of the rotating prop keep distance Only use on official flying ...

Страница 4: ... density areas Please disconnect the lipo packs when finished flying Lieferumfangs Delivery contents Technische Daten Technical Data Spannweite ausgelegt Flat wingspan 260 cm Fläche ausgelegt Flat area 1 5 m Zellenzahl Number of cells 25 Leergewicht Dry weight 850g Fluggewicht Flying weight 1250g 2500g Maßstab Scale 1 5 Viele weitere Zubehörteile finden Sie in unserem Online Shop You will find man...

Страница 5: ...del gesteckt werden Es ist unbedingt zu vermeiden dass die Kabel am Motor oder Propeller schleifen können Connect the three motor cables to the controller The cables can either be fixed with the enclosed cable ties or inserted into the opening on the back of the nacelle It is imperative that the cables do not rub against the motor or propeller Verbinden Sie nun die Servos und den Regler mit Ihrem ...

Страница 6: ...Arm in Flugrichtung gesehen nach unten geneigt Linke Hälfte des Schirms wird angebremst Linkskurve Rechter Arm in Flugrichtung gesehen nach unten geneigt Rechte Hälfte des Schirms wird angebremst Rechtskurve control stick in neutral position control stick to the left control stick to the right Arm upwards flying straight ahead Left arm in flight direction showing downwards Left half of the wing is...

Страница 7: ...rrow ist bereits fertig verbaut und muss nur noch angesteckt werden Der Ein und Ausschalter befindet sich direkt auf der Platine neben den LED s Vermeiden Sie es direkt in die extrem starken LED s zu schauen Schalten Sie die Beleuchtung nach dem Flug wieder aus sonst kann es zu Hitzeschäden kommen The Sparrow lighting module is already installed and only needs to be plugged in The on and off switc...

Страница 8: ...d die Servoarme kontrolliert werden Die Propellerachse sollte waagerecht oder ganz leicht nach unten zeigen Es kann entweder der Akku verschoben oder die Hauptaufhängung nach vorne oder nach hinten gesetzt werden In der Gondel sind drei Befestigungslöcher bereits vorgesehen Zeigt der Propeller zu weit nach oben muss der Akku nach hinten oder die Aufhängung nach vorne Zeigt der Propeller zu weit na...

Страница 9: ...he wing The brake lines are tied to the servo arms Hold the backpack on the bottom and make sure the lines hang down freely Now pull the backpack away from the wing until the lines are straight then check the wind direction and pull up the wing with a circular motion from the ground The glider will open up above you now start to walk Jetzt erkennt man genau ob die Einstellung der Bremsleinen passt...

Страница 10: ...n The lower profile of the wing should be straight in the wind With the controls to the right you should see a significant lowering of the right edge of the wing and the glider will immediately move to the right Once you pull down the elevator both sides of the rear edge of the glider will be lowered and the glider will stall and drop to the ground If this is the case then you have already found t...

Страница 11: ... Folgen die aus unserer Lieferung oder Arbeit entstehen übernehmen wir keine Haftung Soweit gesetzlich zugelassen wird die Verpflichtung zur Schadensersatzleistung aus welchen Rechtsgründen auch immer auf den Rechnungswert unseres an dem Ereignis unmittelbar betroffenen Produkt begrenzt Dies gilt nicht soweit wir nach zwingenden gesetzlichen Vorschriften oder grober Fahrlässigkeit unbeschränkt haf...

Страница 12: ...e product complies with the essential requirements of the EMC Directive 2014 30 EU You can request the declaration of conformity for this product here Hacker Motor GmbH Schinderstraßl 32 84030 Ergolding or download at www hacker motor com Technische Änderungen behalten wir uns vor für Druckfehler wird keine Haftung übernommen Technical changes reserved we assume no liability for misprints Kontakti...

Отзывы:

Похожие инструкции для Para-RC Cloud 1.5