Hach HQ440d Скачать руководство пользователя страница 19

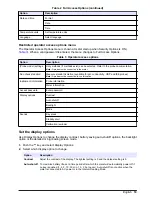
Table 1  Spreadsheet column descriptions (continued)

Column header name

Data description and example values

Date/Time POSIX

Date and time of reading stored in POSIX format (number of seconds from
January 1, 1970) Example: 1149234913 

Cal Date/Time POSIX

Date and time of calibration stored in POSIX format (number of seconds from
January 1, 1970). Example: 1111320348 

Meter SN

Meter serial number used to take the measurement

Remove column headers

When transferred data is viewed in a spreadsheet program, the first row of data contains headings to
identify the type of data in each column. If an application or post-processing method is used that is
incompatible with the headers, the column headers can be omitted.

1.

Push the 

 key.

2.

Select Column Headers.

3.

Set the column headers to off.

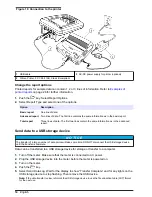
Send data directly to a computer

Data can be transferred from any HQd series meter directly to a computer when the HQ40d PC
Application is installed. The data can be sent in real time during data collection, or the entire data log
can be transferred.
To download the most current version of the software, refer to the applicable product page on the
manufacturer's website.

1.

Install the HQ40d PC Application on the computer.

2.

Turn off the meter. Make sure that the meter is connected to AC power.

3.

Connect the PC to the meter with a USB type B cable.

4.

Turn on the meter.

5.

Open the HQ40d PC Application on the computer. Click on the green triangle in the menu bar to
start a connection.

6.

Collect the data in real time or transfer the data from the data log:

• Real time—when a data point is stored in the meter, the result is sent simultaneously to the PC

Application (refer to 

Set the measurement mode

 on page 20).

• Data log—push the 

 key and select Send Data Log. Wait for the display to show “Transfer

Complete.” The data is sent as a comma separated values (.csv) file.

The data is shown in the HQ40d PC Application window.

Advanced operation

Security options

The Security Options menu is used to protect the meter setup and method settings from unwanted
changes. This menu is available in the Full Access Options menu.
The Setup Measurement Mode, Date and Time, Temperature Units, Language, Probe settings,
Delete data log and Security Options screens are disabled in the Operator Access Options menu. All
menu options are enabled in the Full Access Options menu.

Note:  The Full Access Options menu is shown when the key is pushed when Security Options is OFF, whether
or not a password has been set.

When the meter is powered on for the first time and Security Options is selected, the display prompts
the user to set a password. Until the meter is shut off, pushing the   key will still display the Full

English


17

Содержание HQ440d

Страница 1: ...DOC022 53 80116 HQ440d HQ430d HQ411d 10 2016 Edition 3 User Manual...

Страница 2: ......

Страница 3: ...on 11 About calibration 11 About sample measurements 11 About check standards 11 Use a sample ID 12 Use an operator ID 12 Data management 12 About stored data 12 View stored data 12 View stored probe...

Страница 4: ...information 22 Update the meter software 22 Download software updates 23 Transfer method settings 23 Bi directional Communication between the meter and a PC 23 About meter control 23 About meter confi...

Страница 5: ...2 0 flash memory device printer keyboard and Integrated USB type B for PC Temperature correction Off automatic and manual parameter dependent Measurement display lock Continuous measurement Interval o...

Страница 6: ...thout care Electrical equipment marked with this symbol may not be disposed of in European domestic or public disposal systems Return old or end of life equipment to the manufacturer for disposal at n...

Страница 7: ...device printer and keyboard 3 USB connector type B for PC connections 6 Probe connection port Product components Refer to Figure 2 to make sure that all components have been received If any items are...

Страница 8: ...rrect battery installation can cause the release of explosive gases Be sure that the batteries are of the same approved chemical type and are inserted in the correct orientation Do not mix new and use...

Страница 9: ...ace the battery cover Note Do not over tighten the screws Figure 4 Battery installation User interface and navigation User interface Figure 5 Keypad description 1 LEFT key calibrates cancels or exits...

Страница 10: ...atus 12 Display size icon 5 Power source 13 Calibrate Cancel Exit 6 Sample temperature C or F 14 Sample and operator identification 7 Secondary measurement unit 15 Stability or display lock indicator...

Страница 11: ...Figure 8 Note For probe calibration change the screen mode to the single screen mode To change the screen mode to single or dual screen use the and keys In dual screen mode the key will select the pr...

Страница 12: ...ged from the Meter Options menu Access to the language menu can be restricted with the Security Options Refer to Security options on page 17 1 Push the key and select Language 2 Select a language from...

Страница 13: ...red the LDO sensor cap should be replaced the calibration is out of range the calibration results are outside acceptance criteria settings About sample measurements Each probe has specific preparation...

Страница 14: ...ed Delete Operator ID Delete an existing operator ID Data management About stored data The following types of data are stored in the data log Sample measurements stored automatically each time a sampl...

Страница 15: ...rent calibration information shows the calibration details for the most recent calibration If the probe has not been calibrated by the user the factory calibration data is shown View Calibration Histo...

Страница 16: ...contain the same information as in the advanced report Send data to a USB storage device N O T I C E The transfer of a large number of data points will take some time DO NOT disconnect the USB storage...

Страница 17: ...IC Current Calibration Parameter Type Parameter LDO pH CD conductivity ORP ISE Date Date of reading stored in user defined date format Time Time of reading stored in user defined format Operator ID O...

Страница 18: ...e value for the calibration Cal Slope Aux Used by pH to give the percent of nominal slope Cal Slope Units Units of the calibration slope Example mV pH for pH Cal Offset Calibration offset value Cal Of...

Страница 19: ...the meter is connected to AC power 3 Connect the PC to the meter with a USB type B cable 4 Turn on the meter 5 Open the HQ40d PC Application on the computer Click on the green triangle in the menu ba...

Страница 20: ...to enable the Full Access Options menu again when the meter is turned on Set Password Set a password that must be entered to enable the Full Access Options menu The requirement for password entry is...

Страница 21: ...connected to use this option Instrument information Probe information Meter information Access password Enter password Display options Contrast Auto shutoff Backlight Mode Sounds Key press Stability a...

Страница 22: ...is reached Cal reminder The meter will make an audible sound when calibration is due Note Refer to Set the probe calibration reminder on page 20 to set the calibration reminder to on or off Set the p...

Страница 23: ...h 8 h 24 h 48 h or no limit 5 Select Interval and select how often measurements will be taken every 10 s 30 s 1 min 5 min 15 min or 30 min Start interval measurements During interval measurements the...

Страница 24: ...then on again before the software update will begin The software update initiates upon meter startup after the USB device is correctly inserted N O T I C E Do not remove the USB device until the Upda...

Страница 25: ...he AC power and USB device to a meter that will receive the method settings Turn the meter on 9 Push the key and select Transfer Methods If the USB device already contains a method settings file an op...

Страница 26: ...on in the search and click the Browse button 15 Select the INF folder or location and click OK 16 Click Next The new software will be installed 17 Click Finish to complete the Found New Hardware Wizar...

Страница 27: ...ery replacement Troubleshooting Refer to the following table for common problem messages or symptoms possible causes and corrective actions Error Warning Description Solution Connect a Probe Probe dis...

Страница 28: ...meter batteries 3 Install the meter batteries properly Follow the polarity makings 4 Set correct date and time in the meter 5 Connect the probe and verify that message has been removed Software not u...

Страница 29: ...B male 5924000 Power supply without power cord 5827000 Power cord US 1801000 Power cord EU YAA080 Power cord UK XLH057 Power cord CH XLH051 Keyboard QWERTY USB type LZV582 USB memory device with HQd S...

Страница 30: ...n a basic advanced or total report format Total report refer to Figure 13 Advanced report refer to Figure 14 Basic report refer to Figure 15 Figure 13 Basic report for sample data 1 line 1 Data type R...

Страница 31: ...ype of parameter and user settings May be blank 3 Date of calibration DD MM YY or user defined format 6 Operator ID user defined shows if undefined Check standard reports Check standard data is printe...

Страница 32: ...d and number of calibration standards used May be blank 5 Probe model 11 Operator ID user defined shows if undefined 6 Date of calibration DD MM YY or user defined format The calibration history can b...

Страница 33: ...ay description 19 dual screen mode calibration 9 I interval measurements 20 M measurement modes 20 menu navigation 9 modes screen 19 O operator ID 12 P power 6 battery replacement 25 printing 13 probe...

Страница 34: ......

Страница 35: ......

Страница 36: ...2932 orders hach com www hach com HACH LANGE GMBH Willst tterstra e 11 D 40549 D sseldorf Germany Tel 49 0 2 11 52 88 320 Fax 49 0 2 11 52 88 210 info de hach com www de hach com HACH LANGE S rl 6 ro...

Отзывы: