background image

32 


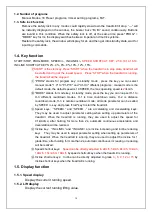
H.  In distance countdown mode, press MODE to enter 

Calorie Countdown mode

; the 

initial distance will be displayed as 50.0kcal; set the calorie by SPEED +/ SPEED - 
and I/ INCLINE - in the range of 20.0-990.0 kcal; each time of increase/ 
decrease will be 10.0 kcal. 


1.7.3. Operation in manual mode: 

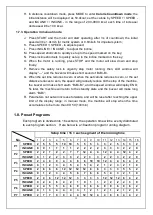
J.  Press  START  and  the  motor  will  start  operating  after  3s  of  countdown;  the  initial 

speed will be 1.0km/h for metric system or 0.6mile/h for imperial system; 


K.  Press SPEED +/ SPEED - to adjust speed; 


L.  Press I/ INCLINE - to adjust the incline; 


M.  Press speed shortcuts to quickly set up to the speed marked on the key; 


N.  Press incline shortcuts to quickly set up to the incline marked on the key; 


O.  When  the  motor  is  running,  press  STOP  and  the  motor  will  slow  down  and  stop 

finally; 


P.  Remove  the  safety  lock  to  urgently  stop  motor  running;  then,  LCD  window  will 

display “---” and the buzzer will make short sound of Bi-Bi-Bi. 


Q.  When the set time reduces to zero or when the set calorie reduces to zero, or the set 

distance reduces to zero, the speed will gradually reduce till the stop of the machine, 
the buzzer will make short alarm “Bi-Bi-Bi”, and the speed window will display END; 
5s later, the machine will return to the standby state and the buzzer will make long 
alarm “Bi-Bi”; 


R.  Parameters not set will increase forwards, and will be reset after reaching the upper 

limit  of  the  display  range;  in  manual  mode,  the  machine  will  stop  when  the  time 
accumulates to be more than 99: 59 (100min). 


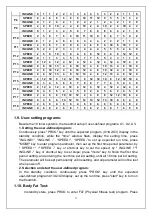
1.8. Preset Programs 

Each program is divided into 16 sections; the operation time will be evenly distributed 
to each program section.    Here below is a 18section program running diagram.   


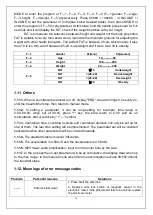
No. 

Setup time / 16 = each segment of the running time 

10 

11 

12 

13 

14  15 

16 

P1 

SPEED 

10 

10 

INCLINE 

P2 

SPEED 

12 

12 

12 

INCLINE 

P3 

SPEED 

10 

10 

12 

INCLINE 

P4 

SPEED 

12 

12 

12 

12 

INCLINE 

P5 

SPEED 

12 

12 

12 

12 

12 

12 

INCLINE 

P6 

SPEED 

INCLINE 

P7 

SPEED 

12 

12 

Содержание Usain 1332 83778

Страница 1: ...0 USAIN 1332_83778...

Страница 2: ...31 M10 40 1 77 2 1 1 32 M10 1 2 18 78 2 1 1 33 M10 4 79 ST2 9 9 5 10 1 1 34 M10 55 1 80 M4 8 4 1 1 35 M8 18 4 81 M5 16 4 1 1 36 D8 6 82 ST4 12 2 1 1 37 D8 10 83 2 1 1 38 M8 35 2 84 M4 8 2 1 1 39 M8 50...

Страница 3: ...2...

Страница 4: ...dit ou il va causer des probl mes 4 Nous ne prenons aucune responsabilit pour les probl mes ou blessures pour les raisons cit es ci dessus 5 Veuillez porter des v tements de sports 6 Attendre au minim...

Страница 5: ...he le tapis roulant pendant que vous tes debout sur la courroie Apr s la mise sous tension et le r glage du contr le de la vitesse il peut y avoir une pause avant la courroie commence se d placer Rest...

Страница 6: ...a poitrine un rythme cardiaque irr gulier essoufflement sensation de faiblesse ou un inconfort quelconque alors que vous exercez Arr tez vous imm diatement Consulter votre m decin avant de poursuivre...

Страница 7: ...uvrez l emballage sortez toutes les pi ces et le ch ssis principal sur le terrain plat remarque s il ne pas couper les sangles d emballage ETAPE 2 1 Coupez les sangles d emballage puis connectez l ext...

Страница 8: ...3 enfin verrouiller le ch ssis de l ordinateur 60 sur le tube vertical 2 3 avec la vis 55 et la rondelle 32 Maintenant serrer toutes les vis install es avant 2 Couvrir le couvercle du tube vertical 61...

Страница 9: ...8 ETAPE 4 Lorsque vous pliez la machine mettez vos mains sur le point A soulever la machine puis le pousser la direction de la fl che l arr ter quand vous entendez le son du cylindre 43...

Страница 10: ...s d pliez la machine saisir le point A par vos mains bloquer le point B du cylindre 43 par votre pied droit pousser le marchepied au niveau de point C le marchepied en cours d ex cution sera de descen...

Страница 11: ...et r gulations locaux DANGER Une mauvaise connexion du conducteur mise terre peut entra ner un risque de choc lectrique Consultez un lectricien qualifi si vous avez des doutes concernant la mis terre...

Страница 12: ...5HP FOLDABLE SIZE mm 1160 820 1590 MAX OUTPUT POWER 2 0HP RUNNING SURFACE SIZE mm 500 1410 INPUT CURRENT Voltage 230v and Frequency 50HZ NET WEIGHT 87KG SPEED RANGE 1 0 20 KM H MAX WEIGHT 150KG INCLIN...

Страница 13: ...arra la vitesse la plus basse Appuyez sur STOP lorsque le tapis roulant est en cours d ex cution le tapis roulant sera arr t PROG est la cl du programme en mode veille appuyez sur la touche vous pouve...

Страница 14: ...naison lorsque le tapis roulant est en cours d ex cution 1 5 Fonction d affichage 1 5 1 Affichage de la vitesse Afficher la vitesse de fonctionnement courant 1 5 2 Affichage du levage Affiche la valeu...

Страница 15: ...chaque fois d augmentation diminution sera de 1 00 C En mode compte rebours appuyez sur MODE pour entrer en mode de compte rebours Distance la distance initiale sera affich e 1 00 km r gler la distan...

Страница 16: ...vitesse 2 5 5 5 10 10 5 5 5 3 3 2 5 5 3 2 INCLINE inclinaison 0 0 1 1 1 1 2 2 2 2 3 3 3 2 2 0 P2 SPEED 2 2 7 2 2 7 7 12 4 4 12 4 4 12 4 2 INCLINE 0 1 2 2 3 3 2 2 3 3 2 2 3 2 2 0 P3 SPEED 2 4 9 9 4 4...

Страница 17: ...er la vitesse par INCLINE INCLINE ou la touche Raccourci pour d finir la pente appuyez sur la touche mode pour terminer le premier R glage de la p riode de temps et en entrant le prochain r glage de p...

Страница 18: ...lant s arr tent compl tement puis reviens en mode manuel 1 11 2 Les param tres tels que le temps la vitesse ont tous la gamme ajust e lorsque leur valeur est au maximum appuyer sur ce qui va le mettre...

Страница 19: ...n soit correcte et tester nouveau 2 V rifier si les fils du moteur sont bien connect s rebrancher les fils du moteur ou si le probl me n est toujours pas r solut remplacer le moteur 3 V rifier s il y...

Страница 20: ...pteur d alimentation surcharge de protection et le cordon d alimentation du contr leur et le transformateur pour assurer une bonne connexion 3 V rifiez si les cordons d alimentation du compteur lectro...

Страница 21: ...er ou branler vos muscles dans l tirement Il est conseill de former au moins trois fois par semaine et si l espace possible vos s ances d entra nement uniform ment tout au long de la semaine Pour toni...

Страница 22: ...la vis droite 1 2 tour vers la droite et le boulon de r glage gauche 1 2 tour dans le sens inverse des aiguilles d une montre Si la courroie a d riv vers la gauche tournez la vis gauche 1 2 tour vers...

Страница 23: ...expos e de la plate forme de chaque c t de la courroie mobile et aussi les rails lat raux Cela r duit l accumulation des corps trangers sous la courroie La partie sup rieure de la ceinture peut tre ne...

Страница 24: ...d shoes before running 15 Do not do exercise in 40 minutes after meal 16 To prevent hurts please warm up before exercise 17 Consult with doctor before exercise if you have high blood pressure 18 The t...

Страница 25: ...pace behind the treadmill 9 Keep small children away from the treadmill during operation 10 Always hold the handrails when initially walking or running on the treadmill until you are comfortable with...

Страница 26: ...mp to the side rail when emergency or the safety key is not attached 19 Make sure the treadmill has stopped before folding Please don t operate it after folding the treadmill ASSEMBLY STEPS ASSEMBLY S...

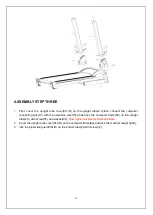
Страница 27: ...wire 13 with the extension wire 73 at last lock the computer frame 60 on the upright tube 2 3 with screw 55 and washer 32 Now tighten all screws installed before 2 Cover the upright tube cover 61L R o...

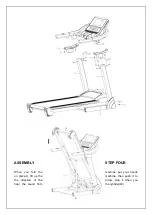
Страница 28: ...27 ASSEMBLY STEP FOUR When you fold the machine put your hands on place A lift up the machine then push it to the direction of the arrow stop it when you hear the sound from the cylinder 43...

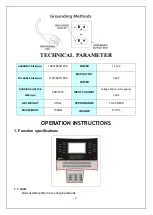
Страница 29: ...an appropriate outlet that is properly installed and grounded in accordance with all local codes and ordinances DANGER Improper connection of the equipment grounding conductor can result in a risk of...

Страница 30: ...60 820 1590 MAX OUTPUT POWER 2 0HP RUNNING SURFACE SIZE mm 500 1410 INPUT CURRENT Voltage 230v and Frequency 50HZ NET WEIGHT 87KG SPEED RANGE 1 0 20 KM H MAX WEIGHT 150KG INCLINE 0 15 OPERATION INSTRU...

Страница 31: ...ress the key you can loop set H 1 to H 3 different countdown modes H 1 is time countdown mode H 2 is distance countdown mode H 3 is calorie countdown mode all mode parameter can be setted by SPEED key...

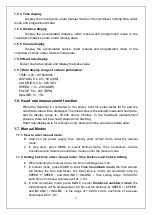
Страница 32: ...imes minutes In the heartbeat measurement process there will be a heart shaped icon flashing Heart rate displayed is for reference only and can not be used as medical data 1 7 Manual Modes 1 7 1 How t...

Страница 33: ...educe till the stop of the machine the buzzer will make short alarm Bi Bi Bi and the speed window will display END 5s later the machine will return to the standby state and the buzzer will make long a...

Страница 34: ...8 4 6 8 4 6 8 4 6 8 2 INCLINE 0 6 8 2 6 8 1 6 8 2 6 8 1 6 8 0 1 9 User setting programs Beside the 18 inner systems the treadmill setup 3 user defined programs U1 U2 U3 1 Setting the user defined pro...

Страница 35: ...play END the alarm rings 0 5s every 2s until the treadmill full stop then return to manual mode 1 11 2 In setting a parameter it can be roop setting for example time range is 5 00 99 00 when set at 99...

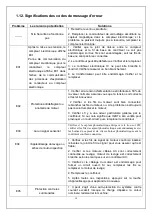
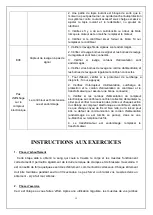
Страница 36: ...ther wires of photoelectric sensor are damaged and whether terminals of the photoelectric sensor and speed terminals on the controller are firmly connected E04 Lifting learning or self inspection fail...

Страница 37: ...on power cord defect damaged or broke down in such case re connect or replace wires 4 The transformer is damaged replace the transformer EXERCISE INSTRUCTIONS 3 The Warm Up Phase This stage helps get...

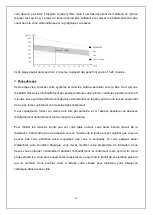
Страница 38: ...e amount of effort you put in The harder and longer you work the more calories you will burn Effectively this is the same as if you were training to improve your fitness the difference is the goal MAI...

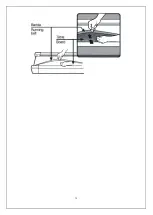
Страница 39: ...sure to clean the exposed part of the deck on either side of the walking belt and also the side rails This reduces the build up of foreign material underneath the walking belt The top of the belt may...

Страница 40: ...39...

Отзывы: