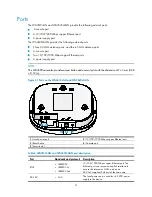
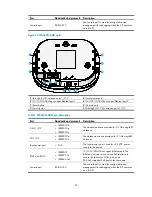
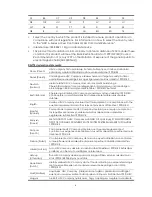
H3C WA3610i-GN Скачать руководство пользователя страница 34

Table 1


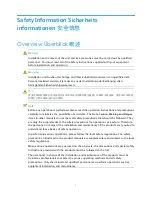
 Safety symbol and description/Sicherheitssymbole und Beschreibung/

安全标识和描述


Safety Symbol 
Symbole 

安全标识


Description 
Erläuterung 

描述


Generic alarm symbol: To suggest a general safety concern. 
Alarm: Hinweis auf ein generelles Sicherheitsproblem. 

一般注意标识:用于一般安全提示。


ESD protection symbol: To suggest electrostatic-sensitive equipment. 
ESD-Schutz: Hinweis auf ESD-gefährdete Bauteile. 

防静电标识:用于表示静电敏感的设备。


Electric shock symbol: To suggest a danger of high voltage. 
Elektrischer Schlag: Hinweis auf Gefährdung durch Hochspannung. 

电击防护标识:用于表示高压危险。


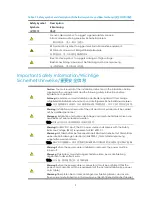
Important Safety Information/Wichtige 

Sicherheitshinweise/

重要安全信息


Caution: 

You must read all of the installation instructions in the Installation Guide 

supplied with your equipment and the following safety instructions before 
installation or operation. 

Achtung:

 Sie müssen vor der Installation oder Bedienung das mit Ihrer Anlage 

mitgelieferten Installationshandbuch und die folgende Sicherheitshinweise lesen. 

注意:在安装和操作本设备时,务必阅读设备安装手册的内容,以及下文的所有安全说明。


Warning: 

Installation and removal of the unit and its accessories must be carried 

out by qualified personnel.


Warnung::

 Installation und Ausbau der Anlage und ihrer Zubehörteile müssen von 

qualifiziertem Personal realisiert werden. 

警告

必须由专业人员来安装和移动设备以及附件。


Warning: 

For SELV DC input: the DC power source shall comply with the Safety 

Extra-Low Voltage (SELV) requirements of IEC 60950-1.  

Warnung:

 Mit Gleichstrom betriebenes Modell: Das Gerät arbeitet mit Gleichstrom, 

wobei die Anforderungen der Norm (IEC60950-1) für Schutzkleinspannung 
eingehalten werden müssen.


警告:

SELV DC

电源输入:设备使用满足

IEC60950-1

安规标准的安全超低电压

(SELV)

电源。


Warning: 

Before the power cable is installed or removed, the power must be 

turned off.  

Warnung:

 Das System muss stets abgeschaltet werden, bevor die Zuleitung 

angebracht oder entfernt wird. 

警告:在安装、移动线缆之前,请切断电源。


Warning: 

Before the power cable is connected, it must be confirmed that the 

power cord  complies with the requirements of the actual installation(see power 
cord  table.) 

Warnung: 

Überprüfen Sie vor dem Anbringen der Zuleitung immer, ob das von 

Ihnen verwendete Kabel den Anforderungen entspricht(siehe Netzkabel-Tabelle). 

Содержание WA3610i-GN

Страница 1: ...H3C WA3600 Series Indoor Access Points Installation Guide Hangzhou H3C Technologies Co Ltd http www h3c com Document version APW100 20110926...

Страница 2: ...ou H3C Technologies Co Ltd All other trademarks that may be mentioned in this manual are the property of their respective owners Notice The information in this document is subject to change without no...

Страница 3: ...on describes the conventions used in this documentation set GUI conventions Convention Description Boldface Window names button names field names and menu items are in Boldface For example the New Use...

Страница 4: ...ware installation software upgrading and software feature configuration and maintenance documentation Products Solutions Provides information about products and technologies as well as solutions Techn...

Страница 5: ...wall or ceiling II 9 Mounting the AP to a T rail 10 Securing the AP 12 Connecting the power supply 13 Check before power on 13 PoE power supply 13 Local power supply 14 Check after power on 15 Connec...

Страница 6: ...A3628i AGN also supports external antennas The WA3600 series can serve as fit APs to cooperate with wireless switches or access controllers to provide wireless access for WLAN users All configuration...

Страница 7: ......

Страница 8: ...sures are in place Keep the chassis clean and dust free Do not place the access point in a moist area and avoid liquid surrounding the access point Keep the chassis and installation tools away from wa...

Страница 9: ...address label User supplied installation tools and equipment When you install a WA3600 access point you may need the following tools Level Marker Knife Wire stripper RJ 45 crimping tool Percussion dri...

Страница 10: ...fore installation Before you install an AP check the following Connect the power cord and connect the AP to the network Check the LED status to make sure that the AP can operate properly For more info...

Страница 11: ...l APs in a place where water seeping water soaking and condensing occur Prevent water or moisture from entering the APs CAUTION If part of the power line is routed outdoors use a power strip with ligh...

Страница 12: ...nsert a wall anchor into each mounting hole and tap the wall anchor with a rubber hammer until it is all flush with the wall surface c Align the holes in the wall mounting bracket with the anchors and...

Страница 13: ...Tab 4 Mounting keyhole 4 Mount the AP on the hook on the wall mounting bracket See callout 1 in Figure 7 5 Pull down the AP with force until it clicks into place See callout 2 in Figure 7 Figure 7 Fi...

Страница 14: ...t holes on the wall mounting bracket in mm 1 Bolt hole 1 2 Bolt hole 2 To install the AP on a wall 1 Drill two 6 2 mm 0 24 in diameter holes in the wall or ceiling where you want to mount the AP The d...

Страница 15: ...cket to avoid falloff Mounting the AP to a T rail NOTE The width of the T rail must be in the range of 14 mm to 24 mm 0 55 in to 0 94 in This installation method applies only to T rails The two 5 mm 0...

Страница 16: ...Fix the T rail holder to the T rail 3 Tighten the four M3 6 screws on the two clip holders until the screw heads touch the T rail and then fix the screws 4 Check whether the T rail holder is fixed to...

Страница 17: ...ity lock is user supplied You can secure the AP by installing a security lock into the security slot on the AP To install the security lock 1 Loop the security cable around a nearby immovable object 2...

Страница 18: ...elect one as needed Check before power on Check the following items before you power on the AP The power supply is well grounded when the AP adopts local power supply The PoE power supply is well grou...

Страница 19: ...P Table 4 Power adapter specifications Item Description Input 100 VAC to 240 VAC Output 48V at 0 52 A The WA3600 series supports both AC and DC power adapters You can connect the power port of the AP...

Страница 20: ...AC You can use the display wlan ap all command to check the AP status on the AC When the AP status is R M the AP has been successfully connected to the AC on a WA3628i AGN for example AC display wlan...

Страница 21: ...o the device to remotely manage and maintain it Logging in through web You can log in to the web interface of the device to remotely manage and maintain it Logging in through the console port Prepare...

Страница 22: ...parameters for example on a Windows XP HyperTerminal 1 Select Start All Programs Accessories Communications HyperTerminal The Connection Description dialog box appears 2 Enter the name of the new conn...

Страница 23: ...he HyperTerminal connection 4 Set Bits per second to 9600 Data bits to 8 Parity to None Stop bits to 1 and Flow control to None and click OK Figure 19 Set the serial port parameters NOTE To restore th...

Страница 24: ...By default the Telnet and web functions are enabled You can use the following default settings to log in to the web interface Username admin Password h3capadmin Management IP address of VLAN interfac...

Страница 25: ...available when the AP operates as a fit AP Breathing A client is connected to the 5G port NOTE Not available on the WA3610i GN Red Steady on An initialization exception has occurred to the AP Flashing...

Страница 26: ...d a security slot with the dimension of 7 3 mm 0 28 0 12 in Figure 21 Ports on the WA3610i GN and WA3620i AGN 1 Local power port 2 10 100 1000 Mbps copper Ethernet port 3 Reset button 4 Console port 5...

Страница 27: ...ols Description 2 4G 1 2 3 IEEE802 1 1b IEEE802 1 1g IEEE802 1 1n The antenna ports are provided for 2 4 GHz single RF antennas 5G 1 2 3 IEEE802 1 1a IEEE802 1 1n The antenna ports are provided for 5...

Страница 28: ...15 Connecting the power supply 13 D Determining the installation position 6 E Examining the installation site 3 I Installing the AP 6 L LEDs 20 Logging in through Telnet or web 19 Logging in through t...

Страница 29: ...Compliance and Safety Manual...

Страница 30: ...e 3 Electricity Safety Elektrische Sicherheit 4 Regulatory Compliance Information 5 Regulatory compliance standards 5 European Directives compliance 5 Wireless CE Marking 5 EU Country Restriction in 2...

Страница 31: ...ii List of Tables Table 1 Safety symbol and description Sicherheitssymbole und Beschreibung 3 Table 2 Regulatory compliance standards 5 Table 3 Equipment may be operated in the following country 5...

Страница 32: ...l safety precautions that should be followed They are only the supplements to the safety precautions for operations as a whole Therefore the personnel in charge of the installation and maintenance of...

Страница 33: ...Sicherheitsvorschriften Bei verschiedenen Bedienungen mit den Produkten sind deshalb grunds tzlich alle Sicherheitsvorschriften und spezifischen Sicherheitshinweise genau zu beachten Das f r die Insta...

Страница 34: ...ise lesen Warning Installation and removal of the unit and its accessories must be carried out by qualified personnel Warnung Installation und Ausbau der Anlage und ihrer Zubeh rteile m ssen von quali...

Страница 35: ...0mm Electricity Safety Elektrische Sicherheit Conducting articles such as a watch hand chain bracelet or ring should be removed during the installation Es ist nicht erlaubt w hrend dieser Arbeiten le...

Страница 36: ...SS B AS NZS CISPR22 CLASS B CISPR 24 EN 55024 EN 61000 3 2 EN 61000 3 3 EN60601 1 2 EN 301 489 1 EN 301 489 17 Safety UL 60950 1 CAN CSA C22 2 No 60950 1 IEC 60950 1 EN 60950 1 AS NZS 60950 1 RF FCC B...

Страница 37: ...imetatud direktiivist tulenevatele teistele asjakohastele s tetele English Hereby H3C Company declares that this Equipment is in compliance with the essential requirements and other relevant provision...

Страница 38: ...och vriga relevanta best mmelser som framg r av direktiv 1999 5 EG slenska Icelandic H r me l sir H3C Company yfir v a b na ur er samr mi vi grunnkr fur og a rar kr fur sem ger ar eru tilskipun 1999 5...

Страница 39: ...TV technician for help These products comply with Part 15 of the FCC Rules Operation is subject to the following two conditions 1 This device may not cause harmful interference 2 This device must acce...

Страница 40: ...ecifications were met To reduce potential radio interference to other users the antenna type and its gain should be so chosen that the equivalent isotropically radiated power EIRP is not more than tha...

Отзывы: