background image


4-7 

9. 

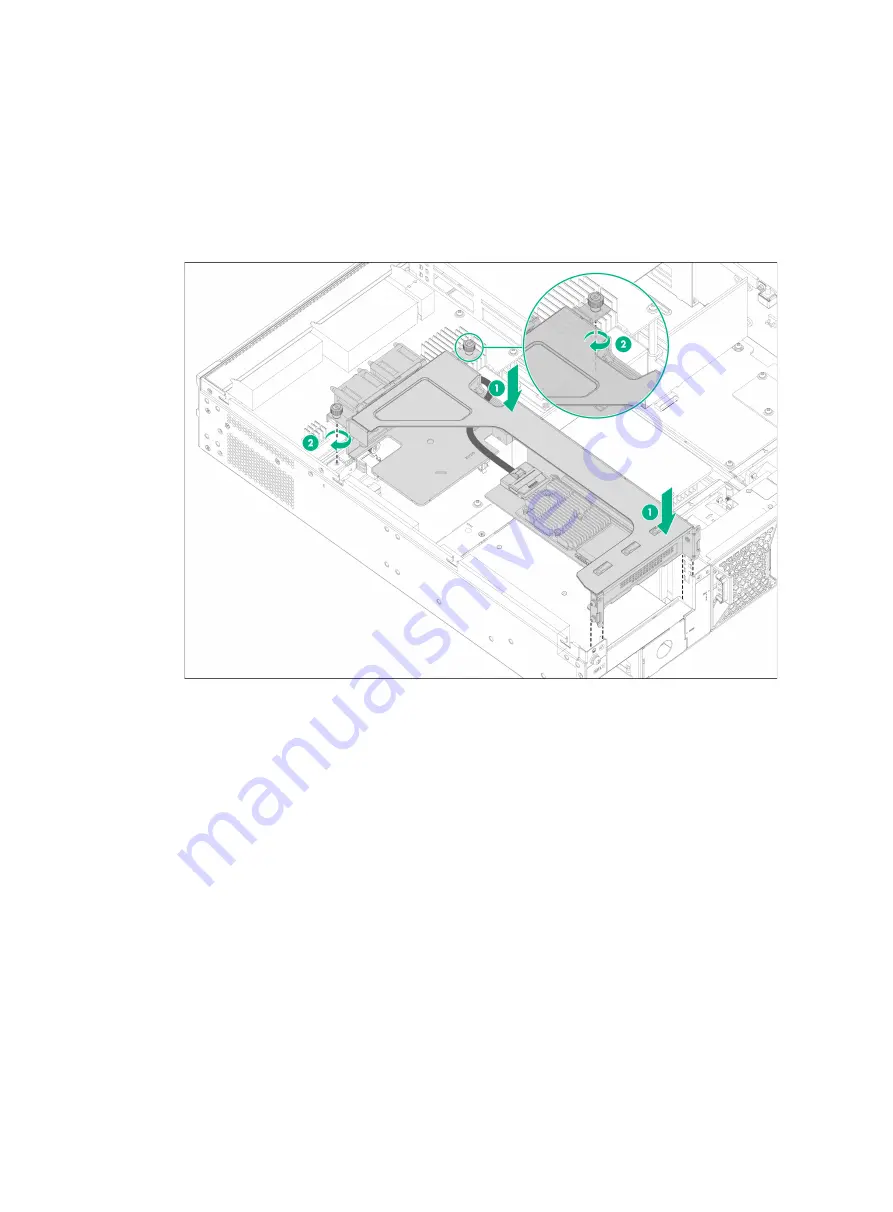
Install the riser module installed with the storage controller in the device: 

a. 

Align the front tabs of the riser module with the guide rails on the system board and align the 
captive screw with the screw hole on the system board. 

b. 

Align the golden plating of the riser module with the PCIe riser connector on the main board, 
and insert the riser module vertically onto the system board. 

c. 

Fasten the captive screws to secure the riser module to the system board. 

Figure4-7 Installing the riser module in the device 


Содержание SR6602-I AI Series

Страница 1: ...H3C SR6602 I IE AI Powered ICT Converged Gateways Installation Guide New H3C Technologies Co Ltd http www h3c com Document version 5W101 20210811...

Страница 2: ...respective owners Notice The information in this document is subject to change without notice All contents in this document including statements information and recommendations are believed to be acc...

Страница 3: ...you replace with actual values Square brackets enclose syntax choices keywords or arguments that are optional x y Braces enclose a set of required syntax choices separated by vertical bars from which...

Страница 4: ...generic network device such as a router switch or firewall Represents a routing capable device such as a router or Layer 3 switch Represents a generic switch such as a Layer 2 or Layer 3 switch or a...

Страница 5: ...ardware model configuration or software version It is normal that the port numbers sample output screenshots and other information in the examples differ from what you have on your device Documentatio...

Страница 6: ...a workbench 3 7 Grounding the device 3 7 Grounding the device installed on a workbench 3 8 Grounding the device installed in a rack 3 8 4 Installing internal removable components 4 1 Installing a stor...

Страница 7: ...tion 11 4 Displaying memory usage information 11 5 Displaying the fan tray operating status 11 6 Displaying the power supply operating status 11 6 Displaying device temperature information 11 7 Displa...

Страница 8: ...1 1 Figure1 1 Device installation flow End Install the device On a workbench Ground the device Install internal removable components Connect cables Power on the device for the first time Operating cor...

Страница 9: ...oom before installation so you can quickly shut power off when an electrical accident occurs Make sure the operating voltage is in the required range Before powering on the device make sure the device...

Страница 10: ...rap on your wrist 2 Lock the wrist strap tight around your wrist to keep good contact with the skin 3 Secure the wrist strap lock and the alligator clip lock together 4 Attach the alligator clip to th...

Страница 11: ...in three days NOTE Dust particle diameter 5 m The equipment room must also meet strict limits on salts acids and sulfides to eliminate corrosion and premature aging of components as shown in Table2 3...

Страница 12: ...n impedance including the grounding system coupling To prevent EMI use the following guidelines If AC power is used use a single phase three wire power receptacle with protection earth PE to filter in...

Страница 13: ...ded with the device Prepare installation tools yourself as required The screwdrivers of different specifications are required to install the device Prepare flat head screwdrivers with a tip width of 2...

Страница 14: ...bracket at the chassis front 25 mm 0 98 in for the power supply handle at the chassis rear A minimum of 0 6 m 1 97 ft in depth recommended A minimum of 70 mm 2 76 in between the front rack posts and...

Страница 15: ...ion 2 Cable management bracket 3 Mounting bracket Figure3 2 Slide rail and chassis rail 1 Rear end of the slide rail 2 Front end of the slide rail 3 Chassis rail To install the device by using the mou...

Страница 16: ...ts Install cage nuts at the marked positions Figure3 3 Attaching cage nuts to the rack 3 Use a slide rail to mark the cage nut installation positions on the rear rack posts Install cage nuts at the ma...

Страница 17: ...the front end of each slide rail slides a minimum length of 68 mm 2 68 in into the chassis rail Figure3 5 Attaching the chassis rails and mounting brackets to the device 5 One person supports the bot...

Страница 18: ...unting the device To install the device by using the mounting brackets and a rack shelf 1 Wear an ESD wrist strap and make sure the strap makes good skin contact and is reliably grounded 2 Identify th...

Страница 19: ...he mounting brackets to the device 6 Place the device horizontally on the rack shelf Move the device along the rack shelf until the mounting brackets of the device are flush against the front the rack...

Страница 20: ...the device upside down on the workbench and clean the four round holes in the chassis bottom with a dry cloth 2 Attach the four rubber feet to the round holes in the chassis bottom 3 Place the device...

Страница 21: ...e grounding cable Attach the hook to the grounding post and secure the hook with the nut Figure3 12 Grounding the device mounted on a workbench Grounding the device installed in a rack If the device i...

Страница 22: ...3 9 Figure3 13 Grounding the device mounted in a rack...

Страница 23: ...torage controller is installed you can configure RAID by using the controller The device supports RAID levels 0 and 1 For information about RAID configuration see Managing RAID To install a storage co...

Страница 24: ...4 2 4 Connect one end of the storage controller cable to the storage controller Figure4 2 Connecting one end of the storage controller cable to the storage controller...

Страница 25: ...crewdriver to unlock the screw on the locking lever b Press the blue unlock button on the locking lever to release the locking lever and pull the lever upward The access panel will slide back slightly...

Страница 26: ...6 Face the rear panel of the device use a Phillips screwdriver to remove the screws from the riser module blank and lift the riser module blank from the device Figure4 4 Removing the riser module bla...

Страница 27: ...4 5 7 Remove the cable from the drive backplane The cable is used by the system to identify the external SATA drives Keep the removed cable secure Figure4 5 Removing the cable from the drive backplane...

Страница 28: ...the storage controller cable to the drive backplane and use a cable clamp to secure the storage controller cable to the side panel of the storage controller Figure4 6 Connecting the storage controlle...

Страница 29: ...m board and align the captive screw with the screw hole on the system board b Align the golden plating of the riser module with the PCIe riser connector on the main board and insert the riser module v...

Страница 30: ...l a Face the front panel of the device place the access panel on top of the device chassis and align the pegs inside the access panel with the slots on the device side panels b Press the locking lever...

Страница 31: ...ded with the riser module to install a GPU in the riser module The GPU support bracket and screws provided with a GPU might not fit the riser module structure To install a GPU 1 Wear an ESD wrist stra...

Страница 32: ...er module and connect the GPU power cord a Connect the end marked Riser of the GPU power cord to the riser module and then connect the other end of the power cord to the GPU module b Insert the GPU in...

Страница 33: ...er 10 Install the access panel For more information see Installing a storage controller Installing a DIMM CAUTION The DIMMs are not hot swappable IMPORTANT For system identification use the DIMMs reco...

Страница 34: ...ns of 22 60 mm 0 87 2 36 in adjust the stud location in the system board The following procedure installs an M 2 SSD drive with dimensions of 22 80 mm 0 87 3 15 in To install an M 2 SSD drive 1 Wear a...

Страница 35: ...4 13 7 Install the access panel For more information see Installing a storage controller...

Страница 36: ...ll two MIC X interface cards on the FIP module install one first in slot 2 and then another in slot 1 as a best practice Otherwise the access panel of the device might hinder the interface card instal...

Страница 37: ...dure see Installing a FIP module Installing a FIP module CAUTION The FIP modules are hot swappable If you are to install a MIC X interface card on the device first install it on a FIP module and then...

Страница 38: ...ecure Figure5 4 Removing the protective cover 5 Press the red latch to disengage the ejector lever from the FIP module 6 Holding the ejector lever by one hand and supporting the FIP module by the othe...

Страница 39: ...or system identification use SATA drives dedicated for the device Hold a SATA drive by two sides and do not touch any components of the drive or squeeze shake or strike the drive To prevent ESD damage...

Страница 40: ...damage or bodily injury install a power supply as shown in Figure5 7 Figure5 7 Installation procedure The installation procedure is similar for AC and DC power supplies This following procedure insta...

Страница 41: ...ply with the power supply slot Grasp the handle of the power supply with one hand and support its bottom with the other and slide the power supply slowly along the guide rails into the slot The slot i...

Страница 42: ...le tie to secure the power cord to the handle of the power supply 4 Connect the other end of the power cord to an AC power source Figure6 1 Connecting an AC power cord Connecting a DC power cord 1 Wea...

Страница 43: ...wrist strap Make sure the wrist strap makes good skin contact and is reliably grounded 2 Slide the cable clamp onto the tie mount on the power supply 3 Connect the female connector of the power cord t...

Страница 44: ...modules might emit invisible laser light Do not stare into beams or view directly with optical instruments when the device is operating CAUTION Never bend an optical fiber excessively The bend radius...

Страница 45: ...port on the transceiver module to the Tx port and the Rx port on the peer device respectively Figure7 1 Connecting a transceiver module and optical fiber Connecting E1 interface cables The MIC X ET16...

Страница 46: ...is correctly and securely connected The power supplies are compatible with the device and the power source is as required by the device The power cords are correctly connected If part of the network...

Страница 47: ...Table9 1 Serial console cable pinout RJ 45 Signal DB 9 Signal 1 RTS 8 CTS 2 DTR 6 DSR 3 TXD 2 RXD 4 SG 5 SG 5 SG 5 SG 6 RXD 3 TXD 7 DSR 4 DTR 8 CTS 7 RTS CAUTION Identify the mark for the console port...

Страница 48: ...ble is correctly connected The configuration terminal a PC for example has started and terminal parameters have been configured correctly 2 Power on the device During the startup process you can acces...

Страница 49: ...y 1 Wear an ESD wrist strap Make sure the wrist strap makes good skin contact and is reliably grounded 2 Remove the power cord from the power supply 3 Pressing the latch on the power supply towards th...

Страница 50: ...an tray slots Slot FAN3 is reserved for future use As a best practice install a fan tray in both the FAN1 and FAN2 slots When two fan trays are installed on the device you can hot swap one of them To...

Страница 51: ...FIP module only after the remove LED is off To remove a FIP module 1 Wear an ESD wrist strap Make sure the wrist strap makes good skin contact and is reliably grounded 2 Remove all cables from the mod...

Страница 52: ...an ESD wrist strap Make sure the wrist strap makes good skin contact and is reliably grounded 3 Use a Phillips screwdriver to loosen the captive screws on the module 4 Open the two ejector levers of t...

Страница 53: ...t in RAID configuration you must first power off the device To replace a SATA drive 1 Press the red button on the drive tray panel to release the locking lever 2 Hold the locking lever and pull the dr...

Страница 54: ...rewdriver to turn the screw on the locking lever anticlockwise to unlock the lever b Press the blue button on the locking lever and then pull the locking lever backward The access panel will automatic...

Страница 55: ...odule to the chassis Figure10 9 Removing the screws that secure the riser module to the chassis 4 Loosen the captive screws on the riser module and lift the riser module slowly out of the chassis and...

Страница 56: ...rage controller from the riser module 7 Place the removed storage controller on an antistatic mat 8 Install a new storage controller in the PCIe slot on the riser module For the installation procedure...

Страница 57: ...riser module For more information see Replacing a storage controller 5 Place the removed riser module on an antistatic mat 6 Remove the GPU from the riser module a Use a Phillips screwdriver to remov...

Страница 58: ...a GPU If you are not to install a new GPU install a module blank in the PCIe slot and then reinstall the access panel Replacing an M 2 SSD 1 Power off the device 2 Remove the access panel For more in...

Страница 59: ...ss panel Replacing a DIMM 1 Power off the device 2 Remove the access panel For more information see Replacing a storage controller 3 Open the DIMM slot latches and pull the DIMM out of the slot Figure...

Страница 60: ...nt configuration to collect operating information feature by feature or module by module Use the display diagnostic information command to save or display operating information for multiple or all fea...

Страница 61: ...l N A 2 2 N A Absent N A N A Slot 0 RT SR6602 IE Subslot No Board Type Status Max Ports 0 Fixed SubCard on Board Normal 34 Slot 1 RT FIP 30 Subslot No Board Type Status Max Ports 0 Fixed SubCard on Bo...

Страница 62: ...not start up Normal The module is operating correctly Primary Role of the module Master indicates that the module is an MPU Max Ports Number of ports on the module Displaying electrical label informat...

Страница 63: ...name display device manuinfo slot 1 Slot 1 DEVICE_NAME RT FIP 30 DEVICE_SERIAL_NUMBER 210231ADDL0000000011 MAC_ADDRESS 4422 8866 0000 MANUFACTURING_DATE 2020 06 03 VENDOR_NAME H3C Table11 2 Command ou...

Страница 64: ...e 2884720 29714112 Swap 0 0 0 Container memory statistics are measured in KB Slot 0 Total Used Free UsageRatio Mem 32598832 528824 28514480 1 6 Table11 4 Command output Field Description Mem Memory us...

Страница 65: ...sname display fan Fan No State Speed 1 Normal 50 2 Normal 50 Table11 5 Command output Field Description Fan No Slot number of the fan tray State State of the fan tray Normal The fan tray is operating...

Страница 66: ...not support this field this field displays NA WarningLimit Warning temperature threshold If the device does not support this field this field displays NA AlarmLimit Alarming temperature threshold If...

Страница 67: ...n this mode the device directly overwrites the target next startup configuration file If a reboot or power failure occurs during this process the next startup configuration file is lost You must speci...

Страница 68: ...command Schedule a reboot to occur at a specific time or date or after a delay by using the schedule reboot command Power off and then power on the device This method cuts off the power of the device...

Страница 69: ...l not be recovered RAID 1 also known as drive mirroring generates an ISO image file on another drive while data is being written to one drive If the current drive fails the system will read and write...

Страница 70: ...d all member drives will be used as a whole Reading and writing data to one of the member drives is equivalent to reading and writing data to all member drives After the RAID array is created the orig...

Страница 71: ...dir hdb0 Directory of hdb0 EXT4 Directory of xxx EXT4 indicates that the file system format is EXT4 3 If the file system format of a partition is not EXT4 execute the format command in user view to fo...

Страница 72: ...er Figure12 6 Storage controller configuration screen Table12 2 Option description Option Description Controller Details Allows you to view storage controller configuration information Configure Contr...

Страница 73: ...he spacebar to select drives and then press Enter Figure12 8 Selecting drives 6 Select RAID 0 or RAID 1 as required and then press Enter Figure12 9 RAID level configuration The RAID array information...

Страница 74: ...Exiting the RAID configuration screen Deleting a RAID array To remove a member drive from a RAID array and use it as an independent drive you must delete the RAID array on the device To delete a RAID...

Страница 75: ...Figure12 13 If you fail to press Ctrl A in time the system returns to the Bootware screen starts up and enters the CLI Figure12 13 BIOS screen 3 On the storage controller configuration screen as shown...

Страница 76: ...ss Ctrl D to delete the built RAID arrays Figure12 16 Deleting the RAID array 6 Enter Yes to confirm the deletion Figure12 17 Confirming the deletion 7 Press Esc to exit the storage controller configu...

Страница 77: ...can rebuild the RAID array only when the drive status is correct Identifying the drive status 1 Start up the device When the device enters the BootWare screen press Ctrl E as prompted in time to acces...

Страница 78: ...d RAID 0 array first and then create a new RAID 0 array For the method of deleting and creating a RAID 0 array see Creating a RAID array and Deleting a RAID array respectively A RAID 1 array can be re...

Страница 79: ...ails to be powered on and the status LED on the power supply is off Solution To resolve the issue 1 Verify that the power cord is connected correctly and reliably 2 Verify that the power source is as...

Страница 80: ...able is correctly connected 3 Verify that the console cable does not have any issues and the terminal settings are correct 4 If the issue persists contact H3C Support Garbled display Symptom The displ...

Отзывы: