background image

2-27 

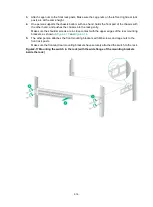
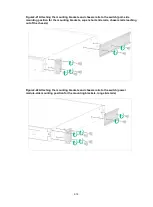
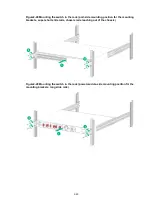
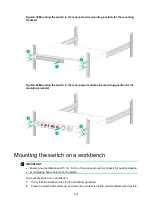
Figure2-35 Mounting the switch in the rack (port-side mounting position for the mounting 
brackets) 


Figure2-36 Mounting the switch in the rack (power module-side mounting position for the 
mounting brackets) 


Mounting the switch on a workbench 


IMPORTANT: 

  Ensure good ventilation and 10 cm (3.9 in) of clearance around the chassis for heat dissipation. 

  Avoid placing heavy objects on the switch. 


To mount the switch on a workbench: 

1. 

Verify that the workbench is sturdy and reliably grounded. 

2. 

Place the switch with bottom up, and clean the round holes in the chassis bottom with dry cloth. 

Содержание S6812 Series

Страница 1: ...H3C S6812 S6813 Switch Series Installation Guide New H3C Technologies Co Ltd http www h3c com Document version 6W100 20220118...

Страница 2: ...espective owners Notice The information in this document is subject to change without notice All contents in this document including statements information and recommendations are believed to be accur...

Страница 3: ...ose syntax choices keywords or arguments that are optional x y Braces enclose a set of required syntax choices separated by vertical bars from which you select one x y Square brackets enclose a set of...

Страница 4: ...s a Layer 2 or Layer 3 switch or a router that supports Layer 2 forwarding and other Layer 2 features Represents an access controller a unified wired WLAN module or the access controller engine on a u...

Страница 5: ...Documentation feedback You can e mail your comments about product documentation to info h3c com We appreciate your comments...

Страница 6: ...nding the switch 2 30 Installing and removing a fan tray 2 30 Installing a fan tray 2 31 Removing a fan tray 2 31 Installing and removing a power module 2 32 Installing a power module 2 32 Removing a...

Страница 7: ...ii Fan tray failure 5 48 Symptom 5 48 Solution 5 48 Configuration terminal display problems 5 49 No display 5 49 Garbled display 5 49...

Страница 8: ...nlet and outlet vents of the switch free of obstruction Connect the yellow green protection grounding cable before power on Make sure the operating voltage is in the required range To avoid electrical...

Страница 9: ...1 describes the dust concentration limits in the equipment room Table1 1 Dust concentration limits in the equipment room Substance Particle diameter Concentration limit Dust particles 0 5 m 3 5 10 6 p...

Страница 10: ...sulfur or chlorine containing insulation cottons rubber mats sound proof cottons and avoid using plasterboards with high sulfur concentration Place fuel diesel or gasoline engines separately Do not p...

Страница 11: ...p Flat blade screwdriver Phillips screwdriver Marker Needle nose pliers Diagonal pliers Installation accessories Before installation make sure you have all the required installation accessories If an...

Страница 12: ...ed All models 2114A01Q Power module filler panel 1 provided All models 04041104 AC power cord The appearance and parameters for AC power cords vary depending on countries and regions The AC power cord...

Страница 13: ...6 BOM code Description Quantity Applicable device models ports 1499A01G QSFP port dust cap Same as the number of QSFP28 ports All models...

Страница 14: ...k mounting procedures at a glance You can install the switch in a rack by using only the two front mounting brackets Additionally you can use rear mounting brackets long slide rails super short slide...

Страница 15: ...ear door Front and rear mounting brackets with the rear mounting brackets reaching out of the chassis 377 mm 14 84 in 174 to 338 mm 6 85 to 13 31 in A minimum of 130 mm 5 12 in between the front rack...

Страница 16: ...unting brackets and extension rail kit 650 to 850 mm 25 59 to 33 46 in Front mounting brackets N A Installation accessories Figure2 4 Front mounting bracket 1 Screw hole for attaching the bracket to t...

Страница 17: ...slide rail and chassis rail 1 Chassis rail 2 Long slide rail Figure2 7 1U super short slide rail and chassis rail 1 Chassis rail 2 Super short slide rail Figure2 8 1U extension rail kit 1 Extension br...

Страница 18: ...sis The switch has one mounting position near the network ports and one mounting position near the power modules for mounting brackets You can select one position as needed To attach the front mountin...

Страница 19: ...een securely attached to the switch chassis See Attaching the front mounting brackets to the chassis 3 Attach cage nuts to the front rack posts 4 One person supports the bottom of the switch and moves...

Страница 20: ...el Align the mounting bracket installation holes with the screw holes in the chassis See Figure2 13 2 Fasten the M4 screws to attach the mounting bracket to the chassis 3 Unpack the shoulder screws an...

Страница 21: ...on for the mounting brackets Attaching the rear mounting brackets to the rack 1 Orient the rear mounting brackets with the wide flange inside or outside the rack as required as shown in Figure2 15 and...

Страница 22: ...rack with the wide flange outside the rack Mounting the switch in the rack 1 Wear an ESD wrist strap and make sure it makes good skin contact and is reliably grounded 2 Verify that the front mounting...

Страница 23: ...into the rack gently Make sure the shoulder screws are in close contact with the upper edges of the rear mounting brackets as shown in Figure2 17 and Figure2 18 5 The other person attaches the front m...

Страница 24: ...e provided M4 screws to attach the mounting bracket to the chassis 2 Place the chassis rail against the chassis side panel Align the chassis rail installation holes with the screw holes Use the provid...

Страница 25: ...itch port side mounting position for the mounting brackets long slide rails Figure2 20 Attaching the mounting brackets and chassis rails to the switch port side mounting position for the mounting brac...

Страница 26: ...ch port side mounting position for the mounting brackets super short slide rails chassis rails reaching out of the chassis Figure2 22 Attaching the mounting brackets and chassis rails to the switch po...

Страница 27: ...e mounting position for the mounting brackets super short slide rails chassis rails reaching out of the chassis NOTE Secure the mounting brackets and chassis rails to both sides of the chassis in the...

Страница 28: ...y that the slide rails have been correctly attached to the rear rack posts See Attaching the long or super short slide rails to the rack 4 Attach cage nuts to the front rack posts and make sure they a...

Страница 29: ...rack port side mounting position for the mounting brackets long slide rails Figure2 27 Mounting the switch in the rack port side mounting position for the mounting brackets super short slide rails cha...

Страница 30: ...ck port side mounting position for the mounting brackets super short slide rails chassis rails reaching out of the chassis Figure2 29 Mounting the switch in the rack power module side mounting positio...

Страница 31: ...the mounting brackets super short slide rails chassis rails reaching out of the chassis Rack mounting by using front mounting brackets and extension brackets and rails Attaching the extension bracket...

Страница 32: ...rackets to the switch port side mounting position for the mounting brackets Figure2 33 Attaching the front mounting brackets and extension brackets to the switch power module side mounting position fo...

Страница 33: ...ounded 2 Verify that the mounting brackets and extension brackets have been securely attached to the switch chassis See Attaching the extension bracket to the chassis 3 Verify that the extension rails...

Страница 34: ...ounting brackets Mounting the switch on a workbench IMPORTANT Ensure good ventilation and 10 cm 3 9 in of clearance around the chassis for heat dissipation Avoid placing heavy objects on the switch To...

Страница 35: ...nding system in the equipment room Do not connect it to a fire main or lightning rod CAUTION To guarantee the grounding effect and avoid switch damage use the grounding cable provided with the switch...

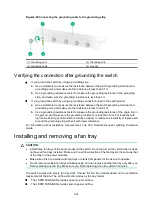
Страница 36: ...Nm IMPORTANT Orient the grounding cable as shown in Figure2 39 so you can easily install or remove the fan tray Figure2 39 Connecting the grounding cable to the chassis 1 Grounding screw 2 Grounding s...

Страница 37: ...is less than 10 For locations with high soil resistivity sprinkle some resistance reducer to reduce soil resistivity or replace soil around the grounding strip with soil with lower resistance For inf...

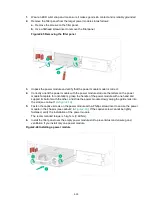
Страница 38: ...d TOP facing up and slide the fan tray along the guide rails into the slot until the fan tray seats in the slot and has a firm contact with the backplane Figure2 41 Installing a fan tray Removing a fa...

Страница 39: ...R180 12A B power modules are available for the switch The installation and removal procedures are the same for the PSR180 12A F and PSR180 12A B power modules The following procedures install and remo...

Страница 40: ...e faceplate for orientation grasp the handle of the power module with one hand and support its bottom with the other and slide the power module slowly along the guide rails into the slot see callout 1...

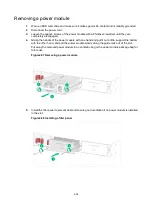
Страница 41: ...the handle of the power module with one hand and pull it out a little support the bottom with the other hand and pull the power module slowly along the guide rails out of the slot Put away the remove...

Страница 42: ...iner clip supplied with the power module into the two holes next to the AC input power receptacle on the power module and pull the retainer clip leftwards see Figure2 49 3 Connect one end of the AC po...

Страница 43: ...tion around the switch and the rack or workbench is stable The grounding cable is securely connected The correct power source is used The power cords are correctly connected All the interface cables a...

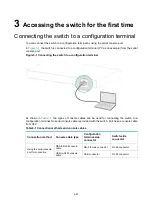
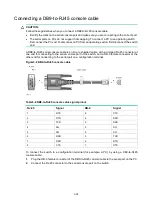
Страница 44: ...configuration terminal As shown in Table3 1 two types of console cables can be used for connecting the switch to a configuration terminal No serial console cable is provided with the switch Purchase a...

Страница 45: ...ith a crimped RJ 45 connector at one end for connecting to the serial console port of the switch and a DB 9 female connector at the other end for connecting to the serial port on a configuration termi...

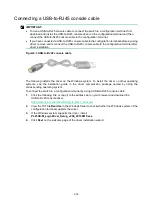
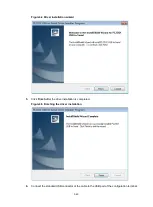
Страница 46: ...lowing installs the driver on the Windows system To install the driver on other operating systems see the installation guide in the driver compression package named by using the corresponding operatin...

Страница 47: ...er installation wizard 5 Click Finish after the drive installation is completed Figure3 5 Finishing the driver installation 6 Connect the standard USB connector of the cable to the USB port of the con...

Страница 48: ...ns are met All fan tray slots have a fan tray installed The power cord is correctly connected The input power voltage meets the requirement of the switch The console cable is correctly connected The c...

Страница 49: ...an IRF fabric Step Description 1 Plan IRF fabric setup Plan the installation site and IRF fabric setup parameters Planning IRF fabric size and the installation site Identifying the master switch and p...

Страница 50: ...h the S6812 and S6813 series to form an IRF fabric Plan the installation site depending on your network solution as follows Place all IRF member switches in one rack for centralized high density acces...

Страница 51: ...e an IRF port you must bind a minimum of one physical port to it When connecting two neighboring IRF member switches you must connect the physical ports of IRF port 1 on one switch to the physical por...

Страница 52: ...vary by port type SFP ports SFP transceiver modules and optical fibers or SFP cables For the available transceiver modules and cables see ports in Hardware Information and Specifications QSFP28 ports...

Страница 53: ...r switches in a ToR solution You can install IRF member switches in different racks side by side to deploy a top of rack ToR solution Figure4 6 shows an example for connecting four top of rack IRF mem...

Страница 54: ...lanned Accessing the IRF fabric to verify the configuration To verify the basic functionality of the IRF fabric after you finish configuring basic IRF settings and connecting IRF ports 1 Log in to the...

Страница 55: ...tch is in an acceptable range and the power module has good ventilation 4 If the issue persists contact H3C Support 5 To replace a failed power module see Installing and removing a power module Fan tr...

Страница 56: ...e is connected correctly 3 Verify that the console cable does not have any problems and the terminal settings are correct 4 If the issue persists contact H3C Support Garbled display Symptom The config...

Страница 57: ...6813 48X6C 2 6 3 FRUs and compatibility matrixes 3 7 Removable power modules 3 7 Removable fan trays 3 7 4 Ports and LEDs 4 9 Ports 4 9 Console port 4 9 Management Ethernet port 4 9 USB port 4 9 SFP p...

Страница 58: ...fications Table1 2 Technical specifications Item S6812 24X6C S6812 48X6C S6813 24X6C S6813 48X6C Dimensions H W D 44 440 360 mm 1 72 17 32 14 17 in Weight 5 5 kg 12 13 lb 6 kg 13 22 lb 6 kg 13 22 lb 6...

Страница 59: ...le AC input 162 W Dual AC inputs 163 W Single AC input 143 W Dual AC inputs 145 W Single AC input 176 W Dual AC inputs 177 W Melting current of power supply fuse 6 3 A 250 V 6 3 A 250 V 6 3 A 250 V 6...

Страница 60: ...S6812 24X6C switch comes with power module slot 1 empty and power module slot 2 installed with a filler panel You can install one or two power modules for the switch as required In Figure2 2 two PSR1...

Страница 61: ...8X6C switch comes with power module slot 1 empty and power module slot 2 installed with a filler panel You can install one or two power modules for the switch as required In Figure2 4 two PSR180 12A B...

Страница 62: ...4X6C switch comes with power module slot 1 empty and power module slot 2 installed with a filler panel You can install one or two power modules for the switch as required In Figure2 6 two PSR180 12A B...

Страница 63: ...8X6C switch comes with power module slot 1 empty and power module slot 2 installed with a filler panel You can install one or two power modules for the switch as required In Figure2 8 two PSR180 12A B...

Страница 64: ...ys you have installed on the device Removable power modules The S6812 S6813 switch series provides power module slots and uses removable power modules Select power modules for the switches as required...

Страница 65: ...he port side Input voltage 12 V Maximum power consumption 9 8 W Reference H3C LSPM1FANSA SN LSPM1FANSB SN Fan Trays User Guide LSPM1FANSB SN fan tray Dimensions H W D 40 40 6 105 mm 1 57 1 60 4 13 in...

Страница 66: ...edium and max transmission distance 100 m 328 08 ft over category 5 or higher twisted pair cable Compliant standard IEEE 802 3i IEEE 802 3u IEEE 802 3ab Functions and services Switch software and Boot...

Страница 67: ...l bandwidt h MHz km Max transmis sion distance SFP copper transceiver module SFP GE T N A RJ 45 Twisted pair cable N A 100 m 328 08 ft SFP GE T D N A RJ 45 Twisted pair cable N A 100 m 328 08 ft SFP f...

Страница 68: ...gle mode 9 125 N A 40 km 24 86 miles SFP GE LH40 SM1310 D 1310 LC Single mode 9 125 N A 40 km 24 86 miles SFP GE LH40 SM1310 I 1310 LC Single mode 9 125 N A 40 km 24 86 miles SFP GE LH40 SM1550 1550 L...

Страница 69: ...BIDI and SFP GE LX SM1490 BIDI SFP GE LH40 SM1310 BIDI and SFP GE LH40 SM1550 BIDI SFP GE LH70 SM1490 BIDI and SFP GE LH70 SM1550 BIDI Table4 4 10 GE SFP transceiver modules available for the SFP por...

Страница 70: ...M1 330 BIDI TX 1330 RX 1270 LC Single mode 9 125 N A 10 km 6 21 miles SFP XG LH40 S M1270 BIDI TX 1270 RX 1330 LC Single mode 9 125 N A 40 km 24 86 miles SFP XG LH40 S M1330 BIDI TX 1330 RX 1270 LC Si...

Страница 71: ...ilable for the SFP ports Cable description Cable length SFP XG D AOC 7M 7 m 22 97 ft SFP XG D AOC 10M 10 m 32 81 ft SFP XG D AOC 20M 20 m 65 62 ft NOTE As a best practice use only H3C SFP SFP transcei...

Страница 72: ...ft QSFP 100G LR4 WDM13 00 Four lanes 1295 1300 1304 1309 LC Single mode 9 125 N A 10 km 6 21 miles QSFP 100G LR4 WDM13 00 A Four lanes 1295 1300 1304 1309 LC Single mode 9 125 N A 10 km 6 21 miles QS...

Страница 73: ...R4 MM850 850 MPO PC polished 12 fiber Multi mode 50 125 2000 300 m 984 25 ft 4700 400 m 1312 33 ft QSFP 40G BIDI SR MM850 850 LC Multi mode 50 125 2000 100 m 328 08 ft 4700 150 m 492 12 ft QSFP 40G LR...

Страница 74: ...FP transceiver modules QSFP cables and QSFP to SFP cables available for the QSFP ports contact H3C Support or marketing staff You can use a QSFP 40G SR4 MM850 or QSFP 40G CSR4 MM850 transceiver module...

Страница 75: ...A link is present on the port and the port is operating at 100 Gbps Flashing green The port is sending or receiving data at 100 Gbps Steady yellow A link is present on the port and the port is operati...

Страница 76: ...4 19 Status Description Off The fan tray is operating correctly or no power is being input...

Страница 77: ...ns that match the heat dissipation requirements at the installation site You must fully configure fan trays for these switches and the fan trays on a switch must be the same model Table5 1 Cooling sys...

Отзывы: