background image

Installation Manual 
Neocean IX1000 Network Storage System 

Chapter 4  Initial Configuration and System Startup Information


4-4 


  Note: 

z


Figure 4-2

 is only a network diagram. In practice, you can connect the client PC and 

the IX1000 with an Ethernet cable or through a switching device. 

z


You are recommended to use the FE port of the IX1000 as the management port. 


4.2.2  Setting HyperTerminal Parameters 

The following example, based on Windows 2000 HyperTerminal running on the PC, 
describes the settings of terminal parameters. 

The specific setting procedure is as follows: 

1) Select 

[Start/Programs/Accessories/Communication/HyperTerminal] and click 


to create a new connection. 

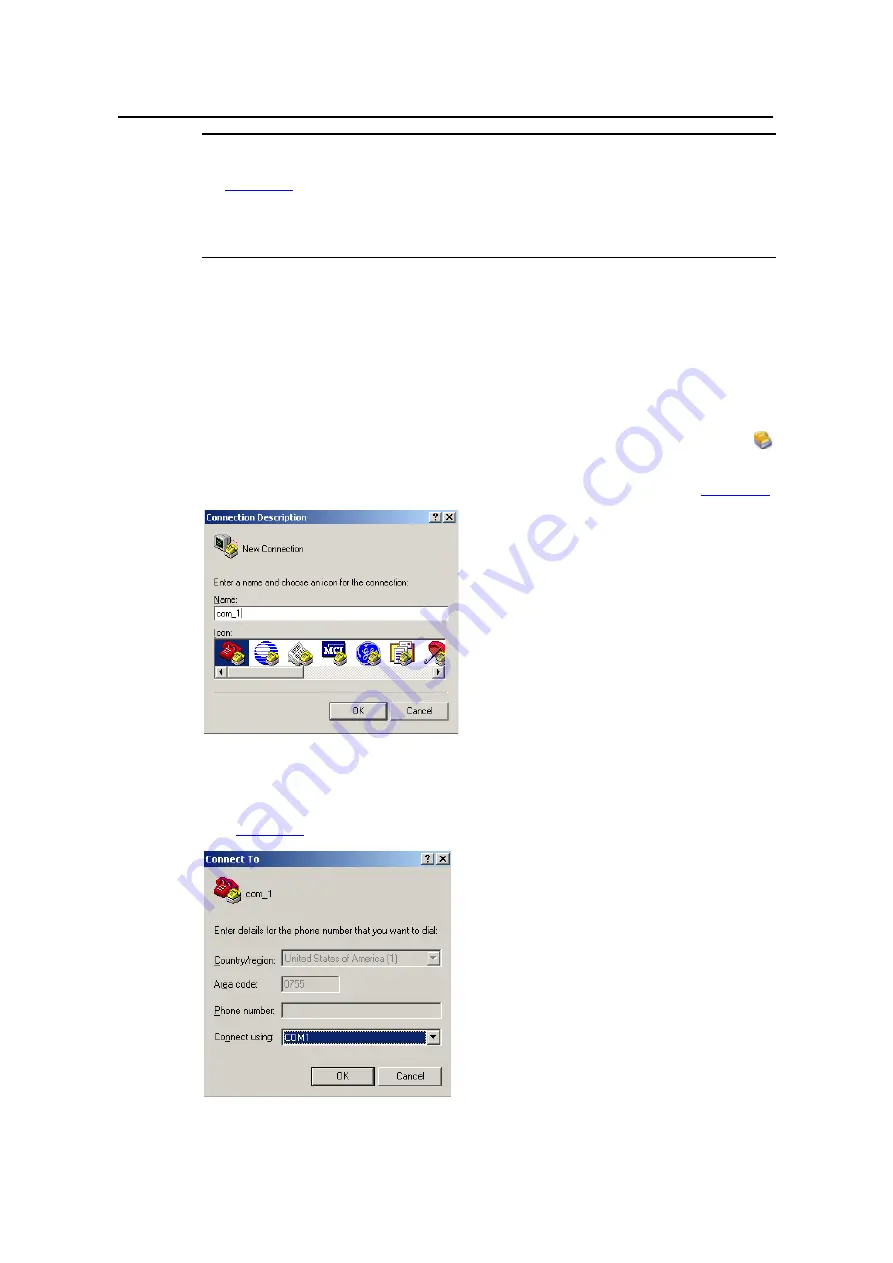
The system displays the Connection Description interface, as shown in 

Figure 4-3


Figure 4-3 

HyperTerminal connection description 

2)  Enter the name of the new connection and click <OK>. On the interface shown in 

Figure 4-4

, select a serial port from the [Connect using] dropdown list box. 


Figure 4-4 

Serial port setting in HyperTerminal 

Содержание Neocean IX1000

Страница 1: ...Neocean IX1000 Network Storage System Installation Manual Hangzhou H3C Technologies Co Ltd http www h3c com Manual Version T2 08048L 20070430 C 1 03...

Страница 2: ...TiGem InnoVision and HUASAN are trademarks of Hangzhou H3C Technologies Co Ltd All other trademarks that may be mentioned in this manual are the property of their respective owners Notice The informa...

Страница 3: ...IX1000 3 Installing an IX1000 Describes the method of installing an IX1000 and its cables 4 Initial Configuration and System Startup Information Describes the initial configuration and startup informa...

Страница 4: ...y injury Caution Means reader be careful Improper operation may cause data loss or damage to equipment Note Means a complementary description Environmental Protection This product has been designed to...

Страница 5: ...tallation Site 2 3 2 2 1 Temperature Requirements 2 3 2 2 2 Humidity Requirements 2 3 2 2 3 Cleanness Requirements 2 4 2 2 4 Electromagnetic Susceptibility 2 5 2 2 5 Grounding Requirements 2 5 2 2 6 P...

Страница 6: ...bles 3 18 3 10 1 Use Correct Labels 3 18 3 10 2 Requirements on Cable Bundling 3 18 3 11 Verifying the Installation 3 21 Chapter 4 Initial Configuration and System Startup Information 4 1 4 1 Initial...

Страница 7: ...erformance All these features enable it to provide users with cost effective network storage solutions IX1000 is designed for z Small and medium sized enterprises IX1000 can be used for databases file...

Страница 8: ...ng LED ID LED 12 Reset button 13 Power button 14 Grounding terminal 15 PCI X slot two Figure 1 2 The rear view of an IX1000 1 2 2 Power Module The power module accepts AC input Rated voltage range 100...

Страница 9: ...lid ON The disk has failed z Blinking once per second Data is being synchronized or reconstructed in the array where the disk resides II Ethernet port LEDs As shown in Figure 1 2 an IX1000 provides fo...

Страница 10: ...Blinking once per second AC power supply is provided but the system is not powered on z Solid ON The system is powered on Positioning LED Blue z Solid ON System positioning is being performed from the...

Страница 11: ...t counted in Power consumption 562 W Power module 100 VAC to 127 VAC or 200 VAC to 240 VAC 50 Hz or 60 Hz Power of the power module 700 W Weight z Weight with no disk installed 22 7 kg 50 0 lb z Weigh...

Страница 12: ...tools away from walk areas z Never perform any operation that may harm you or your device z Ensure that you are fully aware of what you are going to do and obtain necessary authorization before instal...

Страница 13: ...ignal pins in the socket for fear of the chips on the disk interface board being damaged by ESD z Before manipulating a disk make sure that the chassis is well grounded and that you wear an ESD preven...

Страница 14: ...temperature 40 C to 70 C 40 F to 158 F Long lasting high temperature will speed up the aging of the insulating materials greatly lowering the reliability of the device and seriously shortening its ser...

Страница 15: ...tion which may result in poor contact of connectors or metal contact points This happens more frequently when indoor relative humidity is low which will not only shorten the service life of the switch...

Страница 16: ...z Keep the device far away from any radio transmitter radar transmitter or high frequency large current device Note Take electromagnetic shielding measures when necessary 2 2 5 Grounding Requirements...

Страница 17: ...tallation Manual Neocean IX1000 Network Storage System Chapter 2 Installation Preparation 2 6 Caution An IX1000 comes with a set of ESD preventive wrist strap You need to prepare other installation to...

Страница 18: ...1 Chapter 3 Installing an IX1000 3 1 Installation Flow Figure 3 1 Flow of installing an IX1000 3 2 Verification Before Installation Before the installation of an IX1000 make sure that you have read C...

Страница 19: ...ver of an IX1000 without permission If you want to open the chassis you should contact the local agent of H3C for permission Otherwise H3C shall not be held liable for any consequence caused thereby F...

Страница 20: ...f the buckle is shown in Figure 3 4 Move it near the mounting brackets of the power module on the rear panel of the IX1000 chassis as shown in Figure 3 5 2 Press the two sides of the buckle hardly wit...

Страница 21: ...1 Power module mounting bracket 2 Bracket hole 1 3 Bracket hole 2 4 Bucket installation completion diagram Figure 3 5 Power cable buckle installation Note After you plug the power cable into the powe...

Страница 22: ...s for fastening the mounting brackets are delivered along with the mounting brackets II Installation 1 When installing a mounting bracket make sure its handle is on the front 2 Press the side of the m...

Страница 23: ...is fixed firmly 4 Mounting brackets are fixed firmly 3 4 Installing an IX1000 in a Standard 19 Inch Rack You can install an IX1000 in a standard 19 inch rack by using tray mounted slide rails This ins...

Страница 24: ...le 2 Rear mount angle 3 Tray of the left tray mounted slide rail 4 Rail end Figure 3 8 Install tray mounted slide rail 1 Caution As shown in Figure 3 9 pay attention to the position of the slide rail...

Страница 25: ...arry it in front of the rack 3 Lift the IX1000 a little higher than the predefined installation position and put the end part of the device onto the tray mounted slide rails Uplift the front part a li...

Страница 26: ...ell earthed z Your IX1000 is ready and has been moved to a place near the workbench and convenient for moving 3 5 2 Installation Procedure To install an IX1000 on a workbench perform the following ste...

Страница 27: ...stallation z Wear an ESD preventive wrist strap as shown in Figure 3 14 z Remove the blank panel on the bay if any z The screws on the two sides of the disk are firmly fixed and the ejector lever for...

Страница 28: ...sert it and push it steadily inwards as shown in Figure 3 16 Figure 3 16 Inserting a disk into the disk bay 3 Keep pushing in the disk When the disk handle touches the slide rails and starts to close...

Страница 29: ...installation according to the item listed in Table 3 2 The item should be in normal state Table 3 2 Disk installation check list Check item Check result Number Item Yes No Remarks 1 All disks are inst...

Страница 30: ...000 at different places Note The following figures illustrate the methods for grounding an IX1000 by using the grounding terminal or the power inputs rather than indicating the specific positions of t...

Страница 31: ...corrosion protection 1 2 5 3 4 1 2 5 3 4 1 Power input 2 Grounding terminal 3 Protection ground cable 4 Earth 5 Angel iron Steel pipe Figure 3 19 Grounding an IX1000 by burying a grounding body into...

Страница 32: ...Step 1 Connect one end of the chassis ground cable which was shipped with the IX1000 to the grounding terminal on the rear of the chassis and the other end to the grounding system as close to the devi...

Страница 33: ...000 UPS AC power cord Figure 3 22 Connecting an IX1000 to an UPS device Finally check whether the PWR LED on the rear panel of the IX1000 is blinking If the LED is blinking this means that the power c...

Страница 34: ...he RJ 45 connector of the console cable to serial port 2 of your IX1000 Note z A PC serial port does not support in service connection disconnection of a cable therefore do not plug unplug the console...

Страница 35: ...ed to route all interface and service cables separately from the chassis power cords as indicated by the arrows in Figure 3 24 You can bundle the long cables with cable ties and stick a label to the p...

Страница 36: ...an route them in a cross over manner In the case of parallel routing the space between the power cables and the signal cables should be at least 30 mm 1 2 in z The cable clamp rails and cable manageme...

Страница 37: ...ing example 3 z Spare cables or excessive cable parts should be folded and bound to an appropriate place in the cabinet or on the cable management ducts Appropriate place refers to a place where the c...

Страница 38: ...nd the cable z Do not use tapping screws to fasten a wiring terminal z The power cables of the same type and in the same direction should be bundled together and kept neatly and straight in the bundle...

Страница 39: ...e sure to turn off the power before verifying the installation z Check that the IX1000 is mounted firmly no screw is missing and all screws are fastened firmly z Check that the correct power source is...

Страница 40: ...ts namely one fast Ethernet FE port and four Gigabit Ethernet ports GE1 to GE4 As shown in Figure 4 1 the IX1000 is connected to a client PC in the figure through an Ethernet cable The NeoStor console...

Страница 41: ...ware User s Guide 4 1 2 Setting IP addresses In Figure 4 1 if the PC is connected to the FE port of the IX1000 the IP addresses of the PC and the FE port must be in the same network segment Table 4 1...

Страница 42: ...tion by unauthorized personnel will lead to unpredictable consequences H3C shall not be held liable for any consequence caused thereby 4 2 1 Setting Up the Environment As shown in Figure 4 2 the clien...

Страница 43: ...The following example based on Windows 2000 HyperTerminal running on the PC describes the settings of terminal parameters The specific setting procedure is as follows 1 Select Start Programs Accessor...

Страница 44: ...0 z Data bits 8 z Parity None z Stop bits 1 z Flow control None Figure 4 5 Serial port properties 4 Click OK The system displays the HyperTerminal window as shown in Figure 4 6 Properties Properties F...

Страница 45: ...em check that z The power cable is connected correctly z The voltage of the power supply meets the requirement of the IX1000 z The console cable is connected correctly the terminal for configuration w...

Страница 46: ...e IX1000 system is started normally by viewing the information above Warning The following system startup information is provided for you to view only No manual intervention is required during the sys...

Страница 47: ...IX1000 represents the storage appliance and 14 represents the BIOS 1 4 version 3 RAID information After the information Figure 4 9 is displayed HyperTerminal displays the prompt information for RAID...

Страница 48: ...etup information Warning In Figure 4 9 press the key F4 The window shown in Figure 4 12 appears The words in the red ellipse indicate that the system will enter the CMOS Setup window as shown in Figur...

Страница 49: ...Manual Neocean IX1000 Network Storage System Chapter 4 Initial Configuration and System Startup Information 4 10 Figure 4 12 Entering CMOS Setup window Figure 4 13 CMOS Setup window 5 Boot device sel...

Страница 50: ...3 The window shown in Figure 4 14 appears The words in the red ellipse indicate that the boot device selection menu will appear The system displays a boot device list as shown in Figure 4 15 You can o...

Страница 51: ...r Server Event Module OK Starting NeoStor Server Path Manager Module OK Starting NeoStor Server Application OK Starting NeoStor Advanced Backup Module OK Starting NeoStor iSCSI Target Module OK Loadin...

Страница 52: ...apter 4 Initial Configuration and System Startup Information 4 13 The terminal screen gives the following information h3c 1 login This indicates that the system startup process is complete and you can...

Страница 53: ...power supply system is normal z The console cable is connected to serial port 1 of the IX1000 If no error is found it is likely that z The console cable is connected to an incorrect serial port the s...

Страница 54: ...ion z IX1000 supports the in service insertion and removal of power modules z When installing or replacing a power module in the case that the power supply is connected pay attention to the operation...

Страница 55: ...n that position to ensure normal ventilation and heat dissipation of the chassis and prevent dust 3 Take the new power module out of the packing box and ensure that the input mode is of the power modu...

Страница 56: ...back and insert it again Figure 5 2 Installing a power module 5 3 Troubleshooting Disks 5 3 1 Fault Diagnosis You can judge whether a disk is faulty by the status of the disk fault array state LED se...

Страница 57: ...000 chassis proceed as follows 1 Remove the fix screws from both sides of the disk six screws in total 2 Take out the disk by lifting it upwards as shown in Figure 5 3 3 Replace it with a new disk Fas...

Страница 58: ...m Remove and re insert the disk If the disk power positioning Active LED is still OFF in one minute the disk slot is faulty The disk power positioning Active LED is ON normally but the disk cannot be...

Страница 59: ...bles A 1 A 1 Label Material A 1 A 2 Type and Shape A 1 A 2 1 Labels for Signal Cables A 1 A 2 2 Labels for Power Cables A 2 A 3 Filling in Labels A 3 A 3 1 Oil based marker A 3 A 3 2 Font A 3 A 3 3 Wr...

Страница 60: ...the following z Material polyester PET with UL and CSA certifications z Thickness 0 09 mm 0 0035 in z Color chalk white z Ambient temperature 29 C to 149 C 20 2 F to 300 2 F z Laser printing or handw...

Страница 61: ...specify the position information of a cable more clearly For example there is one dividing line between a cabinet number and a frame number another between a frame number and a slot number and so on T...

Страница 62: ...tion the ink of ball pens is apt to leave on labels to blur words Note One end of the two nib oil based marker is larger marked with thin and the other end is smaller marked with extremely thin Make s...

Страница 63: ...able After the label is affixed to the cable the printing area faces to the right or downwards That is the label faces to the right when the cable is laid vertically and downwards when the cable is la...

Страница 64: ...h a large diameter directly affix the label around the cable instead of folding it III Folding the label Fold the label upward along the dotted line and affix it to the cable For the shape see 3 Shape...

Отзывы: