GVA GVAD212 Скачать руководство пользователя страница 12

12 

◆ 

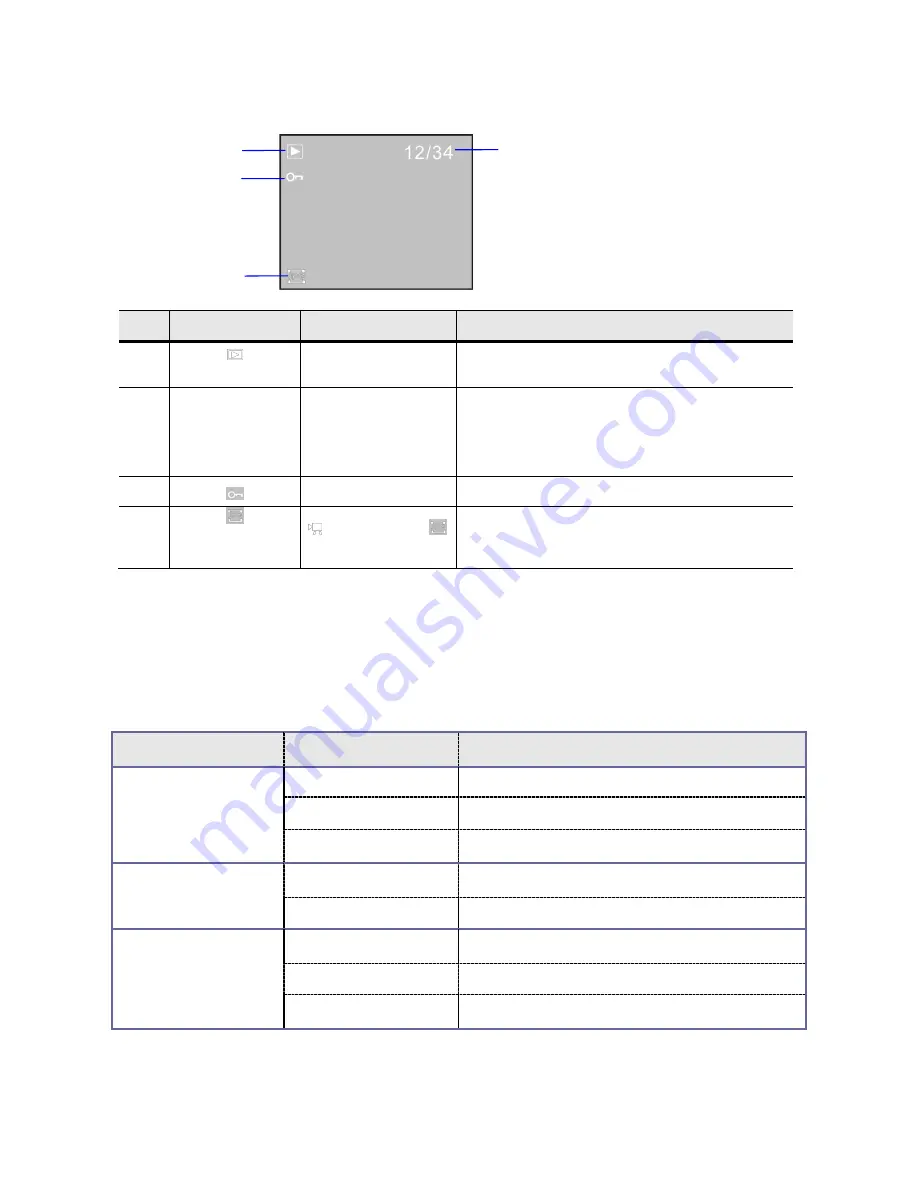
The screen displayed information in playback mode 


Icon 

Icon name 

Description 


Playback mode icon 

Indicates  that  the  playback  mode  has  been 
selected 

12/34 

File number 

Indicates  the  position  of  the  current  file  and  the 
total number of files (a playing timer is displayed 
in the video playing mode) 


File protection 

Indicates that the current file is being protected 


  video file icon, 


photo file icon 

Indicates that the currently selected file is a photo 


  Menu setup 

Press  the  menu  button  to  open  the  main  menu  for  video  recording,  press  the W/T  button  to  select  a 
menu  option,  and  then  press  the  shutter  button  to  enter  the  sub-menu.  In  the  sub-menu,  press  the 
shutter button to confirm and to return to the main menu (or directly press the power button to return to 
the main menu), and press the W/T button to conduct selection. After returning to the main menu, you 
can press the power button to exit the menu. 
In menu selection, the selected menu option will be highlighted. 
Options in playback menu: 

Main menu 

Sub-menu 

Description 

File locking 

Lock/ unlock one 

Lock/ unlock the current file 

Lock all 

Lock all files 

Unlock all 

Unlock all files 

File deleting 

Delete one 

Delete the current file 

Delete all 

Delete all files 

Slide show   

(under photographing 

mode only) 

Start 

Start to play a slide show 

Interval 

1 sec 

– 10 sec 

Repeat 

Y/N 


Содержание GVAD212

Страница 1: ...Instruction Manual Digital Camera GVAD212...

Страница 2: ...has been used previously with other devices cameras ore is brand new the card may require to be formatted Please ensure you have all valuable records before formatting 1 Micro SD Micro SDHC memory car...

Страница 3: ...0 x 480 30fps QVGA 320 x 240 30fps 4 digital zoom Accessories When unpacking the video camera you will see the following main accessories USB cable Installation CD User manual Getting to know your dig...

Страница 4: ...t press to close menu Shutter button Take a photo Start pause video recording Start stop playing Switch over to setup menu confirm menu T button Digital zoom in Select file rightwards Switch over to t...

Страница 5: ...the video recording mode and the playback mode in the playback mode you can press the mode button to switch over back to the photographing mode Video recording In the video recording mode you can pres...

Страница 6: ...mode as MSDC mobile disk or PC CAM pickup head mode and then connect the USB port to the video camera the video camera will accordingly enter the mobile disk or pickup head mode Advanced Operations Ph...

Страница 7: ...currently set exposure compensation value 5 Photo size Indicates the current photo resolution 6 9999 Number of photographabl e photos Indicates the number of remaining photographable photos 7 Card In...

Страница 8: ...g Multi spot metering Spot metering White balance Automatic Automatic white balance is suitable for most cases Daylight Suitable for daylight environment Cloudy Suitable for cloudy environment Fluores...

Страница 9: ...tion 5 00 00 1 Recording time Indicates the remaining recordable time in free state and the used recording time in recording state 6 Card Indicates that a memory card has been inserted and Indicates t...

Страница 10: ...button to exit the menu In menu selection the selected menu option will be highlighted Options in video recording menu Main menu Sub menu Description Movie size 640X480 High resolution format 320X240...

Страница 11: ...mat Language English Setting the menu language to English French Setting the menu language to French Spanish Setting the menu language to Spanish German Setting the menu language to German Italian Set...

Страница 12: ...a menu option and then press the shutter button to enter the sub menu In the sub menu press the shutter button to confirm and to return to the main menu or directly press the power button to return to...

Страница 13: ...nu option SPCA1528 PC Driver in the Start All programs menu where there will be a shortcut icon After the video camera is connected to a computer and enters the pickup head mode you can open the AMCAP...

Страница 14: ...driver Click the Install Driver in the installation guide window and complete the installation step by step according to the instruction Please re start the computer after the driver is installed Aft...

Страница 15: ...nstalled correctly No photographing and video recording can be conducted after the shutter button is pressed No memory card is inserted photographing or video recording can be conducted only after a m...

Страница 16: ...hat we have supplied to the Seller for that purpose and c provide a copy of a proof of purchase to the Seller to whom you are returning the products The best proof of purchase is a tax invoice or rece...

Страница 17: ...t have been paid to you on account of your claim of breach of the Warranty and by returning making the claim for breach of Warranty you agree to this proviso Subject to your rights under the Australia...

Отзывы: