background image

© Guldmann GB/US-941/01/18 • # 944122

© Guldmann GB/US-941/01/18 • # 944122

6

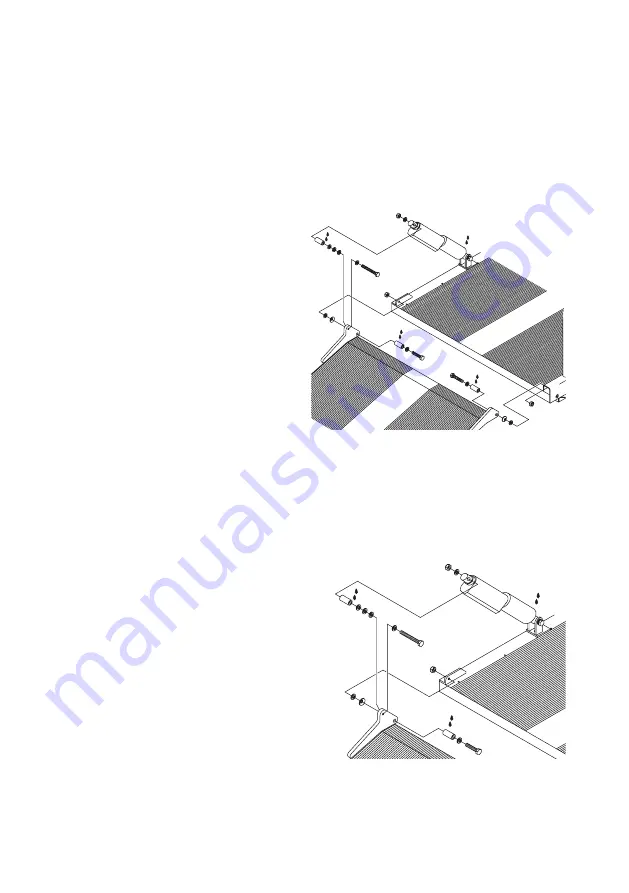
Access ramp, fixing to the lifting platform

1.  Take off all screws, washers, bushings, and nuts which are mounted on the 

hinges of the access ramp. 

2.  Place a washer and a lubricated bushing on the screw and place it in the left 

hinge.

3.  Place the disc washer on the bushing, note: it must not join firmly.

4.  Place washer no. two on the screw and mount it through the hole of the side 

edge.

5.  Mount the nut and tighten it – but not completely.

6.  Place a washer and a lubri-

cated bushing on the screw 

and place it on the right 

hinge.

7.  Place the disc plate on the 

bushing, note: it must not 

join firmly.

8.  Place washer no. two on 

the screw and mount the 

screw in the angle profile.

9.  Mount the nut and tighten it 

completely.

10.  Now tighten completely 

the nut in the safety edge 

described in point 5

Access ramp, mounting of the actuator:

Note: 

components are mounted in correct order on delivery

1.  Lubricate the bushing and place it in the actuator.

2.  Place the washer on the screw and mount it, from the middle of the platform,  

through the top hole of the 

access ramp.

3.  Place the three washers on the 

screw.

4.  Lift up the access ramp to a 

position allowing the screw to 

be pressed through 

the bushing of the actuator.

5.  Place a washer on the screw.

6.  Screw the nut on and tighten it 

completely.

7.  Oil or lubricate the space bet-

ween the bottom of the actuator 

and the hinge.

Oil

Oil

Oil

Oil

Oil

Oil

Oil

Oil

Содержание Stepless LP1

Страница 1: ...1 GB US LP1 Lifting platform Vers 6 00 ...

Страница 2: ...peration electric 8 2 03 Safety Functions 9 2 04 Accessories 10 3 00 Dismantling and Transportation 11 3 01 Transportation 11 3 02 Packaging During Transportation 11 4 00 Maintenance and Storage 11 4 01 Cleaning 11 4 02 Keeping and Storage 11 4 03 How to Avoid Corrosion 11 4 04 What Maintenance is Required by the Owner 11 5 00 Service and Useful Life 12 5 01 Useful Life and Servicing 12 5 02 Fuses...

Страница 3: ...s impractical or too expensive Access and drive off are at opposite ends of the lifting platform For the safety of the user the access ramp acts as a gate and there are handrails on both sides of the LP1 LP1 is designed and produced in accordance with current standards for nego tiating height differences from 0 580 mm LP1 s lifting interval can be adjusted between heights of 100 580 mm depending o...

Страница 4: ...ransport and must be used in accordance with the instructions given in this manual The lifting platform must not be used during fire Safety equipment must only be reset by qualified assistance Playing with or around the lifting platform is not allowed A simple and serviceable Emergency Procedure must be described and agreed between the user and the helper This is to ensure that the user does not g...

Страница 5: ...embled and connected so that it can be raised and lowered only one person may work on it at a time Safety equipment When working under the platform the safety chain strap MUST be used The safety chain strap is fitted be tween the special safety eyelets on the scissors or the two central tubes of the scissors see picture Once the chain strap has been fitted lower the platform until the chain is tau...

Страница 6: ...ot join firmly 8 Place washer no two on the screw and mount the screw in the angle profile 9 Mount the nut and tighten it completely 10 Now tighten completely the nut in the safety edge described in point 5 Access ramp mounting of the actuator Note components are mounted in correct order on delivery 1 Lubricate the bushing and place it in the actuator 2 Place the washer on the screw and mount it f...

Страница 7: ...to the corresponding female plug in the safety edge 3 Tighten the union nut and switch on the current As the noise level of the lifting platform is minimal no steps should be taken to reduce the noise level further during the installation 1 07 Assembly Recessed Lifting Platform If the lifting platform is recessed it must be assembled by the Guldmann Service Team or by an engineer authorised instru...

Страница 8: ...ir user can drive into up onto the lif ting platform without hindrance 2 Activate the hand control by pressing 1 and the access ramp will be raised thereby acting as the drive off lock 3 When the access ramp is right up and 1 conti nues to be depressed the platform will be raised 4 Once the lifting platform is at the correct level it stops automatically and the user can drive off If the lifting pl...

Страница 9: ... a bolt in the actuator Unscrew this bolt and the access ramp will open up See point 1 06 Important When the bolt has been removed from the access ramp the access ramp will no longer be attached Hold the access ramp firmly when removing the bolts Safety curtain Ensures that no one can get in underneath the lifting platform when it is at the upper level and thereby risk getting caught when the lift...

Страница 10: ...sures that the lifting platform can work even if the supply voltage fails In the event of a power failure the battery backup will provide the supply voltage and all functions will be active serviceable as long as there is power in the batteries Important It is important that an indicator lamp is fitted and that this is always visible when the lifting platform is fitted with a battery backup This l...

Страница 11: ...leaning The LP1 can be cleaned with a sponge or brush and soapy water The lifting platform may be sprayed or showered with normal water pressure it may not be rinsed under high pressure Acids bases and solvents should never be used for cleaning 4 02 Keeping and Storage No special requirements The lifting platform contains electronics that must be disposed of according to current rules 4 03 How to ...

Страница 12: ... distributor 5 02 Fuses If the fuse blows the reason for this must be investigated by a competent engineer Fuses should be replaced by qualified personnel before the lifting platform is used again 5 03 General inspection Important The accompanying safety chain strap MUST be used when a ser vice engineer is working under the lifting platform A report of what has been checked and replaced should be ...

Страница 13: ...onclude the inspection 5 04 Trouble Shooting 1 Is the plug from the mains network in the socket Put the plug in the socket 2 Is the socket switched on Switch the socket on 3 Is there power in the socket the fuse may have blown Check the fuses and change the fuse if necessary 4 Is the emergency stop activated The emergency stop is released by turning the switch until it springs up 5 Can the lifting...

Страница 14: ...national standard voltage 230V 115V Power consumption on stand by 6 W Power consumption in operation 192 W Fuse ø5 x 20 mm glass T10A Noise level 52 dB A Cap class Lifting platform components IP 65 Hand control IP 20 Microswitches in hand control IP 67 Permissible operating time operating factor Work Break ratio in percent 15 85 7 00 EC declaration of conformity The product is manufactured in comp...

Страница 15: ...arranty does not cover any part of the equipment which has been sub ject to damage or abuse by the user or others The warranty does not cover any part of the equipment which has been altered or changed in any way by the user or others Guldmann does not warrant that the lifting device functions will meet your requirements be uninterrupted or error free The warranty set forth is in lieu of all other...

Страница 16: ... Guldmann GB US 941 01 18 944122 16 V Guldmann A S Tel 45 8741 3100 Fax 45 8741 3131 E mail info guldmann com www stepless com ...

Отзывы: