background image

15

5 .04 .

Trouble .Shooting

If .the .DH .2000 .does .not .react .when .pressing .the .keys .of .the .hand .con-

trol .?

Check that the plug for the hand control is correctly inserted

If .the .green .light .on .the .bottom .of .the .DH .2000 .does .not .come .on .when .

pressing .the .keys .of .the .hand .control .?

Check that the emergency stop is not activated

Check that the batteries are charged

Check that the charger is on

the hand control could be faulty or a fuse is blown in the hoist

Please contact your local Guldmann representative

If the green light on the bottom of the DH 2000 is still flashing after the 

hoist .has .been .recharged .?

Check that the light on the charger is on when recharging the DH 000

Check that the charger is on

Check that the charging points of the DH 000 have been connected properly 

to the charging station

Please contact your local Guldmann representative

6.00 

Technical Specifications 

Dimension (WxHxL): . . . . . . . . . . . . . . . . . . . . . . . . . . . . . . 350x190x45 mm

Maximum lifting capacity: . . . . . . . . . . . . . . . . . . . . . . . . . . . . . . . . . . . . 175 kg

No. of lifts per charging: . . . . . . . . . . . . . . . . . 100 with 85 kg & 40 with 175 kg

Lifting speed with 85 kg load:  . . . . . . . . . . . . . . . . . . . . . . . .000 mm pr. min.

Lifting interval: . . . . . . . . . . . . . . . . . . . . . . . . . . . . . . . . . . . . . . . . . . 000 mm

Min. distance from pivot joint on the lifting hanger to the ceiling: . . . . 400 mm

Max. distance from pivot joint on the lifting hanger to the ceiling:. . . 400 mm

Total weight of hoist without sling:

without hanger:  . . . . . . . . . . . . . . . . . . . . . . . . . . . . . . . . . . . . . . . . . . .14,5 kg

Lifting hanger:  . . . . . . . . . . . . . . . . . . . . . . . . . . . . . . . . . . . . . . . . . . . .  ,0 kg 

Electrical connection for charger / hoist: . . . . . . . . . . . . . . . . . . . . 30V / 115V

(depending on national voltage standards)

Connection between charger and hoist: . . . . . . . . . . . . . . . . . . . . . . . 4V DC.

Consumption / effect of actuator: . . . . . . . . . . . . . . . . . . . . . . . . . . . . . 40 VA.

Charger, fully automatic:  . . . . . . . . . . . . . . . . . . . . . . . . . . . . 4V DC / 0,5 Ah.

Charging time: . . . . . . . . . . . . . . . . . . . . . . . . . . . . . . . . . . . . . . . Max. 8 hours 

Batteries, gasproof and free of maintenance:   . . . . . . . . . .  pcs 1V / 4,0 Ah

Battery protection at too low a voltage: . . . . . . . . Yes, disconnects below 17V

Permitted periodic load  . . . . . . . . . . . . . . . . . . . . . . . . . . . . . . . . . . . . . . 15/85

(working time / breaks in percentages)

Guarantee  . . . . . . . . . . . . . . . . . . . . . . . . . . . . . . . . . . . . . . . . . . . . . . . .1 year 

©

 G

ul

dm

an

G

B

-8

96

/0

8/

08

 •

 #

 9

00

66

©

 G

ul

dm

an

G

B

-8

96

/0

8/

08

 •

 #

 9

00

66

Содержание 12075-000

Страница 1: ...GB DH 2000 Vers 1 00 ...

Страница 2: ...the hoist 9 2 03 Safety functions 10 2 04 Recharging connecting the hoist 10 2 05 Connection of Charging station 10 2 06 Accessories 11 3 00 Dismantling Transport 12 3 01 Dismantling the hoist 12 3 02 How to transport the hoist 12 3 03 How to package the hoist for transport 12 4 00 Maintenance and storage 12 4 01 Cleaning the hoist 12 4 02 Storing the hoist 12 4 03 Long term storage 13 4 04 How to...

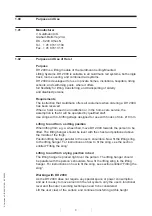
Страница 3: ... hooks of min Ø 8 mm Lifting to and from a sitting position When lifting from e g a wheelchair move DH 2000 towards the person to be lifted The lifting hanger should be level with the chest and positioned above the middle of the thigh Position lifting hanger parallel to the user s shoulders Now fit the lifting sling to the lifting hanger For instructions on how to fit the sling see the section ent...

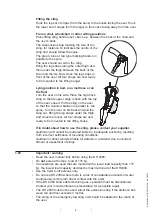
Страница 4: ... his back and pull the sling out Bring the leg straps under the thigh and cross them over All four straps are now ready to be mounted to the lifting hooks If in doubt about how to use the sling please contact your supplier Guldmann A S cannot be rendered liable for inadequate anchoring resulting from incorrect estimation of mounting conditions Guldmann cannot rendered liable for defects or acciden...

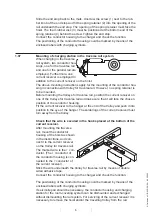
Страница 5: ...harging station Always position the charging station together with an end stop Check that the current receiver on the hoist trolley for traverse rail is turned the right way so that it faces the conductor housing Make a mark on the rail to indicate where the end stop is to be positioned B Loosen the end stop and slide it up the rail Pull the wire of the conductor housing out of the rail and positi...

Страница 6: ...the trolleys for traverse rail and make sure that it will face the chosen position of the conductor housing Fit the current receiver to the hanger at the end of the trolley and push it into position in the eye of the hanger The solderings of the current receiver must turn away from the trolley Check that the wire is secured in the hooks placed at the bottom of the current receiver After mounting t...

Страница 7: ...ing hanger 5 For use with DH 2000 with the oval hook the lifting hanger is model 21190 Loosen the screw remove the pipe and mount the lifting hanger Reposition the pipe and tighten the screw The pipe is mounted as shown below Please make sure that the screw is correctly fixed and fastened after the installation Bath chair bath stretcher or horizontal lifting support are mounted direct on to the ov...

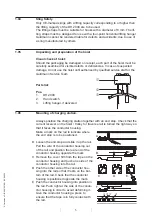
Страница 8: ...ng strap of the hoist B and then wind up the lifting strap of hoist A Once the transfer from one room to the other is carried out one of the lifting straps is unloaded hoist B 4 Disconnect the unloaded strap from the lifting hanger Wind up the lifting strap into the hoist B where it remains until the hook is going to be used again 5 Move the lifting hanger in hoist A up to correct working height a...

Страница 9: ...fting hanger is mounted on the lifting strap Lifting and lowering is activated by pressing and of the hand con trol Transport Transferring along the rail system Transferring and transport of the DH 2000 along the rail is carried out manu ally by the carer The transverse drive motor DH 2000 can be provided with a transverse drive motor which can be build into the hoist The transverse drive motor is...

Страница 10: ...n as possible The DH 2000 is placed at the charging station which is mounted in an appropriate place in the rail system and con nected to the charger When the hoist is run into position in the charging sta tion the hoist will respond with a number of beeps depending on the charging state of the battery At the sound of 3 5 beeps the battery is fully charged At the sound of 6 30 beeps recharging is ...

Страница 11: ... the distance is 3 5 metres between rail and floor you should order an extension strap of 0 5 metres length Switch track The switch track is used when it is necessary to divide a single track rail system into two tracks The manual switch track is activated by pulling one of the strings hanging down from the switch track The DH 2000 is driving in the direction of the string pulled The electric swit...

Страница 12: ... The hoist can be dismantled see section 1 8 3 02 How to transport the hoist The hoist can be dismantled for transport and storage see section 3 1 3 03 How to package the hoist for transport Guldmann recommends that the dismantled hoist is always transported in its original packaging 4 00 Maintenance and storage 4 01 Cleaning the hoist Hoist and lifting hanger can be cleaned using a damp sponge Do...

Страница 13: ...xposed to corrosion 4 05 Maintenance which should be carried out by the owner Check at regular intervals that the lifting strap has no damages If the lifting strap is damaged DH 2000 should not be used The lifting strap must only be exchanged by an atuhorized installer 5 00 Service and Life Span 5 01 Life span and servicing of hoist According to the international standard EN ISO 10535 Hoist for th...

Страница 14: ... and measure the Input Voltage Output Voltage Check electrical functions and signals Check all wirings for errors and defects Check wire lead ins Check all possible conections plugs etc 5 Check the mechanical condition oft the product Clean the product for dirt and other impurities Inspect and evaluate the vital parts of the product Exchange defective and worn Grease the product 6 Mount the cover ...

Страница 15: ...rging station Please contact your local Guldmann representative 6 00 Technical Specifications Dimension WxHxL 350x190x245 mm Maximum lifting capacity 175 kg No of lifts per charging 100 with 85 kg 40 with 175 kg Lifting speed with 85 kg load 2000 mm pr min Lifting interval 2000 mm Min distance from pivot joint on the lifting hanger to the ceiling 400 mm Max distance from pivot joint on the lifting...

Страница 16: ...V Guldmann A S Corporate Office Graham Bells Vej 21 23A DK 8200 Århus N Tlf 45 8741 3100 Fax 45 8741 3131 info guldmann com www guldmann dk Guldmann GB 896 08 08 900662 ...

Отзывы: