background image


MDS86800XW (PIC-00311) 
Revised: 08/31/18

9

• Before each use, check to make sure the 

brakes are working properly.

• Applying pressure on brake handles 

using a pulling up motion the brakes will 
stop the wheels until the brake handle is 
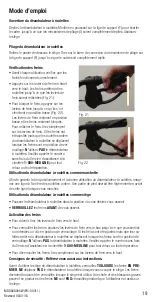
released (Fig 21).

• To lock the brake on, push down on the 

brake handles until they snap into a lower 
position (Fig 22). The brake handles will 
stay in the lower position and the brakes 
will remain locked on. To release the lock, 
simply pull up on the brake handles. If 
the brakes have been adjusted but the 
rear wheels on the rollator move while 
the brakes are in the locked position, 

DO NOT

 use the rollator. Please call our 

toll-free customer service number at 

1-800-MEDLINE

 for returns or repairs.

Operating Instructions

Opening the Rollator

Unfold the Medline rollator by pushing down on the support rod (F) to spread the frame apart until 
the folding brackets (I) are in full extension. Push the seat down into place.

Folding the Rollator

Remove the basket from under the seat. Pull up on the folding bracket tie-bar on the support rod 
(F) until the frame is fully collapsed.

Checking the Brakes

Using the rollator as a walker

For proper positioning and use of your rollator, imagine a line drawn across the back of the rear 
wheels. Part of one foot should be slightly ahead of that line as you walk.

Using the rollator as a seat

• Push the rollator into the position where you want to sit.
• 

LOCK

 the brakes 

BEFORE

 sitting.

To Operate the Brakes

• To slow down, squeeze the brake handles up.
• To lock the brakes, push down on the brake handles until you feel or hear the brakes click 

into locked position. If the brakes have been adjusted but the rear wheels on the rollator move 
while the brakes are in the locked position, 

DO NOT

 use the rollator. Please call our toll-free 

customer service number at 

1-800-MEDLINE

 for returns or repairs.

• To release the brakes from the locked position, simply pull up on the brake handles.

Safety Warnings: Also See Instructions

Before using the seat portion of your rollator, 

ALWAYS

 lock the brakes 

FIRST

DO NOT

 navigate 

the rollator while sitting on the seat. The brakes should always be locked when the seat is being 
used. Risk of fall and serious injury may result if brakes are 

NOT

 locked while the user is sitting 

on the seat.

Fig 21  

Fig 22  

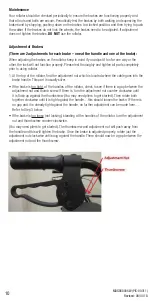
Содержание MDS86800XW

Страница 1: ...R SISTANT MODE D EMPLOI ET GARANTIE ANDADOR BARI TRICO DE PASEO MUY RESISTENTE CON RUEDAS INSTRUCCIONES PARA EL USUARIO Y GARANT A Product is not made with Natural Rubber Latex Ce produit n est pas f...

Страница 2: ...or ground at ALL TIMES This will ensure the rollator is properly balanced The brakes MUST be in the locked position BEFORE sitting on the seat DO NOT sit on the walker if ground is sloped or uneven D...

Страница 3: ...with push buttons 4 Round Knob Screws 2 Triangle Knob Screws 1 Basket Rollator Components A Handgrips B Adjustable Handlebar C Padded Backrest D Brake Cables E Padded Seat F Support Rod G 8 203 mm Fr...

Страница 4: ...arts for shipping damage DO NOT use the rollator if there is apparent damage or if any parts other than the basket are missing If there are missing or damaged parts please call Medline Customer Care t...

Страница 5: ...ront wheel G into the front wheel receptacle Fig 5 and Fig 6 8 Make sure the bolt on the side of the insert goes all the way into the slot Fig 7 Fig 7 9 Insert the round hand screw J Make sure the thr...

Страница 6: ...s the outside of the rollator Fig 9 11 Insert the rear wheel H into rear wheel receptacle The rear wheels have the brake shoe attached which is attached to the cable and the adjustable handlebar Fig 1...

Страница 7: ...tep 9 and insert it into the handlebar receptacle on the same side as the wheel is Fig 14 The brake cable should be on the outside of the rollator running down along the rear leg Align 1 of the holes...

Страница 8: ...shoulders relaxed arms hanging at your side and eyes looking straight ahead Standing in this position the handgrips A of the rollator should be adjusted to a height even with the wrists This will posi...

Страница 9: ...e support rod F until the frame is fully collapsed Checking the Brakes Using the rollator as a walker For proper positioning and use of your rollator imagine a line drawn across the back of the rear w...

Страница 10: ...adjustment nut which is located where the cable goes into the brake handle This part is usually silver If the brake is too tight at the handles of the rollator check to see if there is a gap between...

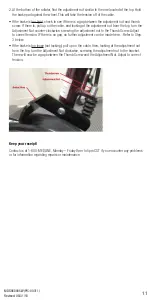
Страница 11: ...t Nut counter clockwise screwing the adjustment nut to the Thumb Screw Adjust to correct tension IF there is no gap no further adjustment can be made here Refer to Step 3 below If the brake is too loo...

Страница 12: ...ENT Le d am bulateur roulettes sera ainsi correctement stabilis Vous DEVEZ verrouiller les freins AVANT de vous asseoir sur le si ge NE vous asseyez PAS sur le d ambulateur si le sol est en pente ou i...

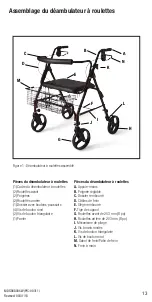
Страница 13: ...boutons poussoirs 4 Vis de bouton rond 2 Vis de bouton triangulaire 1 Panier Pi ces du d ambulateur roulettes A Appuie mains B Poign e r glable C Dossier rembourr D C bles de frein E Si ge rembourr F...

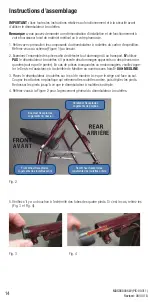
Страница 14: ...quantes autre que le panier En cas de pi ces manquantes ou endommag es veuillez appe ler le Service d assistance la client le de Medline au num ro sans frais 1 800 MEDLINE 3 Placez le d ambulateur ro...

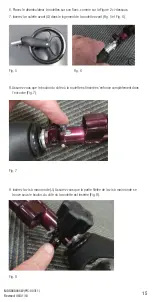
Страница 15: ...e avant G dans le logement de la roulette avant Fig 5 et Fig 6 8 Assurez vous que le boulon du c t o la roulette est ins r e s enfonce compl tement dans l encoche Fig 7 Fig 7 9 Ins rez la vis main ron...

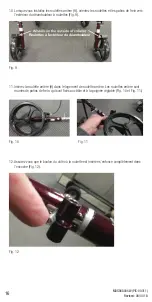
Страница 16: ...lettes Fig 9 11 Ins rez la roulette arri re H dans le logement de roulette arri re Les roulettes arri re sont munies de patins de frein qui sont fix s au c ble et la poign e r glable Fig 10 et Fig 11...

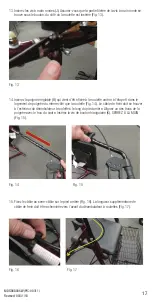
Страница 17: ...ns le logement de poign e du m me c t que la roulette Fig 14 Le c ble de frein doit se trouver l ext rieur du d ambulateur roulettes le long du pied arri re Alignez un des trous de la poign e avec le...

Страница 18: ...s les paules rel ch es les bras le long du corps et regardez devant vous Dans cette position les appuie mains A du d ambulateur roulettes devraient tre la hauteur de vos poignets Les bras seront ainsi...

Страница 19: ...ambulateur roulettes comme marchette Afin de garantir le bon positionnement et la bonne utilisation du d ambulateur roulettes imagi nez une ligne l arri re des roulettes arri re Une partie de pied dev...

Страница 20: ...o le c ble s introduit dans le levier de frein Cette pi ce est g n ralement de couleur argent Si le frein est trop serr v rifiez s il y a un espace entre l crou de r glage et la vis de serrage sur le...

Страница 21: ...serrage Ajustez pour corriger la tension S il n y a aucun espace aucun r glage suppl mentaire ne peut tre effectu Repor tez vous l tape 3 ci dessous Si le frein est trop l che qu il ne se verrouille...

Страница 22: ...acto con el piso o el suelo en TODO MOMENTO Esto garantizar que el andador est equilibrado correctamente Los frenos DEBEN estar en la posici n de bloqueo ANTES de sentarse en el asiento NO se siente e...

Страница 23: ...ondos 2 Tornillos de perilla triangulares 1 Canasta Componentes del andador A Empu aduras B Manillar ajustable C Respaldo acolchado D Cables de freno E Asiento acolchado F Varilla de apoyo G Ruedas de...

Страница 24: ...ieza estuviera da ada o faltara llame al Servicio de Atenci n al Cliente de Medline al n mero gratuito 1 800 MEDLINE 3 Coloque el andador hacia abajo de modo que el asiento quede orientado hacia el su...

Страница 25: ...la rueda delantera G en su recept culo Fig 5 y Fig 6 8 Cerci rese de que el perno en el lado del inserto quede completamente introducido en la ranura Fig 7 Fig 7 9 Inserte el tornillo de mano redondo...

Страница 26: ...ador Fig 9 11 Inserte la rueda trasera H en su recept culo Las ruedas traseras tienen la zapata de freno unida la que a su vez se conecta al cable y al manillar ajustable Fig 10 y Fig 11 12 Cerci rese...

Страница 27: ...trod zcalo en el recept culo del manillar en el mismo lado que la rueda Fig 14 El cable de freno debe estar en el exterior del andador bajando a lo largo de la pata trasera Alinee 1 de los orificios d...

Страница 28: ...s relajados los brazos colgando a los lados y mire hacia adelante De pie en esta posici n la altura de las empu aduras A del andador se debe ajustar para que coincida con la altura de las mu ecas Esto...

Страница 29: ...pletamente abatido Revisi n de los frenos Uso del andador para caminar Para la ubicaci n y el uso adecuados del andador imagine una l nea trazada por la parte posterior de las ruedas traseras Cuando c...

Страница 30: ...te es plateada Si el freno est demasiado ajustado compruebe en los mangos del andador si hay un espacio entre la tuerca de ajuste y el tornillo de pulgar Si hay un espacio gire la tuerca de ajuste en...

Страница 31: ...en el tornillo de pulgar Aj stela para corregir la tensi n SI no hay un espacio no se puede hacer ning n otro ajuste Consulte el paso 3 a continuaci n Si el freno est demasiado flojo no bloquea tire...

Страница 32: ...e fabricado seg n est ndares exactos e inspeccionado exhaustivamente antes de su env o Esta garant a limitada es una expresi n de nuestra confianza en los materiales y la mano de obra de nuestros prod...

Отзывы: