ENGLISH
46
SMART INTER@CTIVE TV 3.0 FEATURE
--------------------------------
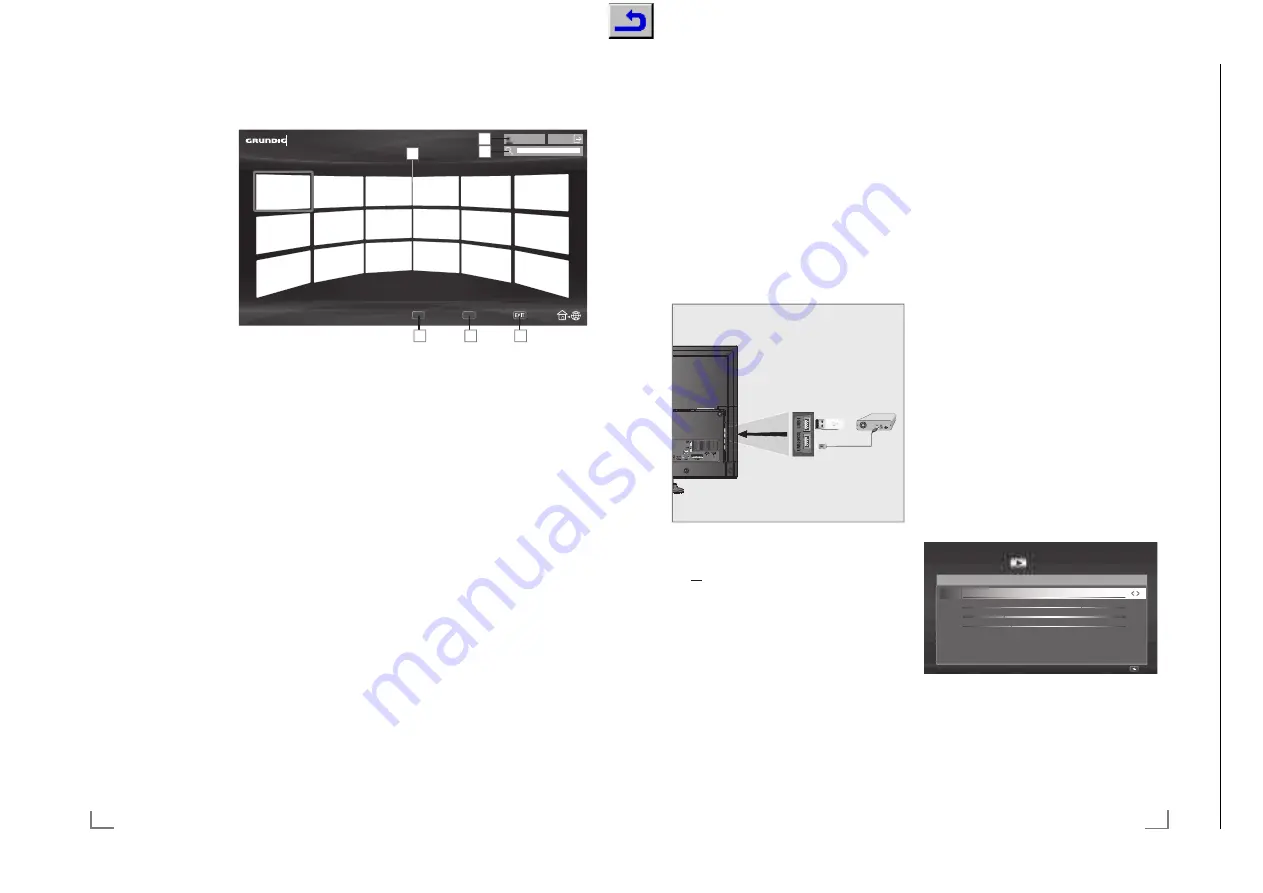
Smart Inter@ctive TV 3.0 browser main menu
1
Applications.
2
Push button to the
Application store.
3
Search
bar.
4
Categories
menu.
5
Tools
menu.
6
Exit.
Navigating in the main menu
1
Press
»
y
« (red) button in »My apps« menu
and select categories with »
<
« or »
>
«.
2
Select the required application with »
V
«,
»
Λ
«, »
<
« or »
>
« and press »
OK
« to con-
firm.
– Main menu of the application will be
displayed after a short while.
3
Usage of application mostly depends on
application’s own structure. Follow the notes
on the screen.
Playback and other options in the
applications
Note:
7
Some applications do not support all play-
ing options, and playing options may vary
among different applications.
1
»
8
« starts playing in the applications;
2
»
!
« pauses playing in the applications;
3
»
7
« stops playing in the applications;
4
In the applications, press »
3
« or »
4
« to
start picture search.
5
In the applications, press »
5
« or »
6
« to
skip forward/backward.
Categories
Tools
Exit
Online Store
My apps
1
2
3
4
5
6
6
»
V
«, »
Λ
«, »
<
«, »
>
« allows sliding of the
navigation keys in the applications and
virtual keyboard.
7
Press
»
OK
« to confirm the selections in
virtual keyboard and applications.
8
»
1…0
« »
y
« (red), »
yy
« (green), »
yyy
«
(yellow), »
yyyy
« (blue) selects/activates
various functions in applications.
9
»
@
« switches off the application and goes
back to »My apps« menu.
10
»
EXIT
« switches off the application and
goes back to the last broadcast source you
were in.
51
ENGLISH
USB RECORDING
-------------------------------------------------------------------------------------------
Connecting external data media
Notes:
7
It is advised to put the television on stand-by
mode before connecting the Skype camera.
7
Before disconnecting the external data me-
dium, the television must first be switched to
standby, otherwise files can be damaged.
7
There are two USB inputs on the television,
namely »
USB1
« and »
USB2 (HDD)
«.
»
USB2 (HDD)
« input is intended for USB
devices that require additional power (e.g.
external hard disk).
1
Plug the external hard disk to the »
USB2
(HDD)
« USB interface of the television;
or
plug the memory stick in one of the »
USB1
«
sockets of the television.
Notes:
7
Both sockets »
USB1
« of the television sup-
ports 500 mA current according to the USB
standard. Devices such as external hard disk
and etc. that consume more power can only
be connected to the »
USB2 (HDD)
« USB
interface of the television.
7
If you are using a power cable for the ex-
ternal hard disk that you have connected to
the »
USB2 (HDD)
« USB interface, then the
power cable of the external hard disk must
also be unplugged when the TV is turned off.
7
You must not disconnect the USB Device
from the TV while a file on the USB Device is
being read by the TV.
USB recording settings
Selecting the menu
1
Open the menu with »
MENU
«.
2
Select the menu item »PRnP« with »
>
« or
»
<
« and press »
OK
« to confirm.
– »Media Player« menu is displayed.
3
Select the option »PVR« with »
>
« or »
<
«
and press »
OK
« to confirm.
– The content is displayed.
4
Press
»
yy
« (green).
– »Media Options« menu is displayed.
Noname
Media Player
PVR
Back
Media Sour
c
e
Info
Total Area (MB)
14.2
Used Area (MB)
13.6
Emp
ty
Area (MB)
0.6
USB DRIVE
Media Options
View Mode
Full Screen
Auto Preview
On
Slide Show Ran
g
e
5
Disk Management
5
Select the line »Disk Management« with
»
V
« or »
Λ
« and press »
OK
« to confirm.
Note:
7
Additional operations are explained in the
following sections.
Chassis KT
GR
UNDIG Ser
vice
1 - 74
Содержание NWJ000
Страница 5: ...GRUNDIG Service Chassis KT 1 5 40 55 UHD...


