❒
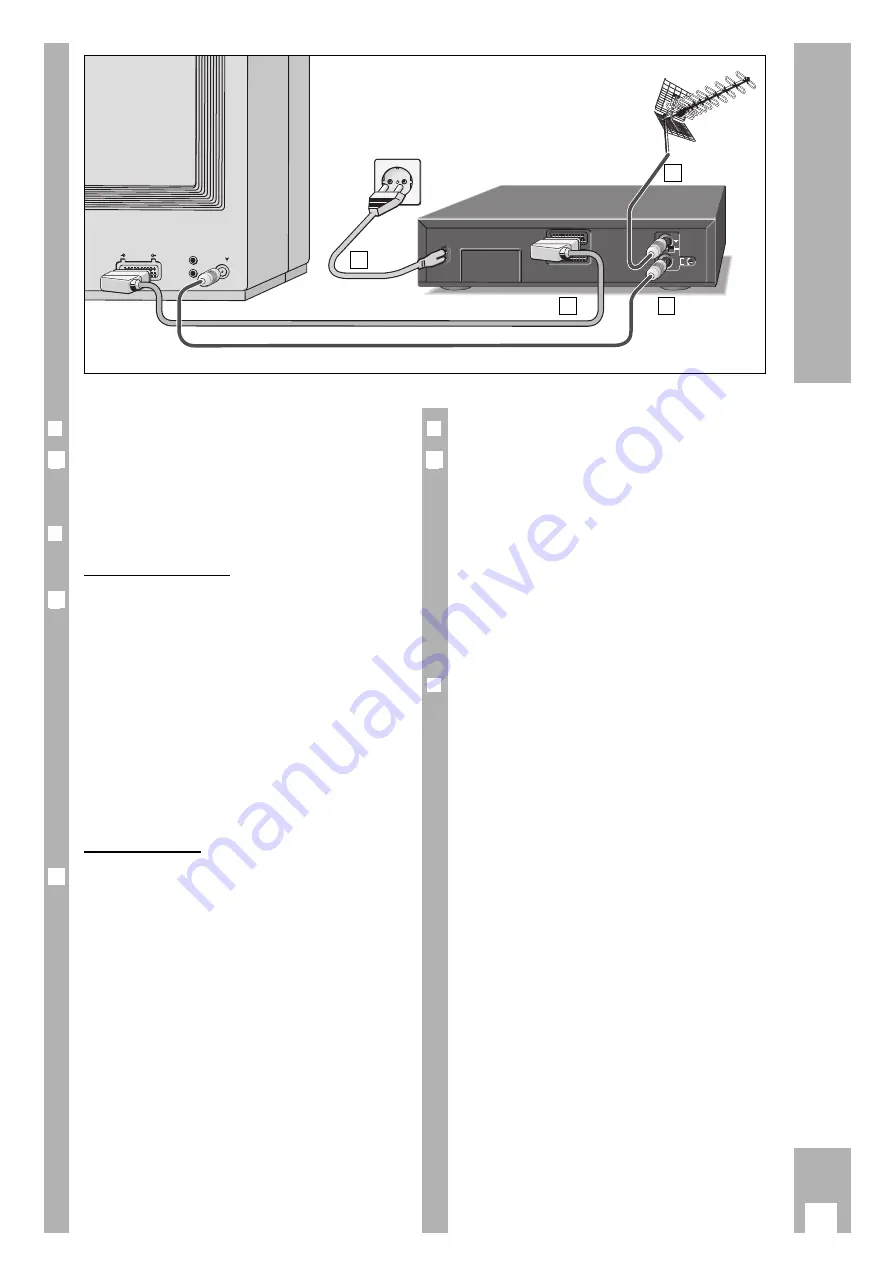
Connecting the recorder to the aerial
Remove the aerial cable from the aerial socket on
the TV set and insert it into the aerial socket –
I I
– on
the recorder.
❒
Connecting the recorder and the TV set
With EURO-AV cable
If the TV set is provided with a EURO-AV socket,
connect this socket using the supplied EURO-AV
cable to the EXT. 1 socket on the recorder.
– The advantage of this connection is even better
picture and sound quality during playback and in
the EE mode (loop-through mode).
w
!
If the connected TV set is provided with Megalogic
functions, recorder and TV set must be connected
using a EURO-AV cable.
Detailed information on the Megalogic functions
can be found in the chapters of the operating
instructions.
With aerial cable
In order that the aerial signal also reaches the TV
set, the supplied aerial cable must be inserted in the
x
socket on the recorder and in the aerial socket
on the TV set.
3
2
1
3
Connecting
❒
Connecting the recorder to the mains
Insert the supplied mains cable into the mains
socket
~
on the recorder.
Insert the plug of the mains cable into the supply
socket. The recorder is now on.
w
!
Only by pulling out the mains plug will the recorder
be isolated from the mains.
w
!
Connecting possibilities for further units such as a
second video recorder, PAY-TV decoder, satellite
receiver, etc. are described in the chapters concer-
ning these units.
❒
Switching the recorder off
(energy-saver mode)
When in stand-by mode – time visible in display on
recorder – press the
¢
8
button on the remote
control or the
i
button on the recorder.
– The recorder is switched off, the time display dis-
appears, the yellow indicator is on.
In this mode the recorder requires very little
power.
w
!
If a TIMER recording is programmed, the recorder
cannot be switched off.
4
x
L
H
SIG
MOD.
FREQ.
EXT 1
EXT 1
EXT 2
EXT 2
EURO-AV
4
2
1
3
Содержание GV 500 SV
Страница 1: ...VIDEORECORDER GV 500 SV...
Страница 31: ...E P GB 3103 166 12721 GV 500 SV 5251 082 B 3 8...


