background image

12

3  Installation

3.1 Appropriate installation 

location

Contact an Authorized Service for 

the installation of the product. In 
order to prepare the product for use, 
refer the information in the user 
manual and ensure that electrical 
installation and water installation are 
appropriate. If not, call a qualified 
electrician and technician to have 
any necessary arrangements carried 
out.

B

WARNING:


Manufacturer shall 
not be held liable for 
damages that may 
arise from procedures 
carried out by 
unauthorized persons.

B

WARNING:


Product 

must not be plugged 
in during installation. 
Otherwise, there is 
the risk of death or 
serious injury!

B

WARNING:


If the 

door clearance of 
the room where the 
product shall be 
place is so tight to 
prevent passing of 
the product, remove 
the door of the room 
and pass the product 
through the door by 
turning it to its side; 
if this does not work, 
contact the authorized 
service.

•  Place the product on an even floor 

surface to prevent jolts.

•  Install the product at least 30 cm 

away from heat sources such as 
hobs, heater cores and stoves and 
at least 5 cm away from electrical 
ovens. 

 •  Product must not be subjected to 

direct sun light and kept in humid 
places.

•  Your product requires adequate air 

circulation to function efficiently. 
If the product will be placed in 
an alcove, remember to leave at 
least 5 cm clearance between the 
product and the ceiling, rear wall 
and the side walls.

• If the product will be placed in 

an alcove, remember to leave at 
least 5 cm clearance between 
the product and the ceiling, 
rear wall and the side walls. 
Check if the rear wall clearance 
protection component is present 
at its location (if provided with 
the product). If the component 
is not available, or if it is lost or 
fallen, position the product so that 
at least 5 cm clearance shall be 
left between the rear surface of 
the product and the wall of the 
room. The clearance at the rear is 
important for efficient operation of 
the product.

•  Do not install the product in places 

where the temperature falls below 
-5°C.

Содержание GRND5052 I

Страница 1: ...GRNE4653 GRNE4653S GRNE5051 GRND5052 I GRND5052 GRNE4302 Buzdolab Kullanma k lavuzu Refrigerator User Manual TR EN 58 5579 0000 AF TR EN...

Страница 2: ......

Страница 3: ...34 5 10 Sebzelik 34 5 11 Hareketli kap raf 35 5 12 Kayar saklama kab 35 5 13 Nem kontroll sebzelik 36 5 14 Otomatik buz makinas 36 5 15 Koku filtresi 37 5 16 Mavi k Vitamin Koruma Teknolojisi 37 5 17...

Страница 4: ...a k lavuzunu kolay ula abilece iniz bir yerde saklay n retici r n zerinde de i iklik yapma hakk n sakl tutar r nle birlikte verilen di er belgeleri de okuyun Bu kullanma k lavuzunun ba ka modeller i i...

Страница 5: ...al d r Bu r n kapal mekanlarda ev ve benzeri yerlerde kullan lmak zere tasarlanm t r rne in Ma azalar n ofislerin ve di er al ma ortamlar n n personel mutfaklar nda iftlik evlerinde Otel motel ve di e...

Страница 6: ...ar n 5 r n devrilmeyecek ekilde muhafaza edin 6 ocuklar n eskimi r n ile oynamas na izin vermeyiniz r n kesinlikle ate e atarak imha etmeyin Patlama tehlikesi vard r r n n kap s nda kilit var ise anah...

Страница 7: ...a k lavuzundaki bilgilere bakarak elektrik tesisat ve su tesisat n n uygun olmas na dikkat edin Tesisat uygun de ilse ehliyetli bir elektrik i ve tesisat a rarak gerekli d zenlemeleri yapt r n Aksi du...

Страница 8: ...klar ndan en az 30 cm uzakta Elektrikli f r nlardan ise en az 5 cm uzakta r n n z koruma s n f I tipi bir cihazd r r n tip etiketinde belirtilen Voltaj Ak m ve Frekans de erine uygun toprakl bir prize...

Страница 9: ...a p sk recek so utma gaz cilt tahri ine ve g z yaralanmalar na sebep olur retici taraf ndan nerilmedik e buzdolab derin dondurucu i ine elektrikli cihazlar koymay n ve kullanmay n Ellerinizin ve g vde...

Страница 10: ...a sebep olabilir Buzdolab n zda Mavi k varsa bu a optik aletlerle bakmay n UV LED lambas na uzun bir s re boyunca do rudan bakmay n Ultraviyole nlar g z yorgunlu una neden olabilir r n kapasitesinden...

Страница 11: ...s t karbonatl gazl i ecekler alkoll i ecekler gibi su p nar yla kullan ma uygun olmayan ba ka bir s v doldurmay n Sa l k ve g venlik riski yaratabilir Kazalar veya yaralanmay nlemek i in ocuklar n su...

Страница 12: ...ne su girmemesine dikkat ediniz Fi u lar ndaki yabanc maddeleri veya tozu silmek i in temiz kuru bir bez kullan n Fi i temizlerken slak veya nemli bir bez kullanmay n Aksi takdirde yang n veya elektri...

Страница 13: ...raf 2 S cakl k ayar d mesi 3 Yumurtal k 4 Su p nar doldurma haznesi 5 Su p nar deposu 6 Kap raf alt saklama kab 7 Hareketli kap raf 8 Ayarlanabilir ayaklar 9 Sebzelik 10 S f r derece b lmesi 11 Kilit...

Страница 14: ...n g ne na maruz b rakmay n ve rutubetli yerde bulundurmay n r n n n verimli al abilmesi i in evresinde uygun bir hava dola m olmal d r r n duvara girintili bir yere yerle tirilecekseniz tavanla ve yan...

Страница 15: ...linde ortaya kacak zararlardan firmam z sorumlu olmayacakt r Elektrik kablosunun fi i kurulumdan sonra kolay eri ilebilir olmal d r Buzdolab n z ile duvar prizi aras nda uzatma kablolu veya kablosuz o...

Страница 16: ...16 10 10 5 4 1 6 4 12 13 3 7 8 9 14 19 19 22 17 180 23 21 16 15 24 24 11 45 2 20 18 3 5 Kap lar n y n n n de i tirilmesi...

Страница 17: ...17 TR 3 6 Kap lar n y n n n de i tirilmesi 1 5 10 11 3 6 7 8 19 18 14 13 9 45 2 17 16 12 4 15 20...

Страница 18: ...Kolayl k ve enerji t ketiminde verimlilik sa lad i in dondurucu b lmenin i inde ve kap s nda bulunan raflar kar lmamal ve herzaman kullan lmal d r Birden fazla se enek olmas durumunda cam raflar arka...

Страница 19: ...n 4 2 lk kullan m Buzdolab n z kullanmaya ba lamadan nce G venlik ve evre talimatlar ve Kurulum b l m ndeki talimatlara uygun haz rl klar n yap ld ndan emin olun r n 6 saat boyunca yiyecek koymadan bo...

Страница 20: ...i 4 C konumunda kullan lmas nerilmektedir Di er ortam s cakl klar nda bu de er ihtiyaca g re art r l p azalt labilir C Bu kullan m k lavuzunda ekiller ematik olup r n n zle birebir uyum i inde olmayab...

Страница 21: ...12 saat a lmaz ise Tatil fonksiyonu otomatik olarak devreye girecektir Fonksiyonu iptal etmek i in d me ayar de i tirilmelidir Tatil fonksiyonu aktifken so utucu b lmede g da saklanmas nerilmez Ayar...

Страница 22: ...u b lme g stergesi 2 Hata durumu g stergesi 3 S cakl k g stergesi 4 Tatil fonksiyon d mesi 5 S cakl k ayar d mesi 6 B lme se im d mesi 7 So utucu b lme g stergesi 8 Ekonomi modu g stergesi 9 Tatil fon...

Страница 23: ...k g stergesinde ibaresi g r n r ve so utucu b lmesinde hi bir aktif so utma i lemi ger ekle tirilmez Bu fonksiyonda yiyeceklerinizi so utucu b lmesinde tutman z uygun de ildir Di er b lmeler bunlar i...

Страница 24: ...sonland rma tu una bas larak uyar silinebilir Herhangi bir d meye bas mla iptal her modelde ge erli de ildir Ayr ca bir sens r ar zas olu tu unda bu g sterge yanar Bu g stergenin yanmas ile birlikte s...

Страница 25: ...r d mesi Bu d meye bas ld nda so utucu b lme s cakl s rayla 8 7 6 5 4 3 2 8 de erlerine ayarlanabilir So utucu b lme s cakl n istedi iniz de ere ayarlamak i in bu d meye bas n 5 Tatil fonksiyonu Tatil...

Страница 26: ...niye bas l tutun C Bu fonksiyon se ili iken su tank ndan su al m duracakt r Ancak buzmatikteki daha nce yap lm buzlar al nabilir 11 H zl dondurma fonksiyonu d mesi buzmatik a ma kapatma d mesi H zl do...

Страница 27: ...kullan m g stergesi s ner 2 Y ksek s cakl k hata uyar s Bu g sterge y ksek s cakl k ar zas durumunda ve hata uyar lar nda yanar Bu g sterge elektrik kesintisi y ksek s cakl k ar zas durumunda ve hata...

Страница 28: ...ktir Bu fonksiyonu iptal etmek i in tekrar tatil fonksiyonu d mesine bas n 6 So utucu b lme s cakl k ayar D meye bas ld nda so utucu b lme s cakl s rayla 8 7 6 5 4 3 2 ve 1 de erlerine ayarlanabilir 7...

Страница 29: ...p l r D meye bas ld nda dondurucu b lme s cakl 18 19 20 21 22 23 ve 24 de erlerine ayarlanabilir 11 H zl dondurma H zl dondurma i lemi i in d meye bas n h zl dondurma g stergesi devreye girecektir H z...

Страница 30: ...da yanar Uzun s re elektrik kesintisi oldu unda dondurucu b lme s cakl n n ula t en s cak de er digital g stergede yan p s ner Dondurucu b lme g dalar kontrol edildikten sonra alarm off d mesine bas l...

Страница 31: ...an z uygun de ildir Di er b lmeler bunlar i in ayarlanm s cakl klara g re so utulmaya devam edecektir Bu fonksiyonu iptal etmek i in tekrar tatil fonksiyonu d mesine bas n 6 So utucu b lme s cakl k ay...

Страница 32: ...l r D meye bas ld nda dondurucu b lme s cakl 18 19 20 21 22 23 ve 24 de erlerine ayarlanabilir 11 H zl dondurma H zl dondurma i lemi i in d meye bas n h zl dondurma g stergesi devreye girecektir H zl...

Страница 33: ...k y n nde evirerek yerine oturtunuz Su buz haznesine d k lecektir Buz olu tuktan sonra buz haznesi d mesini ok y n nde evirerek buzlar n Buz ekmecesine d k lmesini sa lay n z Buz ekmecesini ekerek buz...

Страница 34: ...n tasarlanm t r Fan n al ma zaman r n n z n zelli ine g re farkl l k g sterebilir Baz r nlerde fan sadece kompres r ile birlikte al rken baz lar nda so utma ihtiyac na g re al aca zaman kontrol sistem...

Страница 35: ...tir Raf a a ya da yukar hareket ettiriniz Raf istedi iniz konuma getirdi inizde butonlar b rak n z Raf butonlar b rakt n z yerde tekrar sabitlenecektir 5 12 Kayar saklama kab Bu zellik opsiyoneldir Bu...

Страница 36: ...i i durumlarda po et yerine belirli bir g zeneklili e sahip ka t vb ambalaj malzemeleri kullan n z Elma ba ta olmak zere etilen gaz retimi y ksek olan armut kay s eftali gibi meyveleri di er sebze mey...

Страница 37: ...rsiniz bu da evde yiyecek israf n en aza indirmenize yard mc olur VitaminCare teknolojisinin karanl k periyodu esnas nda buzdolab kap s a ld takdirde buzdolab n z bunu otomatik olarak alg layacak ve m...

Страница 38: ...ola hangi oranda bast rd n za ba l ol du unu l tfen unutmay n Barda n zdaki kab n zdaki su seviye si y kseldik e ta may nlemek i in kol zerindeki bask miktar n hafif e azalt n Kola az miktarda basarsa...

Страница 39: ...an ma uygun olmayan ba ka bir s v doldurmay n Bu t r s v lar kullan l rsa su p nar ar zalanacak ve onar lamaz hasar meydana gelecektir Garanti bu t r kullan mlar kapsamaz Bu t r i ecek s v lardaki baz...

Страница 40: ...r iki taraf ndan tutarak 45 derece a ile yerinden kar n Su deposu kapa n kararak temizleyin C Su deposu ve su p nar bile enleri bula k maki nesinde y kanmamal d r 5 23 Su tepsisi Su p nar kullan l rke...

Страница 41: ...an nce paketlemeye dikkat edin Klasik ambalaj ka tlar yerine dondurucu kaplar n folyolar n ve nem ge irmeyen ka d plastik torba veya di er paketleme malzemelerini kullan n C Dondurucu b lmelerindeki b...

Страница 42: ...G da ambalaj n n hasarl olmamas na dikkat edin 5 26 Derin dondurucu bilgileri IEC 62552 standartlar na g re her 100 litre dondurucu b lme hacmi i in r n n 25 C oda s cakl nda 4 5 kg l k g da maddesini...

Страница 43: ...uyar s hem sesli hem de g rsel olarak kullan c ya g sterilir Uyar 10 dk boyunca devam etti i takdirde i ayd nlatmalar kapan r 5 29 Kap a l y n de i imi Kulland n z yere g re buzdolab n z n kap a l y n...

Страница 44: ...temizlik maddesi kullanmay n z Klor bu t r metal y zeylerde paslanmaya neden olur 6 1 K t kokular n nlenmesi r n n z n retiminde kokuya neden olacak hi bir madde kullan lmamaktad r Ancak uygun olmayan...

Страница 45: ...ap s a k kalm t r r n n kap s n uzun s re a k tutmay n Termostat ok so uk bir de ere ayarlanm t r Termostat uygun de ere ayarlay n Kompres r al m yor Ani elektrik kesilmesinde veya fi in kar l p tak l...

Страница 46: ...kontrol edin So utucu s cakl ok d k ama dondurucu s cakl yeterli So utucu b lme s cakl ok d k bir de ere ayarlanm t r So utucu b lme s cakl n daha y ksek bir dereceye ayarlay p kontrol edin So utucu...

Страница 47: ...lzemesi kullan n Yiyecekler r ne a z a k kaplarda konulmu tur Yiyecekleri kapal kaplarda saklay n A z a k saklanan yiyeceklerden yay lan mikroorganizmalar k t kokulara neden olabilir Saklama s resi do...

Страница 48: ...mal d r G venli iniz i in herhangi bir tamir i lemi ger ekle tirmeden nce r n n fi ini ekin Nihai kullan c lar taraf ndan kullanma k lavuzlar nda belirtilen ya da https www grundig com tr destek adres...

Страница 49: ...ele al r ve de erlendiririz Bu geri bildirimleri s re lerimizin daha m kemmel hale getirilmesinde kullan r z t Ar elik olarak m kemmel m teri deneyimini ya atmay ana ilke olarak kabul eder m teri odak...

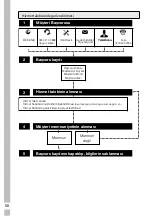
Страница 50: ...Hizmet talebinin al nmas Memnun Memnun de il Hizmet talebi analizi Hizmet hakk nda m terinin bilgilendirilmesi Ke if nakliye montaj bilgi onar m de i im vb Hizmet hakk nda gerekli i lemin ger ekle tir...

Страница 51: ...dana gelen hasar ve ar zalar 4 Do a olaylar ve yang n su bask n vb kaynakl meydana gelen hasar ve ar zalar 5 Mal n tan tma ve kullanma k lavuzlar nda yer alan hususlara ayk r kullan lmas ndan kaynakla...

Страница 52: ...i ve ithalat m teselsilen sorumludur 6 lgili mevzuatlarda belirlenen kullan m mr s resince mal n azami tamir s resi 20 i g n n ge emez Bu s re garanti s resi i erisinde mala ili kin ar zan n yetkili s...

Страница 53: ...holder 31 5 10 Ice container 32 5 11 Fan 32 5 12 Crisper 33 5 13 Chiller compartment 33 5 14 Moving door shelf 33 5 15 Sliding storage container 34 5 16 Blue light Vitamin Care Technology 34 5 17 Humi...

Страница 54: ...manual in an easily accessible place as you may need it later Besides read also the other documents provided with your product Please note that this manual may be valid for other models as well Symbol...

Страница 55: ...o the product A1 1 Intended Use This product is not suitable for commercial use and it must not be used out of its intended use This product is designed to be used in houses and indoor places For exam...

Страница 56: ...so that it is harder for children to enter the product 4 Remove the doors 5 Keep the product in a way that it will not tip over 6 Do not allow children play with the old product Never throw the produ...

Страница 57: ...tention not to damage the cooling system or the piping during transportation If the piping is damaged do not operate the product and call the authorised service agent A1 5 Installation safety Call the...

Страница 58: ...on the Type Label Product must not be installed in places exposed to direct sunlight and it must be kept away from heat sources such as hobs radiators etc If it is inevitable to install the product cl...

Страница 59: ...unplug it and do not operate until it is repaired by the authorised service agent There is the risk of electric shock Do not place flame sources lit candles cigarettes etc on or close to the product...

Страница 60: ...electrical part may cause electric shock or the risk of fire This product is not intended for storing medicines blood plasma laboratory preparations or similar medical substances and products subject...

Страница 61: ...ea where the product is located Do not use fans Call the authorised service agent If the product is damaged and you see refrigerant leak please stay away from the refrigerant Refrigerant may cause fro...

Страница 62: ...frost the product Steam gets into contact with the live parts in your refrigerator causing short circuit or electric shock Make sure that no water enters the electronic circuits or lighting elements o...

Страница 63: ...2 Temperature setting button 3 Water dispenser filling tank 4 Egg section 5 Water dispenser reservoir 6 Storage container under the door shelf 7 Moving door shelf 8 Adjustable feet 9 Crisper 10 Chille...

Страница 64: ...the product on an even floor surface to prevent jolts Install the product at least 30 cm away from heat sources such as hobs heater cores and stoves and at least 5 cm away from electrical ovens Produ...

Страница 65: ...G Damaged power cable must be replaced by the Authorized Service Agent C If two coolers are to be installed side by side there should be at least 4 cm distance between them Our company shall not be li...

Страница 66: ...hold room illumination The intended purpose of this lamp is to assist the user to place foodstuffs in the refrigerator freezer in a safe and comfortable way 3 6 Open door warning An audio warning will...

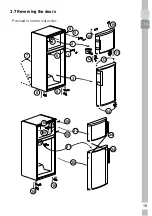
Страница 67: ...15 TR 3 7 Reversing the doors Proceed in numerical order 10 10 5 4 1 6 4 12 13 3 7 8 9 14 19 19 22 17 180 23 21 16 15 24 24 11 45 2 20 18...

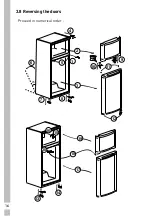
Страница 68: ...16 3 8 Reversing the doors Proceed in numerical order 1 5 10 11 3 6 7 8 19 18 14 13 9 45 2 17 16 12 4 15 20...

Страница 69: ...Airflow should not be blocked by placing foods on the sides of the freezer compartment fan A minimum distance of 3 cm shall be provided on the sides of protective fan cover In case of multiple options...

Страница 70: ...n Run the product without putting any food for 6 hours and do not open its door unless certainly required C You will hear a noise when the compressor starts up The liquids and gases sealed within the...

Страница 71: ...icate the temperature values in C If the ambient temperature is 25 C we recommend you to use the temperature control knob of your refrigerator at 4 C This value may be increased or decreased as requir...

Страница 72: ...to the hottest position then the vacation function will be activated automatically To cancel the function change the knob setting It is not recommended to store food in cooler compartment when the va...

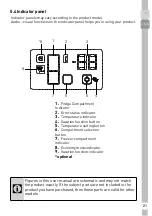
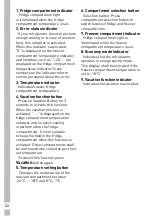
Страница 73: ...atus indicator 3 Temperature indicator 4 Vacation function button 5 Temperature setting button 6 Compartment selection button 7 Freezer compartment indicator 8 Economy mode indicator 9 Vacation functi...

Страница 74: ...he fridge compartment temperature indicator and no active cooling is performed on the fridge compartment It is not suitable to keep the food in the fridge compartment when this function is activated O...

Страница 75: ...ment is heated up to a critical level for the frozen food the maximum value reached by the freezer compartment temperature flashes on the digital indicator Check the food in the freezer compartment Th...

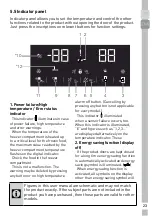
Страница 76: ...compartment temperature setting button Press this button to set the temperature of the fridge compartment to 8 7 6 5 4 3 2 8 respectively Press this button to set the fridge compartment temperature t...

Страница 77: ...3 seconds C Water flow from water tank will stop when this function is selected However ice made previously can be taken from the icematic 11 Quick freeze function button icematic on off button Press...

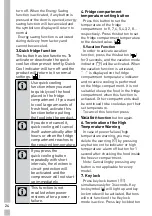
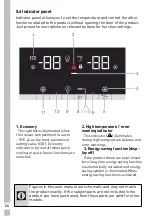
Страница 78: ...e purchased then those parts are valid for other models 1 Economy This symbol is illuminated when the freezer compartment is set to 18 C ye as the most economical setting value Economy indicator is tu...

Страница 79: ...ure To cancel this function press Vacation function button again 6 Fridge compartment tempera ture setting When the button no 6 is pressed you may set the temperature of the fridge compartment to 8 7...

Страница 80: ...e of the freezer compartment to 18 19 20 21 22 23 and 24 respectively 11 Fast freeze Press button no 11 for fast freeze operation quick freeze indicator shall be activated Quick freeze indicator is il...

Страница 81: ...oor of the product Just press the inscriptions on relevant buttons for function settings for a long time energy saving function is automatically activated and energy saving symbol is illuminated When...

Страница 82: ...e compartment to 8 7 6 5 4 3 2 and 1 respectively 7 1 Energy saving function disp lay off Energy saving symbol is illuminated and Energy saving function is activated when you press this button When en...

Страница 83: ...re If you want to freeze large amounts of fresh food press the quick freeze button before putting the food into the freezer compartment 5 8 Twist Ice matic This feature is optional Remove the water ta...

Страница 84: ...d bend it over the service plate Ice cubes will easily fall down to the service plate 5 11 Fan Fan is designed to ensure homoge neous distribution and circulation of the cold air inside your refrigera...

Страница 85: ...rt time Chiller compartment is the coolest place in your refrigerator where you can keep dairy products meat fish and poultry under ideal storage conditions Fruits and vegetables should not be stored...

Страница 86: ...eir vitamin C content longer For VitaminCare Fruits and vegetables stored in crispers illuminated with the VitaminCare technology preserve their vitamin A and C content for a longer time thanks to the...

Страница 87: ...acting with other vegetables is not preferred for hygiene concerns use a perforated paper and other similar packaging materials instead of a bag Do not place together the pear apricot peach etc and ap...

Страница 88: ...e C Odor filter must be cleaned once in a year 5 20 HerbBox HerbFresh Remove the film container from HerbBox HerbFresh Take the film out of the bag and put it into the film container as shown in the i...

Страница 89: ...amount of pressure on the lever to avoid overflow If you slightly press the arm the water will drip this is quite normal and not a failure 5 22 Filling the water dispenser s tank Water tank filling r...

Страница 90: ...e door rack 2 Remove the door rack by holding from both sides 3 Grab the water tank from both si des and remove it with an angle of 45 C 4 Remove the cover of the water tank and clean the tank C Compo...

Страница 91: ...4 Drip tray Water that dripped while using the water dispenser accumulates in the spillage tray Remove the plastic filter as shown in the figure With a clean and dry cloth remove the water that has ac...

Страница 92: ...d before putting them in the freezer Use freezer containers foils and moisture proof papers plastic bags and other packing materials instead of traditional packing papers Label each pack of food by ad...

Страница 93: ...ct shall freeze at least 4 5 kg of food at 25 C ambient temperature to 18 C or lower within 24 hours for every 100 litres of freezer volume It is possible to preserve the food for a long time only at...

Страница 94: ...ref rigerator can be changed according to the place you are using it If this is necessary please call your nearest Authorized Service Above description is a general exp ression For information on cha...

Страница 95: ...to bottom to install Never use cleaning agents or water that contain chlorine to clean the outer surfaces and chromium coated parts of the product Chlorine causes corrosion on such metal surfaces Do n...

Страница 96: ...erial damage Keeping the glass clean becomes too difficult despite the regular cleaning Consequently the appearance and the transparency of the glass deteriorates Harsh and corrosive cleaning methods...

Страница 97: ...ent in closed containers Door of the refrigerator is left ajar Do not leave the doors of your refrigerator open for a long time Thermostat is set to a very cold level Set the thermostat to a suitable...

Страница 98: ...he doors frequently Freezer or fridge compartment door might be left ajar Check if the doors are closed completely The refrigerator is adjusted to a very low temperature Adjust the refrigerator temper...

Страница 99: ...ong enough to carry the refrigerator and level The items put onto the refrigerator may cause noise Remove the items on top of the refrigerator There are noises coming from the refrigerator like liquid...

Страница 100: ...fore dates and spoiled from the refrigerator The door is not closing Food packages are preventing the door from closing Replace the packages that are obstructing the door The refrigerator is not compl...

Страница 101: ...ttps www grundig com tr destek For your own safety please unplug product prior to carrying out any repair Grundig may not be held responsible for safety issues that may arise because of repairs or att...

Страница 102: ...Notes...

Страница 103: ...Notes...

Отзывы: