Grundig GMSX900DABIP Скачать руководство пользователя страница 20

20 


If a fault occurs, first check the points listed below before taking the radio for repair. If you are unable to solve a 

problem by following the below hints we suggest you consult you retailer or service professional. 


WARNING: 

Under no circumstances should you try to repair the unit yourself, as this would invalidate the warranty. 


PROBLEM 

POSSIBLE CAUSE 

SOLUTION 

No sound 


  Your headphones may be 

connected. 

  The volume may have been set to 

low. 

  The power cord may not be 

connected correctly/firmly.  

  Disconnect your Headphones from 

the unit. 

  Adjust the volume level of the 

radio. 

  Reconnect the power cord firmly.  

  Ensure that the speaker cables are 

connected correctly.  

The buttons on the unit 

are not responding


  Electrostatic discharge or 

interference from other electrical 

equipment. 


  Turn the unit off and disconnect the 

power cord. Wait for 5 – 10 

seconds, then reconnect and turn 

the unit back on 

Radio poor reception 


  There is weak aerial signal or there 

may be interference from other 

electrical equipment. 

  Reposition the aerial and the unit to 

receive the best reception possible.  

  Ensure the aerial is connected.  

  Keep the unit away from other 

electrical equipment, where 

interference is possible.  

iPod/iPhone is not 

charging 

  iPod/iPhone is not connected 

properly to the unit.  

  Remove the iPod/iPhone from the 

docking port and check that you 

are using the correct cradle 

  Reinsert the correct cradle and the 

iPod/iPhone securely. Make sure 

you hear it click into the unit.  

Unable to operate the 

unit from the remote 

control 
 

  There may be obstacles in between 

the unit and the signal  

  The batteries may be exhausted 

  Make sure there are no obstacles 

between the unit and the remote 

control. 

  Move closer to the unit. 

  Replace the batteries. 
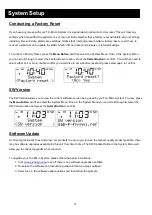


Troubleshooting 

Содержание GMSX900DABIP

Страница 1: ... MICRO SYSTEM WITH DOCK FOR IPHONE GMSX900DABIP Toll Free Warranty and Service 1800 509 394 The Gold Technical Support Line 1902 215 259 Charges will apply at 2 95 per minute for gold technical support only ...

Страница 2: ...tions Safety is important Your safety is very important Please therefore ensure you read the Safety Instructions before you operate this unit Warranty In the unlikely event that your product fails to work normally please call one of our qualified service engineers on either of the below toll free phone numbers to discuss any issues directly Australia GRUNDIG Warranty 1800 509 394 New Zealand GRUND...

Страница 3: ...ntilation holes with items such as tablecloths or curtains etc This may cause the unit to overheat No naked flame sources such as candles should be placed on or near the unit Do not place objects filled with liquids such as vases or jugs on or near the unit Do not place the unit in a closed cabinet without proper ventilation Cleaning Disconnect the unit from the mains supply before cleaning Do not...

Страница 4: ...3 Contents 4 Your DAB Micro System 5 Your DAB Micro System Remote Control 8 Using DAB Radio 10 Using FM Radio 12 Using iPod 14 Using Aux In 15 System Setup 15 Product Specifications 19 Troubleshooting 20 Warranty 21 Contents ...

Страница 5: ... ensure good reception in both DAB and FM radio modes It may be necessary to alter the position of the DAB Radio and or aerial to achieve the best signal Using Headphones To listen to your DAB Radio via Headphones you will require headphones with a 3 5 mm diameter stereo plug not included The Headphone Socket is located on the back of the unit Plug the Headphone Jack into the Headphone socket and ...

Страница 6: ...posite Video Output 3 Preset Button 11 Fast Forward Button 19 Audio Output R L 4 Button 12 Mode Button 20 Headphone Output 5 Select Button 13 F Type Antenna 21 Auxiliary Input 6 Button 14 Speaker Jacks 22 DC Input 7 Menu Button 15 Speaker Jacks 8 Info Button 16 USB Input Your DAB Micro System ...

Страница 7: ... to switch between iPod Auxiliary Input DAB and FM Radio modes ANTENNA It is recommended that you extended the antenna to ensure that you get the best possible reception SPEAKER JACKS The Speaker Jacks are where you connect the speaker cables to the unit You will receive two cables to so you can design the distance between the main unit and your speakers USB INPUT The USB Input allows for your Tri...

Страница 8: ...utton to enter the iPod mode Aux In Press the AUX IN Button to enter the Auxiliary Input mode Press the Info Button to view the station or track information Press the Menu Button to enter the Main Menu Press the Menu Button again to go back to the play display Press the Rewind Button in iPod mode to skip backwards to the previous track or to the beginning of the song currently playing in the curre...

Страница 9: ...odes Shift Press the Shift Button to select the preset number you wish to play For example to play preset 6 press the Shift Button first and then press the 1 6 Button to select 1 6 Press the 1 6 Button to set or play preset numbers 1 or 6 2 7 Press the 2 7 Button to set or play preset numbers 2 or 7 3 8 Press the 3 8 Button to set or play preset numbers 3 or 8 4 9 Press the 4 9 Button to set or pl...

Страница 10: ...n Auto Scan will automatically scan for all available stations and then store them in the Station List A Manual Scan will allow you to search for a particular station s frequency and then store manually in the station list To confirm either option press the Select Button Once a scan is complete the radio will either play the first station stored in the station list or the last station played previ...

Страница 11: ...hen select the number either via the unit or remote control Viewing information While you are listening to your DAB Radio you may wish to view the broadcast station information such as program name track title and contact details To view the station information simply press the Info Button and the information we be displayed on the second line of the display To scroll through the information provi...

Страница 12: ... the Navigation Buttons and The frequency displayed will start to change until the next station is found Alternatively you can manually scan for an FM frequency by just pressing the Navigation Buttons and and the frequency will change by 5 kHz with each press Viewing information While you are listening to your FM Radio you may wish to view the broadcast station information such as program name tra...

Страница 13: ...ton and then select scan settings pressing select or ok to confirm Then choose between Strong Station or All Station pressing ok or select to confirm Strong Station will provide you with only the strong signal stations and All Station will provide you with all possible frequencies Audio Setting In FM mode you can also choose your preferred Audio Settings to ensure you receive the best possible sou...

Страница 14: ... Trio Micro System will immediately switch to iPod mode and begin to play the last song listened to 4 You will now be able to use either the keypad or remote control to make your selections 5 You can use the Shuffle Button to play your songs at random or press the Repeat Button a song album or playlist 6 To play a video from your iPod you must connect the Trio Micro System to your TV or computer m...

Страница 15: ...n select the Time Menu option and press the Select Button to confirm When you have entered the Time Menu you will be asked to select either 12 or 24 hour time Press the Select Button to select your desired option Manually Setting the Time and Date To set the time manually enter the Time Menu and then select the Time and Date option Once in the time and date option you will be able to begin the man...

Страница 16: ...ress the Select Button to confirm you wish to set the Alarm and use the Navigation Buttons and to scroll through the desired options provided by your Trio Micro System First you will be asked to set the Alarm to on as shown below Then you will be asked to set the alarm time and date alarm duration time this is how long the alarm will play for you can choose between 15 30 45 60 and 90 minutes the a...

Страница 17: ...s Snooze Button on remote repeatedly until the time you wish to snooze is displayed as per above image Setting the Backlight Level With your Trio Micro System you can change the backlight display light settings to ensure that as bright or dull as you would like In the backlight menu you set the Timeout time This will be the amount of time the display will stray bright for and then fade out You can...

Страница 18: ...like to set a Factory reset and press select again to confirm SW Version The SW Version allows you to view the current software version being used by you Trio Micro System To view press the Menu Button and then select the System Menu Once in the System Menu you can scroll through to select the SW Version option and press the Select Button to confirm Software Update As Grundig continually tries to ...

Страница 19: ...tuning range from 87 5MHz to 108MHz DAB radio tuning range from 174MHz to 240MHz Inputs USB jack for software upgrades Auxiliary audio input Outputs Composite video output Digital output via optical output only DAB and FM modes Accessories IR remote control 5 iPod Cradles Dimensions 420mm x 120mm x 150mm Product Specifications ...

Страница 20: ... equipment Turn the unit off and disconnect the power cord Wait for 5 10 seconds then reconnect and turn the unit back on Radio poor reception There is weak aerial signal or there may be interference from other electrical equipment Reposition the aerial and the unit to receive the best reception possible Ensure the aerial is connected Keep the unit away from other electrical equipment where interf...

Страница 21: ... New Zealand and have your receipt of purchase on hand This warranty is subject to the following provisions It is only valid within boundaries of the country of purchase The product must be correctly assembled and operated in accordance with the instructions contained in the manual This product must be used solely for domestic purposes The warranty does not cover accidental damage The warranty wil...

Страница 22: ...22 PO BOX 6287 Silverwater NSW 1811 www grundig net au ...

Отзывы: