background image

GDV200

Allgemeiner Teil / General Section

GRUNDIG Service

1 - 27

40

PARENTAL CONTROL SYSTEM

________________________________________________

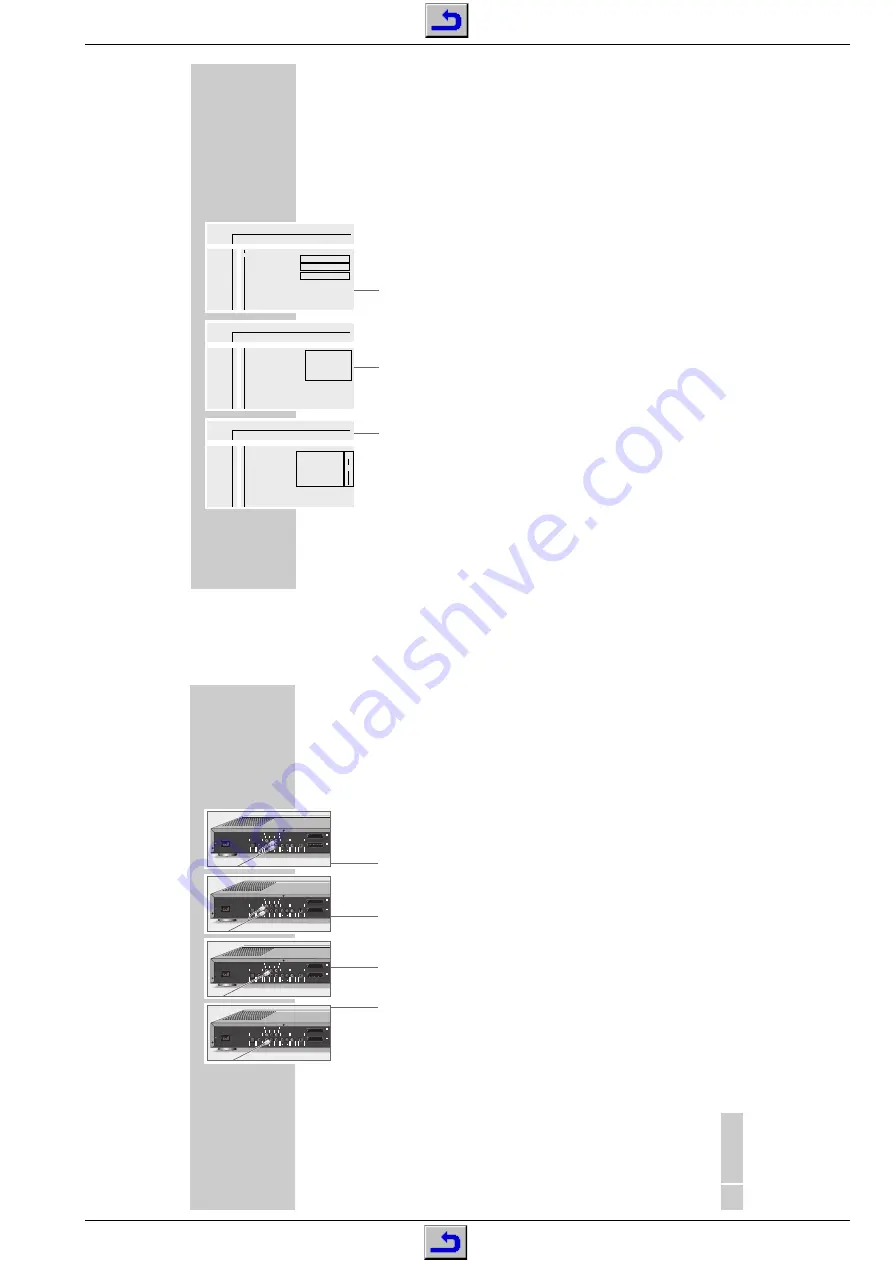
Authorising the contents of a DVD

Films  on  DVD  may  be  wholly  or  partially  unsuitable  for  children.  Such  DVDs
contain information which identifies these scenes, providing them with ratings from
1 to 8. You can select one of the ratings and thereby authorise alternative scenes
for playback.

1

Call up the menu line by pressing »

OSD

«.

2

Select  the  »

Ö

«  item  (Settings)  using  »

Ǹ

«  or  »

Ƿ

«  and  press  »

P  –

«  to

confirm.

3

Select  the  »

Ü

«  line  (Special  functions)  using  »

.

«  and  press  »

Ƿ

«  to

confirm.

4

Select the »Access control« line using »

,

« or »

.

« and press »

Ƿ

« to

confirm.

5

Enter the four-digit code number using the »

1...0

« buttons.

6

Select  the  »Parental  level«  line  using  »

,

«  or  »

.

«  and  activate  by

pressing »

Ƿ

«.

7

Select the rating (from 1 to 8) using »

,

« or »

.

«.

8

Conclude the setting by pressing »

OSD

«.

Access control

Status window

Low power standby

Enter code…

On

Off

Ö

P

K

(

I

R

k

/

1

2

1

off

no

off

>

O

>

U

Ü

Ö

P

K

(

I

R

k

/

1

2

1

off

no

off

O

>

U

Ü

Access control

Status window

Low power standby

>

Child lock

Parental level

Change country

Change code

5

a

S

Ö

P

K

(

I

R

k

/

1

2

1

off

no

off

O

>

U

Ü

Access control

Status window

Low power standby

>

a

( ) ( ) ( ) ( )

Enter code

A

s

S

a

ENGLISH

43

USING EXTERNAL DEVICES

_____________________________________________________

Connecting to an analog multi-channel audio/video
amplifier

Your DVD player has an integrated multi-channel decoder. This enables you to
play  DVDs  which  use  the  multi-channel  surround  system.  A  decoder  is  not
necessary.
The connection is made at the »

MULTICHANNEL AUDIO OUT

« sockets.

1

Plug  a  standard  cinch  cable  into  the  »

LEFT  FRONT

«  and  »

RIGHT

FRONT

«  sockets  on  the  DVD  player  and  the  appropriate  sockets  on  the

amplifier for the front loudspeaker.

2

Plug a standard cinch cable into the »

LEFT REAR

« and »

RIGHT REAR

«

sockets on the DVD player and the appropriate sockets on the amplifier for
the surround loudspeakers.

3

Plug a standard cinch cable into the »

CENTER

« socket on the DVD player

and the appropriate socket on the amplifier for the middle loudspeaker.

4

Plug a standard cinch cable into the »

SUBW.

« socket on the DVD player

and the appropriate socket on the amplifier for the subwoofer.
– If the subwoofer is equipped with its own amplifier, then use that socket.

Note: 

Suitable  sound  settings  must  be  selected  on  the  DVD  player.  When  doing
this,  observe  the  settings  in  the  chapter  entitled  ”Adapting  the  digital  or
analog outputs on the DVD players to connected audio devices” on Pages 44
to 47.

MAINS

(CVBS)

(Y/C)

VIDEO OUT

S-VIDEO OUT

DIG OUT

OPT OUT

RIGHT

SUBW.

REAR

RIGHT
FRONT

L

R

AUDIO OUT

LEFT

CENTER

MULTICHANNEL AUDIO OUT

REAR

LEFT
FRONT

DIGITAL AUDIO OUT

PCM/MPEG2/AC3/DTS

STEREO OUT

VIDEO OUT

I

AUX/VCR

IN

II

TV OUT

MAINS

(CVBS)

(Y/C)

VIDEO OUT

S-VIDEO OUT

DIG OUT

OPT OUT

RIGHT

SUBW.

REAR

RIGHT
FRONT

L

R

AUDIO OUT

LEFT

CENTER

MULTICHANNEL AUDIO OUT

REAR

LEFT
FRONT

DIGITAL AUDIO OUT

PCM/MPEG2/AC3/DTS

STEREO OUT

VIDEO OUT

I

AUX/VCR

IN

II

TV OUT

MAINS

(CVBS)

(Y/C)

VIDEO OUT

S-VIDEO OUT

DIG OUT

OPT OUT

RIGHT

SUBW.

REAR

RIGHT
FRONT

L

R

AUDIO OUT

LEFT

CENTER

MULTICHANNEL AUDIO OUT

REAR

LEFT
FRONT

DIGITAL AUDIO OUT

PCM/MPEG2/AC3/DTS

STEREO OUT

VIDEO OUT

I

AUX/VCR

IN

II

TV OUT

MAINS

(CVBS)

(Y/C)

VIDEO OUT

S-VIDEO OUT

DIG OUT

OPT OUT

RIGHT

SUBW.

REAR

RIGHT
FRONT

L

R

AUDIO OUT

LEFT

CENTER

MULTICHANNEL AUDIO OUT

REAR

LEFT
FRONT

DIGITAL AUDIO OUT

PCM/MPEG2/AC3/DTS

STEREO OUT

VIDEO OUT

I

AUX/VCR

IN

II

TV OUT

Содержание GDV 200

Страница 1: ...18 42 0180 52318 43 0180 52318 44 0180 52318 45 0180 52318 51 0180 52318 99 Mo Fr 8 00 18 00 Uhr 0180 52318 40 0180 52318 50 Telefon Fax Technik Ersatzteil Verkauf Mo Fr 8 00 19 00 Uhr GDV 200 GMH7800 Zusätzlich erforderliche Unterlagen für den Komplettservice Additionally required Service Documents for the Complete Service Service Manual Sicherheit Safety Materialnr Part No 72010 800 0000 ʀ TRACK...

Страница 2: ...s 4 43 Exploded Views and Spare Parts Lists 5 1 5 4 D Inhaltsverzeichnis Seite Allgemeiner Teil 1 3 1 19 Messgeräte Messmittel 1 3 Technische Daten 1 3 Ausbauhinweise 1 4 Servicehinweise 1 6 Bedienhinweise 1 7 Servicetestprogramm 2 1 2 8 Fehlersuchdiagramme 3 1 3 7 Netzteil 3 1 Bedieneinheit 3 2 A V MUX Platte 3 3 DVD Monoboard 3 6 Platinenabbildungen und Schaltpläne 4 1 4 44 Verdrahtungsplan 4 1 ...

Страница 3: ...VD Video Video CD Audio CD Multi standard PAL NTSC CD R CD RW DVD Disc Format Diameter 8cm and 12cm Video Format Signal Digital Digital compression MPEG2 for DVD MPEG1 for VCD DVD 50Hz 60Hz Horiz resolution 720 pixel 720 pixel Vert resolution 576 lines 480 lines VCD 50Hz 60Hz Horiz resolution 352 pixel 352 pixel Vert resolution 288 lines 240 lines Audio Format Digital MPEG AC 3 Compressed Digital ...

Страница 4: ...chten 7 3 3 Lademotor ausbauen Riemen H Fig 10 abnehmen Bügel D Fig 6 ausrasten und Lademotor herausnehmen FLEXPRINT Disassembly Instructions Disconnect the mains plug Opening the Tray when the Drive is defective Remove the Drive Mechanism para 7 Push the slider A Fig 6 to the left until its stop The tray can be pulled out now 1 Cabinet Upper Part Undo 7 screws F Fig 2 Remove the upper part of the...

Страница 5: ...GDV 200 Allgemeiner Teil General Section GRUNDIG Service 1 5 Fig 2 Fig 1 Fig 3 Fig 4 Fig 5 Fig 8 Fig 7 Fig 9 F G F E B A D C E E F F F I G H M N K L L J J T I B B C C C C A D Fig 6 ...

Страница 6: ...ramme Bei den in den Schaltplänen und Oszillogrammen angegebenen Messwerten handelt es sich um Näherungswerte Service Instructions Reactivation of the DVD Player after exchanging the DVD Monoboard or resetting the NVRAM Remove the DVD from the unit close the tray and wait until no disc appears on the picture screen Press PLAY Q on the remote control and enter the numbers 274 051 000 000 000 Press ...

Страница 7: ... N O F F O P E N C L O S E DVD VIDEO CD CD PLAYER Die Vorderseite des DVD Players A B DEUTSCH 9 AUF EINEN BLICK______________________________________________________________________ MAINS Netzbuchse für das Netzkabel Digitale Audio Anschlüsse PCM MPEG2 AC3 DTS OPT OUT Ton Ausgangsbuchse optisch zum Anschließen einer digitalen HiFi Anlage mit einem handelsüb lichen OPTICAL Kabel DIG OUT Ton Ausgang...

Страница 8: ...VD TV VCR EXT 3 1 2 4 5 6 7 8 9 0 TV GUIDE VOL REPEAT ANGLE TE L E PI L O T 8 0 V RETURN SHUFFLE SUBTITLE OSD AUDIO MENU SHOWVIEW VCR MENU RECORD FORMAT AUX PIP TXT MUTE Mit der Fernbedienung TP 80 V können Sie nicht nur den DVD Player bedienen sondern auch Grundig Fernsehgeräte Videorecorder und Satelliten Receiver Zum Bedienen des DVD Players den Schiebeschalter DVD TV VCR EXT auf die Position D...

Страница 9: ...er DVD zurück Hinweis Die Möglichkeiten für die Bedienung von Grundig Fernsehgeräten Video recordern und Satellitenreceivern sind ab Seite 54 beschrieben OK P P DVD TV VCR EXT 3 1 2 4 5 6 7 8 9 0 TV GUIDE VOL REPEAT ANGLE TE L E PI L O T 8 0 V RETURN SHUFFLE SUBTITLE OSD AUDIO MENU SHOWVIEW VCR MENU RECORD FORMAT AUX PIP TXT MUTE DEUTSCH 13 DIE BENUTZERFÜHRUNG__________________________________ Mit...

Страница 10: ...ldverschiebung Farbeinstellungen Persönliche Farbwerte A S8 16 9 Ein 1 Persönlich Einstellungen Ö P 1 a DEUTSCH 15 DIE BENUTZERFÜHRUNG ________________________________________________________ DVD s CD s werden wiederholt Titel werden wiederholt Kapitel werden wiederholt Abschnitte werden wiederholt Titel wurden beliebig ausgewählt und abgespielt Die Statusanzeige In der Statusanzeige werden Inform...

Страница 11: ...Die eingestellten Funktionen oder Werte werden automatisch gespeichert Ö P K I R k 1 2 1 off no off Ö P K I R k 1 2 1 off no off O U Ü Audio Dialoge Untertitel Menü S a A OK P P MUTE s a A S Ö P K I R k 1 2 1 off no off O U Ü Audio Dialoge Untertitel Menü A S8 Deutsch Deutsch Deutsch Deutsch Deutsch Deutsch DEUTSCH 21 WIEDERGABE EINER DVD VIDEO CD____________________________________ Vor der Wieder...

Страница 12: ...TSCH 23 WIEDERGABE EINER DVD VIDEO CD____________________________________ Titel oder Kapitel anwählen Wenn eine DVD Video CD mehrere Titel und oder Kapitel enthält können Sie diese anwählen mit dem Menü des DVD Players 1 Menüzeile mit OSD einblenden 2 Menüpunkt P für Titel mit Ǹ oder Ƿ anwählen oder Menüpunkt K für Chapter Kapitel mit Ǹ oder Ƿ anwählen 3 Titel Kapitel mit oder anwählen Hinweis Tit...

Страница 13: ...__________________________________________________________ 7 Das Symbol D mit oder anwählen 8 Einstellung mit OSD beenden Der DVD Player ist verriegelt Hinweis Wird jetzt eine DVD oder Video CD in die Schublade gelegt erscheint die Meldung locked gesperrt und Sie müssen die vierstellige Geheimnummer eingeben Kindersicherung des DVD Players abschalten 1 Zum Abschalten der Kindersicherung die Punkte...

Страница 14: ...G Immer wiedergeben wählen um die Disk in die Kinderliste aufzunehmen Einmal wiedergeben Immer wiedergeben S locked Zugriffskontrolle G Immer wiedergeben wählen um die Disk in die Kinderliste aufzunehmen Einmal wiedergeben Immer wiedergeben S Inhalt der DVD autorisieren DVDs können Spielfilme anbieten deren Inhalt oder auch Szenen nicht für Kinder geeignet sind Diese DVDs enthalten Informationen d...

Страница 15: ...Menüpunkt Ö Einstellungen mit Ǹ oder Ƿ anwählen und mit P aktivieren 3 Zeile Tonmenü mit oder wählen und mit Ƿ aktivieren Hinweis Die weitere Bedienung entnehmen Sie bitte den folgenden Kapiteln jeweils ab Pkt 1 Digital oder Analogausgänge des DVD Players an die angeschlossenen Audio Geräte anpassen Abhängig vom angeschlossenen Fernseh oder Audio Gerät müssen Sie die Ausgangsbuchsen des DVD Player...

Страница 16: ...o Aus Aus Einstellungen Ö P K I R k off no off Lautsprecher Vorne L R Mitte Hinten L Hinten R Subwoofer Ende OK drücken a a S L S 46 TONEINSTELLUNGEN________________________________________________________________ 3 Benötigte Einstellung mit Ǹ oder Ƿ anwählen und Lautsprecher mit oder anpassen u Lautstärke einstellen L groß die Lautsprecher sind für Tonsignale unter 120 Hz geeignet S klein die Lau...

Страница 17: ...bnis durch 30 dividieren Das Ergebnis ist die erforderliche Verzögerungs zeit für den Centerkanal in Millisekunden Verzögerungszeit für Dolby Surround Bei Dolby Surround werden zu der Verzögerungszeit für den Surroundkanal 15 Millisekunden addiert Wird auch der Centerkanal eingeschaltet werden auch hier zur Verzögerungs zeit für den Centerkanal 15 Millisekunden addiert 48 TONEINSTELLUNGEN_________...

Страница 18: ...ormat Schwarzwert Bildverschiebung Farbeinstellungen Persönliche Farbwerte A S8 16 9 Ein 1 Persönlich Einstellungen Ö P K I R k 1 2 1 off no off O U Ü Bildformat Schwarzwert Bildverschiebung Farbeinstellungen Persönliche Farbwerte A S8 16 9 Ein 1 Persönlich Einstellungen 50 BILDEINSTELLUNGEN________________________________________________________________ Schwarzwerteinstellung nur für NTSC Sendung...

Страница 19: ...önliche Farbwerte A S8 16 9 Ein 1 Persönlich Einstellungen 52 KOMFORTEINSTELLUNGEN ____________________________ Sprachmenü anwählen 1 Menüzeile mit OSD einblenden 2 Menüpunkt Ö Einstellungen mit Ǹ oder Ƿ anwählen und mit aktivieren 3 Zeile M Sprachmenü mit oder wählen und mit Ƿ aktivieren Hinweis Die weitere Bedienung entnehmen Sie bitte den folgenden Kapiteln jeweils ab Pkt 1 Synchronsprache des ...

Страница 20: ...tents Use the or button to select it and then press OK to confirm If the selections are numbered use the 1 0 keys 8 DVD play 2 04 26 0 11 30 8 DVD play 2 04 26 0 15 00 ENGLISH 9 OVERVIEW__________________________________________________________________________________ MAINS Socket for mains cable Digital audio connections PCM MPEG2 AC3 DTS OPT OUT Audio output socket optical for connecting to a di...

Страница 21: ..._______________________________ OK P P DVD TV VCR EXT 3 1 2 4 5 6 7 8 9 0 TV GUIDE VOL REPEAT ANGLE TE L E PI L O T 8 0 V RETURN SHUFFLE SUBTITLE OSD AUDIO MENU SHOWVIEW VCR MENU RECORD FORMAT AUX PIP TXT MUTE Using the TP 80 V remote control you can not only operate the DVD player but also Grundig televisions video recorders and satellite receivers To operate the DVD player push the DVD TV VCR EX...

Страница 22: ...e previous DVD menu Note For details on operating Grundig televisions video recorders and satellite receivers see Page 54 onwards OK P P DVD TV VCR EXT 3 1 2 4 5 6 7 8 9 0 TV GUIDE VOL REPEAT ANGLE TE L E PI L O T 8 0 V RETURN SHUFFLE SUBTITLE OSD AUDIO MENU SHOWVIEW VCR MENU RECORD FORMAT AUX PIP TXT MUTE ENGLISH 13 THE OSD MENU__________________________________________________________ The OSD me...

Страница 23: ... a Ö P K I R k 1 2 1 off no off O U Ü TV Shape Black level shift Video shift Colour settings Personal colour A S 8 16 9 On 1 Personal Settings ENGLISH 15 THE OSD MENU_________________________________________________________________________ Repeating DVDs CDs Repeating titles Repeating chapters Repeating tracks Titles selected and played back at random The status display The status display shows in...

Страница 24: ... line press the OSD button The functions or values you set are automatically saved Ö P K I R k 1 2 1 off no off OK P P MUTE s a A S Ö P K I R k 1 2 1 off no off O U Ü Audio Subtitle Menu S a A Ö P K I R k 1 2 1 off no off O U Ü Audio Subtitle Menu A S 8 English English English English English English ENGLISH 21 DVD VIDEO CD PLAYBACK_____________________________________________________ Before playb...

Страница 25: ... K I R k 1 2 1 off no off s a A S Ö P K I R k 1 2 1 off no off s a A S Ö P K I R k 2 2 1 off no off s a A S ENGLISH 37 PARENTAL CONTROL SYSTEM_____________________ The parental control system enables you to Prevent the DVD player from being used Release or block particular DVDs or video CDs for playback Block scenes which are not appropriate for children from DVDs or video CDs or select alternativ...

Страница 26: ...no off O U Ü Access control Status window Low power standby Child lock Parental level Change country Change code D F a A Ö P K I R k 1 2 1 off no off O U Ü Access control Status window Low power standby Child lock Parental level Change country Change code s A S ENGLISH 39 PARENTAL CONTROL SYSTEM________________________________________________ Enabling a DVD or video CD for playback Permitting use ...

Страница 27: ...rd cinch cable into the LEFT FRONT and RIGHT FRONT sockets on the DVD player and the appropriate sockets on the amplifier for the front loudspeaker 2 Plug a standard cinch cable into the LEFT REAR and RIGHT REAR sockets on the DVD player and the appropriate sockets on the amplifier for the surround loudspeakers 3 Plug a standard cinch cable into the CENTER socket on the DVD player and the appropri...

Страница 28: ...P K I R k 1 2 1 off no off O U Ü Digital output Analogue output Night mode Karaoke vocal Speakers Off On PCM only On All formats a S ENGLISH 45 SOUND SETTINGS_____________________________________________________________________ 3 Switch off the menu with the OSD button Settings for active loudspeakers You must adapt the output channels of the DVD player according to the loudspeakers connected and ...

Страница 29: ...ated value Ö P K I R k off no off Speakers Front L R Centre Surround L Surround R Subwoofer OK to exit a a a 0dB u ѕ S L S 0ms ENGLISH 47 SOUND SETTINGS_____________________________________________________________________ Delay time for Digital Surround The distances are calculated in centimetres Measure the distance from the front loudspeakers and the Surround loud speakers to the listener s cent...

Страница 30: ..._________ Selecting the picture menu 1 Display the menu line by pressing OSD 2 Select the Ö item Settings using Ǹ or Ƿ and press P to confirm 3 Select O Picture menu using or and then press Ƿ to confirm Note For further operation see the following sections each one starting from Step 1 Adapting the television format If your television has a 16 9 screen format then select the 16 9 setting If you ha...

Страница 31: ...ape Black level shift Video shift Colour settings Personal colour A S 8 16 9 On 1 Personal Settings ENGLISH 51 PICTURE SETTINGS____________________________________________________________________ Colour settings This function enables you use pre set values colour brightness contrast for the playback image 1 Select the Colour settings line using or and activate by pressing Ƿ 2 Select the desired se...

Страница 32: ... Italiano English S a English English English Ö P K I R k 1 2 1 off no off O U Ü Audio Subtitle Menu Português Italiano English S a 52 CUSTOM SETTINGS__________________________________________________ Selecting the language menu 1 Display the menu line by pressing OSD 2 Select the Ö item Settings using Ǹ or Ƿ and press to confirm 3 Select M Language menu with or and activate with Ƿ Note For furthe...

Страница 33: ...eoScartSwDvd 23a VideoColDencOn Off Bildtest 1 Laufwerk Version Schubladen Test 41a b BeSledgeOut In 39a BeDiscMotorOn Schlitten Test Disk Motor Test 38a BeFocusOn 40a BeRadialOn Fokus Test Radial Test 42a b c BeGroovesIn Mid Out 43a b BeTrayOut In Spursprung Test Schubladen Test 31 LogReadErr 32 LogReadbits Fehlerprotokoll Bits Dauerlauftest Tontest 1 DVD EURO AV Test 54b VideoScartSwPass EURO AV...

Страница 34: ...E CHAPTER TRACK SCAN A B FTS TOTAL TRACK TRACK TITLE TIME CHAPTER VD TITLE W REPEAT L DIGITAL SURROUND L R C R S S S Durch Drücken der Taste NEXT am Gerät kann zum nächsten Test übergegangen werden Fernbedienungs Test Servicetestebene DispRc Dazu ist auf der Fernbedienung eine beliebige Taste einmal zu drücken Der Code der gedrückten Taste wird am Gerätedisplay als Hexadezimalzahl gezeigt solange ...

Страница 35: ...on Servicetestebene BeVer Die Version ist die Laufwerkversions Nummer VCD D SHUFFLE CHAPTER TRACK SCAN A B FTS TOTAL TRACK TRACK TITLE TIME CHAPTER VD TITLE W REPEAT L DIGITAL SURROUND L R C R S S S Durch Drücken der Taste NEXT können die Laufwerktests gestartet werden Schubladen Test Servicetestebene BeTrayOut In Als erstes wird die Schublade überprüft Dieser Test soll außerdem eine Möglichkeit g...

Страница 36: ...s befindet sich auf Seite 2 8 Fehlerbits Die Fehlerbits werden in der Ebene ReadBits gelesen Während dem Lesen der Fehlerbits erscheint folgende Information auf dem Display VCD D SHUFFLE CHAPTER TRACK SCAN A B FTS TOTAL TRACK TRACK TITLE TIME CHAPTER VD TITLE W REPEAT L DIGITAL SURROUND L R C R S S S Es werden nur gesetzte Fehlerbits mit ihrer Nummer dezimal ange zeigt Die Bedeutung der Bits ist a...

Страница 37: ...schaltet werden 1 Bedienvariante M enu Die Bedienvariante M enu ist Bestandteil des Servicetestprogramms Das gewünschte Menü kann durch Eingabe der Nummer des gewähl ten Menüpunktes aufgerufen werden Jede Eingabe ist mit einem return zu bestätigen Ungültige Eingaben zeigt der Menüverwalter mit folgender Fehlermeldung Beispiel Select 9 Invalid menu choice number out of range ER Press RETURN to cont...

Страница 38: ... 47b 3 Total Play time CDDA VCD 47c 4 Total Play time DVD 47d VIDEO COLOURBAR MENU 1 Colourbar DENC on 23a 2 Colourbar DENC off 23b SCART MENU 1 Scart low 25a 2 Scart medium 25b 3 Scart high 25c 1 2 Bildschirmdarstellung der Menüs Bei der Verwendung von Menüs ist keine spezielle Bildschirmdarstel lung festgelegt Mit Ausnahme des vorher beschriebenen Formats gibt es für die Menüs kein bestimmtes La...

Страница 39: ...erface zum Slave Prozessor auf der Display platte mit einem Echo Befehl 13 PapS2bEcho Überprüft das S2B Interface zum Laufwerk mit einem Echo Befehl 14 PapS2bPass Schaltet den RS232 Port und den S2B Port auf Durchgang Der einzige Weg diesen Test zu beenden ist den DVD Spieler vom Netz zu trennen 15 PapNvramWrR Nicht zerstörender Mustertest aller Speicherzellen im NVRAM Dieser Test erkennt Fehler i...

Страница 40: ...ig gelesen 15010B 14 werden Eingabe als eine Suchfunktion nicht 15010C 13 möglich Datenpfad versucht auf einen nicht 15010D 12 existenten Einlaufbereich Zugriff zu nehmen Nicht existierender Burst angefordert 15010E 11 S2b Kommunikations Fehler 1501F0 10 S2b Kommunikations Fehler 1501F1 9 S2b Kommunikations Fehler 1501F3 24 S2b Kommunikations Fehler 1501F4 23 S2b Kommunikations Fehler 1501F5 22 Ko...

Страница 41: ...Lo Colour Setup Test 2 1 Interactive Tests 2 1 1 Keyboard Control Unit Display Test Service Test Level DispDisplay By showing a series of test patterns on the local display the local display is tested To step through all different patterns the user must either press PLAY pattern is OK or PAUSE pattern was incorrect to proceed to the next pattern The display of patterns is continued cyclically mann...

Страница 42: ...l proceed to the next test Remote Control Test Service Test Level DispRc The user must press any key on the remote control just once The code of the key pressed will be shown on the local display in hexadecimal format as long as the key is pressed VCD D SHUFFLE CHAPTER TRACK SCAN A B FTS TOTAL TRACK TRACK TITLE TIME CHAPTER VD TITLE W REPEAT L DIGITAL SURROUND L R C R S S S The user can manually c...

Страница 43: ...est Service Test Level BeTrayOut In First the tray is tested The purpose of this test is also to give the user the possibility to put a disc in the tray of the DVD player Some tests on the Drive Mechanism require that a disc is present in the player At the end of the Drive Mechanism tests this tray test will be repeated solely to enable the user to remove the disc in the tray The local display wil...

Страница 44: ...E W REPEAT L DIGITAL SURROUND L R C R S S S Only the set errorbits will be shown by their decimal number Refer to page 3 18 for the explanation of each bit number If the display only shows EB 0 no error bits were set By pressing NEXT the user can continue to the next test 2 3 Loop Test At the start of the loop test the display will show the result of the interactive player test VCD D SHUFFLE CHAPT...

Страница 45: ...switched off and on again 1 Operating variant M enu The Operating variant M enu is part diagnostic mode A selection can be given by the user by typing the number of the menu item chosen at the prompt Each entry must be terminated with a return Invalid selections will cause an error message by the Menu Handler Example Select 9 Invalid menu choice number out of range ER Press RETURN to continue Resu...

Страница 46: ... 47b 3 Total Play time CDDA VCD 47c 4 Total Play time DVD 47d VIDEO COLOURBAR MENU 1 Colourbar DENC on 23a 2 Colourbar DENC off 23b SCART MENU 1 Scart low 25a 2 Scart medium 25b 3 Scart high 25c 1 2 Screen layout with menus When menus are used no specific screen layout can be given menu information will not be in a special format except for the layout as mentioned in the previous paragraphs A typi...

Страница 47: ... 11 PapI2cNvram Checks the I2C interface with the NVRAM by reading from an arbitrary address 12 PapI2cDisp Checks the I2C interface with the slave processor on the display PWB with the echo command 13 PapS2bEcho Checks the S2B interface to the Drive Mechanism with an echo command 14 PapS2bPass Switches the RS232 port and the S2B port in pass through mode The only way to exit this nucleus is via di...

Страница 48: ...eek couldn t be performed 15010C 13 datapath tries to access a non existing 15010D 12 lead in area A non existing burts cutting area is 15010E 11 requested S2b communikation error 1501F0 10 S2b communikation error 1501F1 9 S2b communikation error 1501F3 24 S2b communikation error 1501F4 23 S2b communikation error 1501F5 22 communikation error with the STi 5505 90000 32 communikation error with the...

Страница 49: ...06 2109 Anlaufschaltung und Spannungsversorgung prüfen 3123 3134 2129 6129 3129 3111 2111 IC7110 prüfen D Fehlersuchdiagramme Fehlersuchdiagramm Netzteil GB Trouble Shooting Diagrams Trouble Shooting Diagram Power Supply Power Supply OK Check DC voltages 12V 5V Stand by 5V 5V 3V3 2V9 Check DC voltages 12V 5V Stand by 5V 5V 3V3 2V9 OK YES not OK not OK not OK not OK not OK Unplug the connections 02...

Страница 50: ... 3 3V at plug contact J4 1 during standby light Service Test Programme PC System Test Service Test Level 29 DispLed Keyboard signals at Pin 36 and 37 see Keyboard Control Test Instruction Keyboard signals at Pin 26 33 see Keyboard Control Test Instruction Service Test Programme PC System Test Service Test Level 27 DispKeyb Check supply voltages The Keyboard Control Unit uses a 24V stabiliser VREG2...

Страница 51: ...fen OK NF Pegel nicht OK OK OK Tonstörung JA NEIN NF an EURO AV Buchsen AUX TV nicht OK Oszillogramme siehe Seite 4 43 Oscillograms see page 4 43 Switch on the sinus signal Service Test Programme PC System Test Service Test Level 21a AudioSineOn Power Supply Check supply voltages 3 3V IC7400 8VAud IC7304 8Vstby R3615 12Vstby T7333 Check flex connection to DVD Monoboard not OK OK not OK OK AF at TP...

Страница 52: ...coax TP18 nicht OK OK Digital out optisch nicht OK Kein Ton an Digitalausgang Digitalausgang OK Trafo 5400 prüfen OK Oszillogramme siehe Seite 4 43 Switch on the sinus signal Service Test Programme PC System Test Service Test Level 21a AudioSineOn not OK OK not OK OK not OK No Sound at Ananlog outputs Analog outputs OK OK Switch on the sinus signal Service Test Programme PC System Test Service Tes...

Страница 53: ...Servicetestprogramm PC Systemtest Service Testebene 53a 53b VideoScartSwPass Oszillogramme siehe Seite 4 43 Power Supply Check oscillograms at TP1 3 24 27 Check IC7305 10V at IC7305 25 5V at IC7305 17 1 2V at EURO AV TV 7 Check VIDEO Buffer T7306 T7309 T7325 Check supply voltages 8Vstby 8Vstby 12Vstby 6V 5V Check IC7304 R3615 Check flex connection to DVD Monoboard not OK OK VIDEO Connector 1300 13...

Страница 54: ...diotaktfrequenz DVD F703 12 2880MHz 0 02 11 I2C NVRAM access 12 I2C Interface Test für Eject µC 13 S2B Interface Test für Laufwerk 15 NVRAM Write Read 3 Audiosignalweg Die A V MUX Platte muss für folgende Tests am DVD Monoboard angeschlossen sein Ref Anmerkung Testpunkt Messwert 21a Audio MMA AC3 Sinus einschalten F628 F629 siehe Seite 4 43 Test beenden F630 F631 DVD Player vom Netz trennen Der in...

Страница 55: ...usgänge O A O B F59 F62 25mV 10mV DVDALAS Ausgänge O C O D F69 F72 25mV 10mV DVDALAS Ausgänge S1 S2 F75 F77 25mV 10mV GB Test Instructions DVD Monoboard General Impedance of measuring equipment should be 1MΩ To check the DVD Monoboard a Drive Mechanism with DVD Disc or a B E Emulator must be connected to the I2S input The analog signals Audio and Video must be measurable at the A V MUX Board Witht...

Страница 56: ...25mV 10mV 3 Audio Path For the next test the A V MUX Board must be connected to the DVD Monoboard Ref Remark Testpoint Value 21a Audio MMA AC3 Sinus On F628 F629 see page 4 43 Terminating the test Disconnect F630 F631 the DVD player from the mains The level of the 1kHz tone which is generated by Service Test Level 21a must be 1 8Vrms 0 25V at the audio chinch sockets With the following commands th...

Страница 57: ...1 12Vstby 12 GND 8006 8007 8004 8002 8005 8002 1 12V 2 GND 3 5Vstb 4 40V 8004 1 SCL 2 GND 3 SDA 4 STB_CONT 5 P50 8007 1 GND 2 HSYNC 3 GND 4 PCM_OUT2 5 GND 6 PCM_OUT1 7 NC 8 SCL 9 12Vstby 10 SDA 11 6V 12 NC 13 GND 14 C_ENC 15 GND 16 Y_ENC 8006 1 P50 2 B 3 G 4 GND 5 R 6 CVBS 7 GND 8 0 6 12V 9 8Vstby 10 5V 11 5V 12 KILL 13 GND 14 PCM_OUT0 15 LRCLK 16 SCLK 17 GND 18 PCM_CLK 19 STANDBY CENTER_ON 20 STE...

Страница 58: ...nals I2C P50 UDA1328T L R C LFE Lr Rr Center_on STV6410 SCART SWITCHING TDA4780 Color Cont setting I2C CVBS Y C RGB YC CVBS CVBS Y C RGB YC CVBS P50 to SLAVE RGB Stereo_mute optional Kill 8Vstab 3V3stab 12V Video IC s and audio buffers DAC Headphone out Lt Rt 6 AUX TV SCART SCART DIG_OUT AUDIO L R AUDIO L R 3 3 PCM 0dB 9dB 9dB DAC 7316 7305 7401 OPTICAL OUTPUT DIGITAL OUTPUT 1113 7104 7200 7503 72...

Страница 59: ... 3 SIGNAL PROCESSOR LASER SUPPLY DIAGRAM DECODER DIAGRAM SERVO 7311 CONTROL BUS DATA ADDRESS BUS AD 0 7 AD 0 7 A 8 16 A 0 16 A 0 7 AD 0 7 AD 0 7 PSENN FLASH ROM ADRESS LATCH 7202 7201 MEMORY 132K S RAM DATA ADDRESS CONTROL 8 15 1 4229_136 9936 Laser 1 Laser 2 Diode Amplifiers Processing DPD Land Groove Swap Dual Laser Supply Serial I Face Push Pull 3 Beam Tracking Var Gain Servo Signals DVD CD D1 ...

Страница 60: ...HESIZER FLASH CLOCK ACLK 27 MHz 1603 MUTE MUTE_AV SCART 0_6_12V DEEM 0 1 PAL_NTSC 6 5V 5V R C G B CVBS CVBS Y TO FROM CONN CONN CONN CONN 0 6 12V SERVICE 12Vstby 7608 7609 7610 7604 7607 AUDIO VIDEO SUBPICTURE 3V3 5V VIDEO FILTER BUFFER 2 5 SCART 0 1 MUTE SCLK PCM_OUT0 PCM_CLK LRCLK SPDIF_OUT R_OUT G_OUT B_OUT C_OUT CVBS_OUT Y_OUT 2 4 5 1604 CONN BOARD A V MUX TO 2 OPTION 12Vstby 3V3 6Vstby 8Vstby...

Страница 61: ...25 C 5 4128 C 5 4250 B 9 6129 D 2 6256 B 10 7223 A 9 7226 A 11 7228 A 11 7235 C 10 7256 B 10 F101 C 1 F102 B 1 F103 B 3 F104 A 2 F105 B 4 F106 B 4 F107 B 6 F108 A 3 F109 D 3 F110 D 4 F111 D 4 F201 B 10 F202 B 10 F203 C 11 F204 C 11 F205 C 10 F206 C 11 F207 B 11 F208 A 10 F209 A 9 F210 B 11 F211 C 10 F212 C 11 F213 C 11 F214 C 11 F215 C 10 F216 A 10 F217 A 10 F218 A 10 F219 A 10 F220 C 10 F221 C 11...

Страница 62: ... 3136 270K 3131 270K 3135 6R8 3126 4R7 22R 3111 3125 1K 3127 1R 3128 1R 15K 3104 22K 3102 3K6 3103 3110 10K 18K 3108 180K 3107 15K 3105 680R 3106 180R 3116 82K 3101 1K 3115 330R 3109 3124 220R 3123 18K 3129 10K 3122 2R7 3133 10M Only for US versions 3134 18K 3112 150R 3113 33R 3228 15K 3227 10K 3226 10K 3225 10K 3224 10K 3223 10K 3222 1K 3221 1K3 3258 10K 3254 1K 3255 680R 3257 27K 3253 27K 3256 4...

Страница 63: ...d Circuit Diagrams GDV 200 Platinenabbildungen und Schaltpläne Layout of PCBs and Circuit Diagrams GRUNDIG Service 4 13 GRUNDIG Service 4 14 A V MUX Platte Board Ansicht von der Bestückungsseite View of Component Side Ansicht von der Lötseite View of Solder Side ...

Страница 64: ...T CINCH 64 ROUT TV 60 ROUT VCR SCL 21 22 SDA 31 SLB AUX 25 SLB TV 27 SLB VCR 23 VCC12 55 VCCA 10 GNDV3 63 GOUT TV 35 LIN AUX 45 LIN ENC 41 LIN STB 53 LIN TV 49 LIN VCR 6 LOUT AUX 59 LOUT CINCH LOUT TV 2 62 LOUT VCR 28 RCIN AUX 42 RCIN ENC 1 RCOUT TV 37 RIN AUX 40 CIN ENC 54 CIN TV 48 CIN VCR COUT AUX 13 COUT VCR 5 34 CVBSIN STB 18 FBIN AUX FBIN ENC 19 17 FBOUT TV 11 FILTER 30 GIN AUX 44 GIN ENC 57...

Страница 65: ...by 8Vstby F140 8Vstby F115 F297 5K6 3607 F192 F300 F184 56R 8Vstby 3421 270R 3423 F175 33R 3416 F171 F149 F127 F145 F247 2408 220p 2402 220p F222 F212 F240 F104 F235 F190 F245 F232 7311 BC847B 2366 220p 220p 2369 F210 220p 2368 F198 4K7 BC817 25 7324 3357 100R 6Vstby YKC21 3930 1402 A 2 1 3439 F133 8Vstby F174 8Vstby 6Vstby 3600 4K7 6K8 3304 BC847B 7303 4K7 4K7 3307 F259 3605 680R 3308 3305 820R 3...

Страница 66: ... 3483 F447 F438 F445 3457 100R 1 4 11 F458 1301 c 1 MC33079 7408 A 3 2 12 3 11 8Vstby F466 F482 7409 F452 BC817 25 3 1 2 BC817 25 7411 GP1F32T 6400 100R 3492 BC817 25 7419 4K7 3520 12VAUD F474 2466 47u 3456 100R F489 2K7 3497 F406 F490 3489 3477 100R 2456 100u 5K6 4 3 2493 47p 3V3 1402 B YKC21 3930 100p 2484 220R 3487 5V 7418 BC857B 5V F467 F462 F469 3458 10K 3445 F415 2K7 3470 F498 3524 F477 21 2...

Страница 67: ... Layout of PCBs and Circuit Diagrams GDV 200 Platinenabbildungen und Schaltpläne Layout of PCBs and Circuit Diagrams GRUNDIG Service 4 22 GRUNDIG Service 4 21 Bedieneinheit Keyboard Control Ansicht von der Bestückungsseite View of Component Side ...

Страница 68: ... Supply 4 9 11 43 44 45 46 47 48 49 50 51 52 53 54 55 56 57 58 59 60 61 62 63 64 65 1 2 3 4 5 1 2 3 66 67 68 69 70 71 72 73 74 75 76 77 78 79 80 40 39 38 37 36 35 34 33 32 31 30 29 28 27 26 25 42 41 15 16 17 18 19 20 21 22 23 24 25 26 27 28 29 30 31 32 33 34 35 36 37 38 14 13 12 11 10 9 8 7 6 5 4 3 2 1 22 21 20 19 18 17 16 15 14 13 12 11 10 9 8 7 6 5 4 3 2 1 23 24 VCD D SHUFFLE CHAPTER TRACK SCAN ...

Страница 69: ...altpläne Layout of PCBs and Circuit Diagrams GDV 200 Platinenabbildungen und Schaltpläne Layout of PCBs and Circuit Diagrams DVD Monoboard Ansicht von der Bestückungsseite View of Component Side GRUNDIG Service 4 26 GRUNDIG Service 4 25 ...

Страница 70: ...tpläne Layout of PCBs and Circuit Diagrams GDV 200 Platinenabbildungen und Schaltpläne Layout of PCBs and Circuit Diagrams GDV 200 DVD Monoboard Ansicht von der Lötseite View of Solder Side 4 27 GRUNDIG Service 4 28 GRUNDIG Service ...

Страница 71: ... F2 100R 3155 F60 5D 3V3S 3106 2R2 2139 100p F37 F13 2117 22n 2123 180p F21 100R 3159 F97 3167 100K F80 F49 TD1 35 TD2 37 TDO 34 TM 19 VDDA1 8 VDDA2 59 VDDA3 53 VDDA4 44 VDDD3 22 VDDD5 30 VDDL 63 VSSA1 9 VSSA2 58 VSSA3 57 VSSA4 43 VSSD 26 52 O A 48 O B 47 O C 46 O CENTRAL 40 O D 45 R EXT 60 RF REF 54 RFN 56 RFP 55 S1 42 S2 41 SICL 24 SIDA 23 SILD 25 31 STB FTC 33 FTC REF 36 HEADER 21 LAND 20 LPF D...

Страница 72: ...12 F214 9203 3A F267 3V3S 1M 3203 3V3S 3V3S F245 1n 2210 F225 9205 F261 3V3S F281 F273 3234 8K2 3235 100K BAS216 6200 2205 100n 9208 2K7 3208 A9 CE_ 22 DQ0 13 DQ1 14 DQ2 15 DQ3 17 DQ4 18 19 DQ5 20 DQ6 DQ7 21 OE_ 24 RESET_ 1 VCC 32 VSS 16 WE_ 31 11 A10 23 25 A11 A12 4 A13 28 A14 29 A15 3 A16 2 A17 30 A2 10 A3 9 A4 8 A5 7 A6 6 A7 5 A8 27 26 Am29F002B 7202 A0 12 A1 3238 10K F289 4200 F200 1201 3V3S F...

Страница 73: ...8 42 NC6 51 NC7 62 NC8 69 NC9 12 OTD 23 PORE 74 RAD0 75 RAD1 87 RAD10 88 RAD11 RAD12 89 90 35 DA5 34 DA6 33 DA7 56 DATA 53 EBUOUT 55 FLAG 6 HFIN 30 INT IREF 2 97 MEAS1 13 MOTO1 15 MOTO2 T3 24 MUXSW 14 NC1 86 NC10 16 NC2 7311 8 AGCOUT 48 ALE 27 BCAIN 57 BCLK 96 CFLG 26 CL1 CRIN 94 95 CROUT 49 CSI 43 DA0 41 DA1 40 DA2 39 DA3 37 DA4 1R 3316 SAA7335 22n 2305 F381 F349 F350 F369 F354 F338 4K7 3313 5V F...

Страница 74: ...E_ 29 RAS_ 14 UCAS_ 30 VCC1 1 VCC2 6 VCC3 21 VSS1 22 VSS2 37 VSS3 42 WE_ 13 28 I O0 2 I O1 3 35 I O10 I O11 36 I O12 38 I O13 39 I O14 40 I O15 41 I O2 4 I O3 5 I O4 7 I O5 8 I O6 9 I O7 10 I O8 33 I O9 7400 GM71V18163CJ A0 17 A1 18 A10 16 A11 15 A2 19 A3 20 A4 23 A5 24 A6 25 A7 26 A8 27 A9 VCCQ3 38 VCCQ4 44 WEN 15 GND2 50 GNDQ1 4 GNDQ2 10 GNDQ3 41 GNDQ4 47 LDQM 14 NC1 33 NC2 37 RASN 17 UDQM 36 VC...

Страница 75: ...85 GND17 200 GND2 19 GND3 35 GND4 68 GND5 77 GND6 87 GND7 96 103 GND8 GND9 111 G_OUT DQ12 112 DQ13 113 DQ14 114 DQ15 115 DQ2 94 DQ3 97 DQ4 98 DQ5 99 DQ6 100 DQ7 101 DQ8 106 DQ9 107 DQML 91 DQMU 105 GND1 4 GND10 DATA14 157 DATA15 158 DATA2 143 DATA3 144 DATA4 145 DATA5 146 DATA6 147 DATA7 148 DATA8 151 DATA9 152 DMAXFER 134 DQ0 92 DQ1 93 DQ10 108 DQ11 109 B_V4 42 B_WCLK 40 CAS0n_OR_HOLDACK 129 CAS1...

Страница 76: ...9 100MHZ 5607 22u 3654 432R 8Vstby STB_CONT 12Vstby 3642 10K 5 7 9 11 13 5V 2 4 6 10 12 14 8 GND 1 15 16 VCC 3 3K3 3637 74HCT365D 7611 7607 BC847B BC847B 5V 5600 BLM21 5 22K 3619 7615 3658 PS2 4 VDD1 13 VDD2 3 X1 2 X2 F602 1K 10 13_5M 9 27M 14 3_68M 6 ACLK 8 AS0 12 AS1 5 GND1 11 GND2 7 PCLK 15 PS0 16 PS1 1 3652 MK2742 7616 18 SCKO1 12 SCKO2 14 SCKO3 17 SCKO4 13 VDD 3 VDDB 16 VDDP 8 XT1 6 XT2 5 761...

Страница 77: ...ne Layout of PCBs and Circuit Diagrams GDV 200 Platinenabbildungen und Schaltpläne Layout of PCBs and Circuit Diagrams DVD Monoboard Messpunkte Test Points Ansicht von der Lötseite View of Solder Side GRUNDIG Service 4 42 GRUNDIG Service 4 41 ...

Страница 78: ... F703 48kHz Audio Clock 0V Ch1 100V M 5µs MP1 T7125 Drain 0V Ch1 1V M 5µs MP2 T7125 Gate 0V Ch1 200mV M 5µs MP3 IC7110 10 0V Ch1 200mV M 5µs MP4 T7125 Source CH1 200mV M 20µs TP1 video B CH1 200mV M 20µs TP2 video G CH1 200mV M 20µs TP3 video R CH1 200mV M 20µs TP4 CVBS CH1 200mV M 20µs TP5 C_ENC CH1 200mV M 20µs TP6 Y_ENC CH1 2V M 500ns TP7 PCM_OUT CH1 2V M 10 0µs TP8 LRCLK CH1 2V M 100ns TP9 SCL...

Страница 79: ...GDV 200 Explosionszeichnungen und Ersatzteillisten Exploded Views and Spare Parts Lists GRUNDIG Service 5 1 1 Explosionszeichnungen und Ersatzteillisten Exploded Views and Spare Parts Lists ...

Страница 80: ...ESONDERTE E LISTE X SEE SEPARATE PARTS LIST S 759880454400 NETZTEIL KPL 30PS203 00 00009 759880452600 SICHERUNGSHALTER 00101 S 759880424000 NETZBUCHSE 01120 S 831562150300 SI 5X20 T2 5A H 250V 01125 S 759880450600 FUNKENSTRECKE DSP 501N A2 L 05120 759875388300 NETZ FILTER L 05131 759880450500 SPULE 100MHZ L 05210 759880452500 SPULE 6 8UH 20 7 7X9 5 L 05230 759880454800 SPULE 10UH 10 4X9 8MM LA L 0...

Страница 81: ... T 07305 830100484700 SMD TRANS BC847B IC 07104 759880449300 IC ROM SLAVE IC 07316 830533478000 IC TDA4780V3 V4 IC 07400 759880452200 IC LD1117DT33 IC 07401 759880452300 SMD IC UDA1328 T IC 07403 759880420400 IC MC33079D IC 07408 759880420400 IC MC33079D IC 07412 759880437400 SMD IC UDA 1328 T N1 IC 07413 759880452400 IC 74HC4053N IC 07414 720086586800 IC LM 833 D L 05400 759540502100 DIGITAL AUSG...

Страница 82: ...ANA S P A Via G B Trener 8 I 38100 Trento 00 39 04 61 89 31 11 GRUNDIG OY Luoteisrinne 5 FIN 02271Espoo 0 03 58 98 04 39 10 GRUNDIG AUSTRIA Ges m b H Breitenfurter Straße 43 45 A 1120 Wien 00 43 1 81 11 76 03 GRUNDIG POLSKA SP Z O O Ul Czéstochowska 140 PL 62800 Kalisz 00 48 62 7 66 77 70 GRUNDIG NORGE A S Glynitveien 25 Postboks 234 N 1402 Ski 00 47 64 87 82 00 GRUNDIG DANMARK A S Lejrvej 19 DK 3...

Отзывы: