Grundig GDR 4500 Скачать руководство пользователя страница 54

54

Note:

Do not connect any other equipment while the device is switched
on. Switch off the other equipment as well before connecting it.
Only plug the device into the mains socket after you have connected
the external devices and the antenna.

Connection and preparation

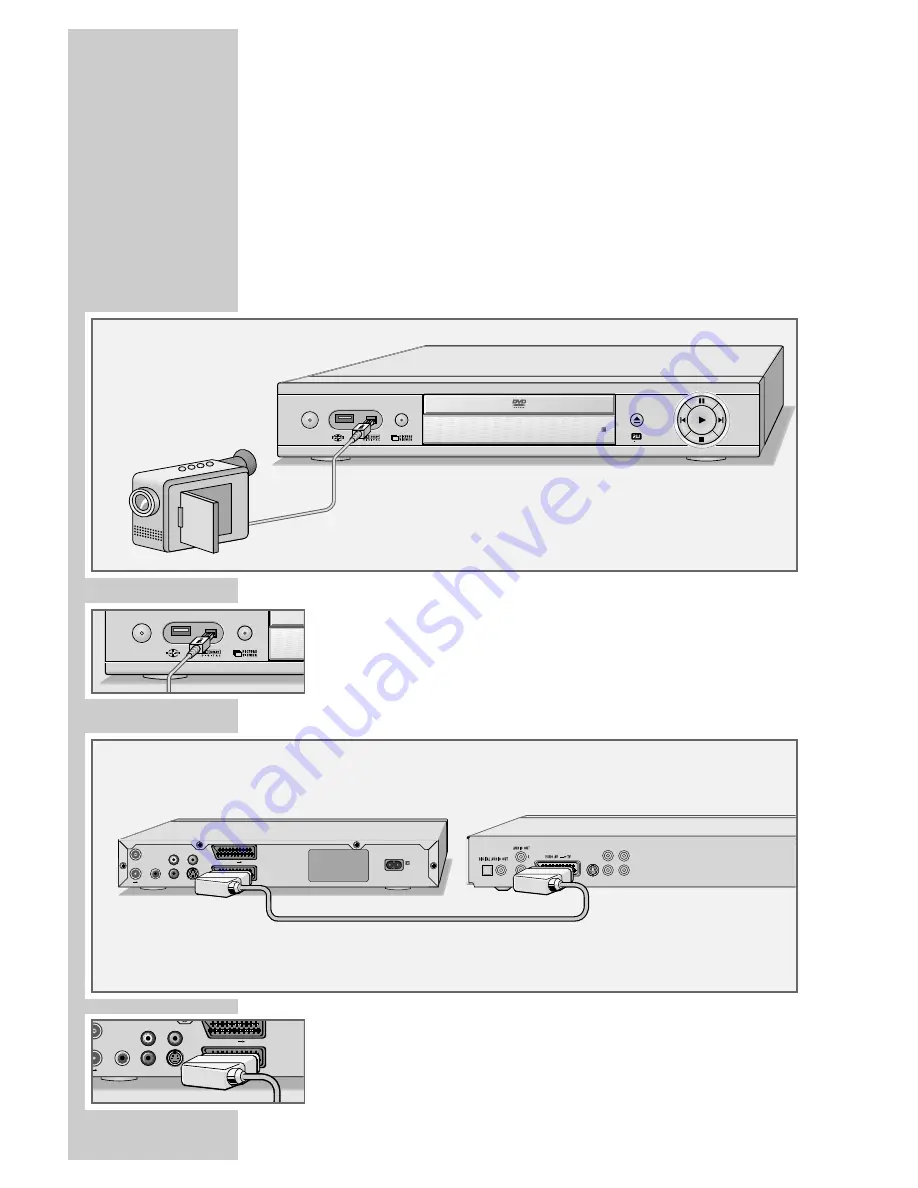
Connecting a camcorder

1

Connect the »

DV IN

« socket on the front of the DVD recorder to

the corresponding socket on the digital camcorder using a stan-
dard cable.

Connecting a video recorder, DVD player or 
set-top box

1

Connect the »

EURO AV2 

DECODER

« socket on the DVD

recorder to the corresponding socket on the video recorder,
DVD player or set-top box using a standard EURO-AV (Scart)
cable.

COPYING

______________________________________________

ǵ

ON/OFF

DVD   ReWritable

110-240 V

~

50/60 Hz 35 W

ANTENNA IN

OUT

TV DIGITAL AUDIO

OUT

L

R

AUDIO OUT

S-VIDEO OUT

VIDEO OUT

EURO AV 1

TV

EURO AV 2

DECODER

S VIDEO OUT VIDEO OUT Pr/Cr

Y

Pb/Cb

ON/OFF

ANTENNA IN

TV DIGITAL AUDIO

OUT

L

R

AUDIO OUT

S-VIDEO OUT

VIDEO OUT

EURO AV 1

TV

EURO AV 2

DECODER

Содержание GDR 4500

Страница 1: ...DVD RECORDER GDR 4500 ENGLISH...

Страница 2: ...ing an audio system with analogue two channel stereo sound 19 Connecting a digital multi channel amplifier or digital two channel audio system 20 Connecting the mains cable 20 Inserting batteries in t...

Страница 3: ...recording 39 Preparing for recording 39 Manually recording television programs from the antenna or the cable feed 40 Manually recording television programs from the satellite receiver 40 Finalising a...

Страница 4: ...off 62 64 Personal settings 62 Language settings 63 Switching the screen saver on off 63 Setting the signal type for the video output socket 64 Recording settings 65 68 Special settings 65 Tuning tel...

Страница 5: ...both CD ROM and DVD ROM Disc formats DVD RWs and DVD Rs are suitable for recording and playback Due to the difference in quality of the recording media and the quality of the recording itself it can o...

Страница 6: ...3 2 Batteries 1 5 V Micro type 4 Operating manual 5 Mains cable GDR 4500 DVD RECORDER ______________ ON OFF DVD ReWritable DVD RECORDER Q SET SV 3 2 1 6 5 4 7 8 9 0 CL SOURCE Tele Pilot 88 D TOP MENU...

Страница 7: ...circumstances No warran ty claims are accepted for damage resulting from improper handling Do not place any vessels filled with liquid such as vases on the DVD recorder as they may spill liquid thus...

Страница 8: ...e steps Compartment for CD media Display Opens and closes the disc compartment 8 Starts playback Confirms the options selected in the menus II Switches to playback and recording pause switches the fre...

Страница 9: ...hannel dts Information on the type of audio signal DIGITAL REC Recording REC Timer recording ANGLE The DVD provides various camera angles PROGRAM Function is activated L R Stereo audio signal selected...

Страница 10: ...nnecting to a digital multi channel audio video amplifier or AV receiver VIDEO OUT VIDEO OUT Video output socket for connecting a television or AV receiver with a cinch socket S VIDEO OUT Video output...

Страница 11: ...5W max Caution Do not connect any other equipment while the device is switched on Switch off the other equipment as well before connecting it Only plug the device into the mains socket after you have...

Страница 12: ...king selected sections for repeated playback CL Deletes a programmed timer position Adds titles to the favorites list deletes titles from the favourites list RND Selects the RANDOM PLAY function PROG...

Страница 13: ...enu Confirms the options selected in the menus x Switches up one menu level MENU Opens the disc menu of a DVD during playback TOP Calls up the title menu of the DVD during playback MENU SELECT Switche...

Страница 14: ...cable of the rooftop antenna or cable feed into the antenna socket ANTENNA IN on the DVD recorder 2 Plug the antenna cable supplied into the OUT TV socket on the DVD recorder and the antenna socket on...

Страница 15: ...ideo recorder in between the DVD s copy protection may impair the picture quality Connect the television or flat screen using a EURO AV Scart cable and an adapter Progressive Scan Caution This connect...

Страница 16: ...te If the socket designations of the external devices differ from those indicated above check the operating instructions of the external device to find out which socket you must connect the DVD record...

Страница 17: ...standard cinch cables into the L AUDIO OUT R sockets on the DVD recorder and the corresponding sockets AUDIO IN on the television or flat screen CONNECTION AND PREPARATION__ ANTENNA IN T TV DIGITAL A...

Страница 18: ...a standard cinch cable into the L AUDIO OUT R socket on the DVD recorder and the corresponding sockets on the audio system Caution Do not connect the L AUDIO OUT R sockets on the DVD recorder to the...

Страница 19: ...18 because depen ding on the disc type the DIGITAL AUDIO OUT socket may not be able to transfer the signal CONNECTION AND PREPARATION__ ANTENNA IN OUT TV DIGITAL AUDIO OUT L R AUDIO OUT S VIDEO OUT VI...

Страница 20: ...open the battery compartment press the catch and remove the lid 2 When inserting the batteries Micro type e g R06 or AA 2 x1 5 V observe the polarity marked on the battery compart ment 3 Close the bat...

Страница 21: ...confirm 2 Select NEXT by pressing OK Tuning television stations The DVD recorder has its own receiver unit It can receive and record from television stations independently of the television This means...

Страница 22: ...with S or A and press OK to activate it 5 Enter the time as six digits using 1 0 and press OK to confirm the setting 6 Select NEXT by pressing OK Ending initial setup 1 Select FINISHED by pressing OK...

Страница 23: ...you have a 4 3 format television or flat screen the following set tings are available 4 3 P S for wide screen playback with the left and right edges of the picture cropped depending on the DVD used o...

Страница 24: ...pressing blue To disc menu Calls up the menu of a home made DVD RW or DVD R so that you can change the name of a disc for example The menu can also be called up directly by pressing MENU To set up me...

Страница 25: ...disc compartment with the label facing upwards 3 Press on the DVD player or 8 on the remote control Display 01 LOAd the disc tray retracts again Display on the DVD recorder The chapter and the elapse...

Страница 26: ...turer with subtitles in up to 32 languages You can select the subtitles you prefer Playback 1 After the disc compartment closes and the DVD is scanned playback starts automatically Does not start play...

Страница 27: ...nt is closed and the disc is scanned play back starts automatically if the disc is write protected or finalised Does not start playback automatically start playback with 8 Note If playback does not st...

Страница 28: ...th 8 The display shows the tracks and elapsed playing time Note Depending on the type of S VCD VCD used you may have to press s 6 or 5 a or 1 0 to select the disc title from a list Press x to return t...

Страница 29: ...ngs They can be played in the normal manner on an audio system The digital signals transmitted during MP3 playback are PCM encoded regardless of the audio output setting The signals are output with th...

Страница 30: ...de show press 8 Displaying pictures on a JPEG CD 1 After the disc compartment has closed and the JPEG CD has been scanned the file browser contents menu of the JPEG CD is displayed 2 Press A or S to s...

Страница 31: ...ure CD is scanned the slide show starts automatically Does not start playback automatically start playback with 8 Adjusting the picture display The pictures can be rotated or reversed 1 During playbac...

Страница 32: ...can be called up with DISPL Repeat functions can be selected in the Mode line 4 Press 7 to end playback Selecting titles directly with the number buttons 1 During playback press 1 0 to enter the one...

Страница 33: ...electing a section to the minute 1 During playback press to open the time display 2 Enter the playing time in five digits hours minutes and seconds using 1 0 and press OK to confirm The DVD recorder l...

Страница 34: ...to resume normal playback Selecting camera angles for scenes Some DVDs contain scenes or passages which were filmed several times from different camera angles You can choose from among these differen...

Страница 35: ...LE 02 10 ENG 2 Press y to select the subtitle language Notes To switch off the subtitles keep pressing y until Off appears in the display The structure of the DVD itself may stop you from activating a...

Страница 36: ...ed or To repeat the entire disc press b during playback until D RPT appears in the display The disc is repeated 2 To quit the function keep pressing b until NORMAL appears in the display Repeating a s...

Страница 37: ...an no longer be recorded on If you want to play them on your DVD recorder you do not have to finalise them You can add more recordings and delete them as necessary Note that any playing time you delet...

Страница 38: ...ime is shorter in high quality mode than in standard quality mode Note The recording quality HQ SP SP LP EP SLP or SEP is selected automatically during playback Remaining recording time You can obtain...

Страница 39: ...example TV Display for example Monitor P001 ARD the current TV station is shown 2 Press A or S or use the number buttons 1 0 to select the TV channel 3 Press Q SET until the recording quality you requ...

Страница 40: ...ding you can press to enter the switch off time 30 minutes 60 minutes 90 minutes off The switch off time depends on the playing time left on the disc The DVD recorder automatically switches off the re...

Страница 41: ...iver press S or A to select the EURO AV 2 chan nel and select the TV station on the satellite receiver The satel lite receiver must be switched on at the selected recording time and for the duration o...

Страница 42: ...elect Cancel with S or A and press OK to confirm 10 Repeat from step 3 if you want to make more recordings or press green to quit the timer recording menu 11 Switch the DVD recorder to stand by with o...

Страница 43: ...re is no disc in the compartment or the disc is unsuitable for recording Put in another disc Failed to start recording Disc is not ready The disc in the loader is write protected or there is not enoug...

Страница 44: ...appears displaying the current data 2 Press S or A to select the timer item and OK to confirm The Item editor menu appears 3 Press S or A to select the recording data press OK and then S or A or 1 0...

Страница 45: ...title menu select Edit title The rest of the process is described in the following sections starting from step 1 Adding chapter markers You can add chapter markers within a title to allow you to find...

Страница 46: ...he chapter is skipped during playback Note If you want to see the chapter again select it with 1 0 select Show chapter with S or A and press OK to confirm 3 Press blue to quit the function Creating a...

Страница 47: ...s 3 Select Rename title with S or A and press OK to confirm 4 Press a or s to select the input position and S to switch to the keyboard 5 Press S A a or s to select letters and numbers and OK to confi...

Страница 48: ...function allows you to use free recording space on the disc Note that only the playing time of the title to be overwritten is available for recording 1 Put a DVD R or DVD RW in the disc compartment Th...

Страница 49: ...press 8 2 Select any title with S or A and press s to open the title menu The title menu appears 3 Select Overwrite disc with S or A and press OK to confirm 4 Press SOURCE to select the input source f...

Страница 50: ...put position and S to switch to the keyboard 5 Press S A a or s to select letters and num bers and OK to confirm Notes The keys at the bottom of the keyboard are function keys Press Caps to switch bet...

Страница 51: ...new titles A new title is added to the disc 1 Put a DVD R or DVD RW in the disc compartment The index screen appears Note If the index screen does not appear press 8 2 Select the disc information MY D...

Страница 52: ...layed on a DVD player Note Depending on the length of the title this can take some time Lock disc This protects the disc from being accidentally recorded over 1 Put a DVD R or DVD RW in the disc compa...

Страница 53: ...the content of the disc DVD RW If you cannot switch to the disc menu on a DVD RW to delete the disc the disc is not compatible to the DVD recorder you can delete the disc using the function in the Sy...

Страница 54: ...rder using a stan dard cable Connecting a video recorder DVD player or set top box 1 Connect the EURO AV2 DECODER socket on the DVD recorder to the corresponding socket on the video recorder DVD playe...

Страница 55: ...h SOURCE or DV on the DVD recorder EURO AV 2 for the video recorder DVD player or set top box or DV for the digital camcorder 2 Press Q SET until the recording quality you require appears in the displ...

Страница 56: ...the television station which requires the decoder using the numerical buttons 1 0 and confirm with OK 5 Select Decoder with S or A and press OK to confirm Press S or A to select ON and press OK to co...

Страница 57: ...r example TV Display for example Monitor P001 ARD the current TV station is shown 2 Press S or A or the number buttons 1 0 to select the pay TV station 3 Press Q SET until the recording quality you re...

Страница 58: ...player using a USB cable or Insert the USB plug of the USB memory stick in the USB inter face IN on the DVD recorder Note It is possible to simultaneously connect several devices to the USB interface...

Страница 59: ...disc compartment Note There may not be any film data on the DVD R RW Read the section on page 53 to find out how to delete the data on the DVD RW Recording 1 Press SELECT to select the USB input sourc...

Страница 60: ...l and OK to confirm 8 Press SETUP to finish the setting Changing the access code password 1 Press SETUP to open the setup menu 2 Select with S or A and press OK to confirm 3 Select Rating level with S...

Страница 61: ...ks have a very large dynamic volume range hence there is a great difference in volume between quiet and loud tones The dynamic range compression function optimises this dynamic range at low volume 1 P...

Страница 62: ...rm 2 Select your language using S or A and press OK to confirm Selecting the dubbing language If several languages are available on the current DVD the sound is played back in the language you have se...

Страница 63: ...CART output with S or A and press OK to confirm 4 Select the video output with S or A and press OK to confirm RGB for EURO AV1 TV YUV for EURO AV1 TV CVBS for EURO AV1 TV or VIDEO OUT 5 Press SETUP to...

Страница 64: ...programmes 1 Select Default source with S or A and press OK to confirm 2 Select the input source with S or A and press OK to confirm Selecting the recording quality The function allows you to select...

Страница 65: ...Select the input position with a or s enter letters or numbers with S or A and press OK to confirm 6 If you want to search by channel special channel or frequency select Scan mode with S or A and pre...

Страница 66: ...levision stations You can sort the TV stations in any order you like 1 Press SETUP to open the setup menu 2 Select with S or A and press OK to confirm 3 Select Sort channel order with S or A and press...

Страница 67: ...etup menu 2 Select with S or A and press OK to confirm 3 Select Remote control type with S or A and press OK to activate 4 Select the remote control type with S or A and press OK to confirm The DVD re...

Страница 68: ...to confirm 3 Select Restore factory settings with S or A and press OK to confirm 4 Select OK with a or s and press OK to confirm 5 Press SETUP to finish the setting SPECIAL SETTINGS__________________...

Страница 69: ...igital Surround decoder must be connected to the digital output S PDIF of the DVD recorder Manufactured with permission from Dolby Laboratories The Dolby label and the double D logo are trademarks of...

Страница 70: ...ere are no fingerprints on the DVD CD follow the cleaning instructions on the next page The DVD CD cannot be played Check if the label on the DVD CD is facing upwards Clean the DVD CD Check if the DVD...

Страница 71: ...ents such as benzene thinners conventional cle aner or anti static spray for vinyl records Do not use a cleaning CD as it might damage the laser of your DVD recorder Software information We wish to po...

Страница 72: ...be protected by a 5A fuse either in the plug or at the distribution board If this type of plug becomes defective ensure that the fuse is removed before disposal to eliminate potential shock hazard If...

Страница 73: ...Grundig Multimedia B V De Boelelaan 7 NL 1083 HJ Amsterdam http www grundig com 34 05...

Страница 74: ...Grundig Multimedia B V De Boelelaan 7 NL 1083 HJ Amsterdam http www grundig com 05 38...

Отзывы: