


Green Link Light indicates good network connection.
Orange Activity Light flashes for network activity indication.
Power up the Camera
To power up the IP Camera please connect the camera´s DC 12V or AC 24V cable with a corresponding power
supply. Alternatively, connect the Ethernet cable to the camera’s PoE port and plug the other end of the cable
into a PoE switch.
NOTE:
If using PoE, make sure Power Sourcing Equipment (PSE) is in use in the network.
Before Login to the IP Camera
A client program will be automatically installed on your PC when connecting to the IP Camera. Before
logging in to the IP Camera, please make sure the ActiveX settings in the Internet Explorer allow the client
software to be installed and executed. To ensure this you can set the security level of the Internet Explorer to
default level. For further details, please refer to the IP Camera’s user manual.
ActiveX Controls and Plug-In
Settings
Internet Security Level
Step 1:
Start the Internet
Explorer.
Step 2:
Select <Tools> from the
main menu of the browser. Then
Click <Internet Options>.
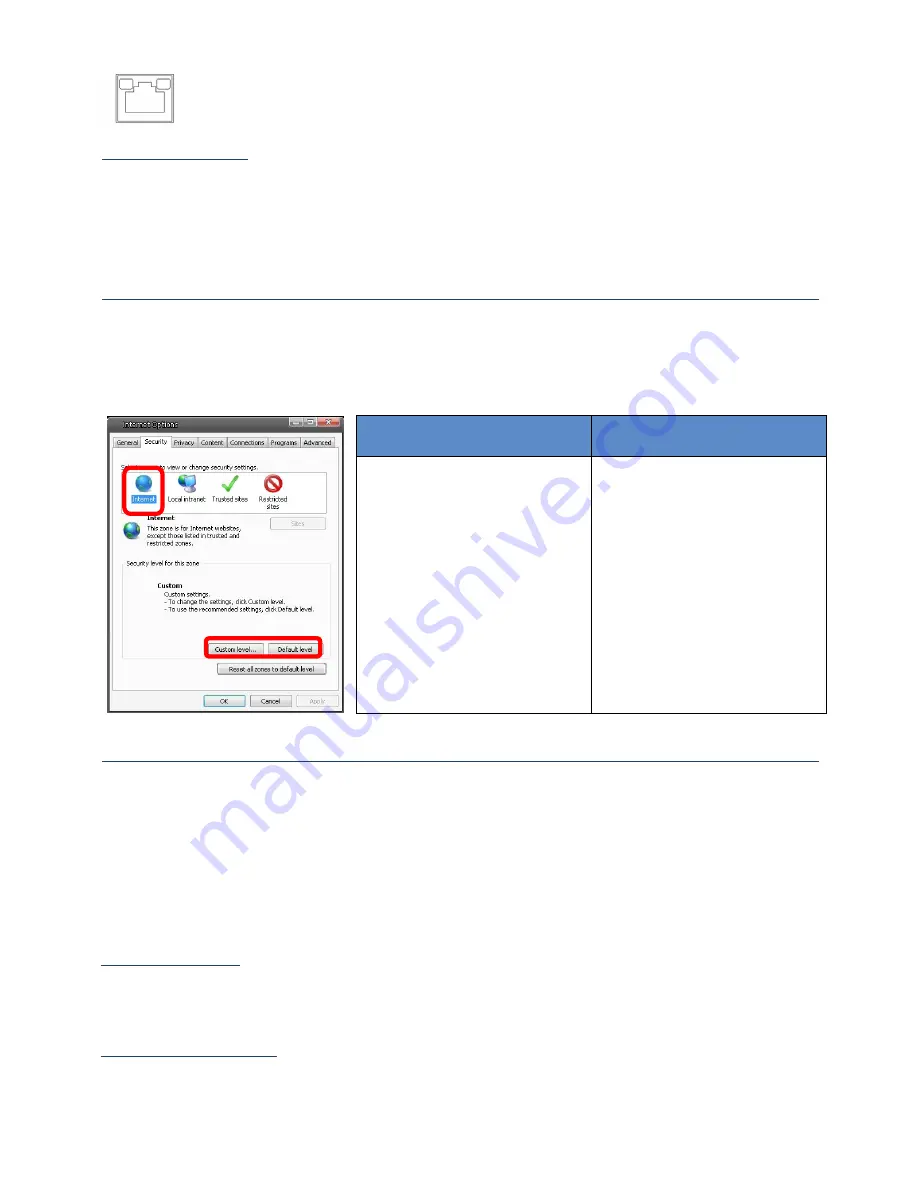
Step 3:
Click the <Security> tab
and select “Internet”, then click
<Custom level> to change
ActiveX settings.
Step 4:
Set “ActiveX controls and
plug-ins” items to <Prompt> or
<Enable>.
Step 1:
Start the Internet
Explorer.
Step 2:
Select <Tools> from the
main menu of the browser. Then
Click <Internet Options>.
Step 3:
Click the <Security> tab
and select “Internet”.
Step 4:
Down the page, press
<Default Level> and click <OK> to
confirm the setting. Close the
browser window, and open a new
one later for accessing the IP
Camera.
IP Camera Login
After the camera is connected, the camera will first look for a DHCP server in the network. If a DHCP server
is found, the DHCP server will assign an IP address to the camera. If no DHCP server is found within 4
minutes, the camera will be set automatically to the factory default IP address:
192.168.1.1
To establish a first connection to the camera with the factory default IP address 192.168.1.1, please proceed
as follows. Set the IP address of your PC to an IP address that is in the same IP address space as the camera:
192.168.1.xxx. Please note that the PC is not allowed to have the same IP address as the camera. For
example:
IP Address of the PC: 192.168.1.100 / Subnet Mask: 255.255.255.0
Login ID & Password
Put in the IP Camera’s IP address in the URL bar of the web browser window and press “Enter”.
Enter the default user name (
admin
) and password (
1234
) in the prompt request dialogue.
Please note that the user name is case sensitive.
Install the ActiveX Control
After connecting to the IP Camera, the request for installing the ActiveX control will appear below the URL
bar.
Содержание GCI-K1527V-1
Страница 1: ...GRUNDIG IP Camera GCI K1527V 1 Quick Guide DE EN ES FR IT NL PL RU TR...
Страница 2: ...ASP AG Grundig Security 20160607...
Страница 3: ...GRUNDIG IP Kamera GCI K1527V 1 Kurzanleitung Deutsch...
Страница 7: ...GRUNDIG IP Camera GCI K1527V 1 Quick Guide English...
Страница 11: ...C mara IP GRUNDIG GCI K1527V 1 Gu a r pida Espa ol...
Страница 15: ...Cam ra IP GRUNDIG GCI K1527V 1 Installation rapide Fran ais...
Страница 19: ...Telecamera IP GRUNDIG GCI K1527V 1 Guida Rapida Italiano...
Страница 23: ...GRUNDIG IP Camera GCI K1527V 1 Verkorte Handleiding Nederlands...
Страница 27: ...Kamera IP GRUNDIG GCI K1527V 1 Skr cona instrukcja Polski...
Страница 31: ...IP GRUNDIG GCI K1527V 1...
Страница 35: ...GRUNDIG IP Kamera GCI K1527V 1 H zl Kurulum K lavuzu T rk e...


