Grundig GCI-K1527V-1 Скачать руководство пользователя страница 21


LED Link Verde: indica collegamento di rete attivo.   

LED Attività arancione lampeggiante: indica attività di rete in corso. 

Accensione della telecamera 

La telecamera accetta alimentazione DC 12V o AC 24V. In alternativa potete utilizzare l’alimentazione PoE 

fornita dagli apparati di rete. 

 
Prima di effettuare il Login alla telecamera IP                                                                                                     

Alla prima connessione verrà installato un plug-in ActiveX nel vostro computer. Prima di effettuare il login 

alla telecamera IP, assicuratevi che le impostazioni ActiveX di Internet Explorer permettano l’installazione 

dei plug-in. Riportate le impostazioni di sicurezza di Internet Explorer ai valori di default. Per ulteriori 

dettagli, fate riferimento al manuale completo della telecamera IP.   


Impostazioni Controlli ActiveX e 
Plug-In 

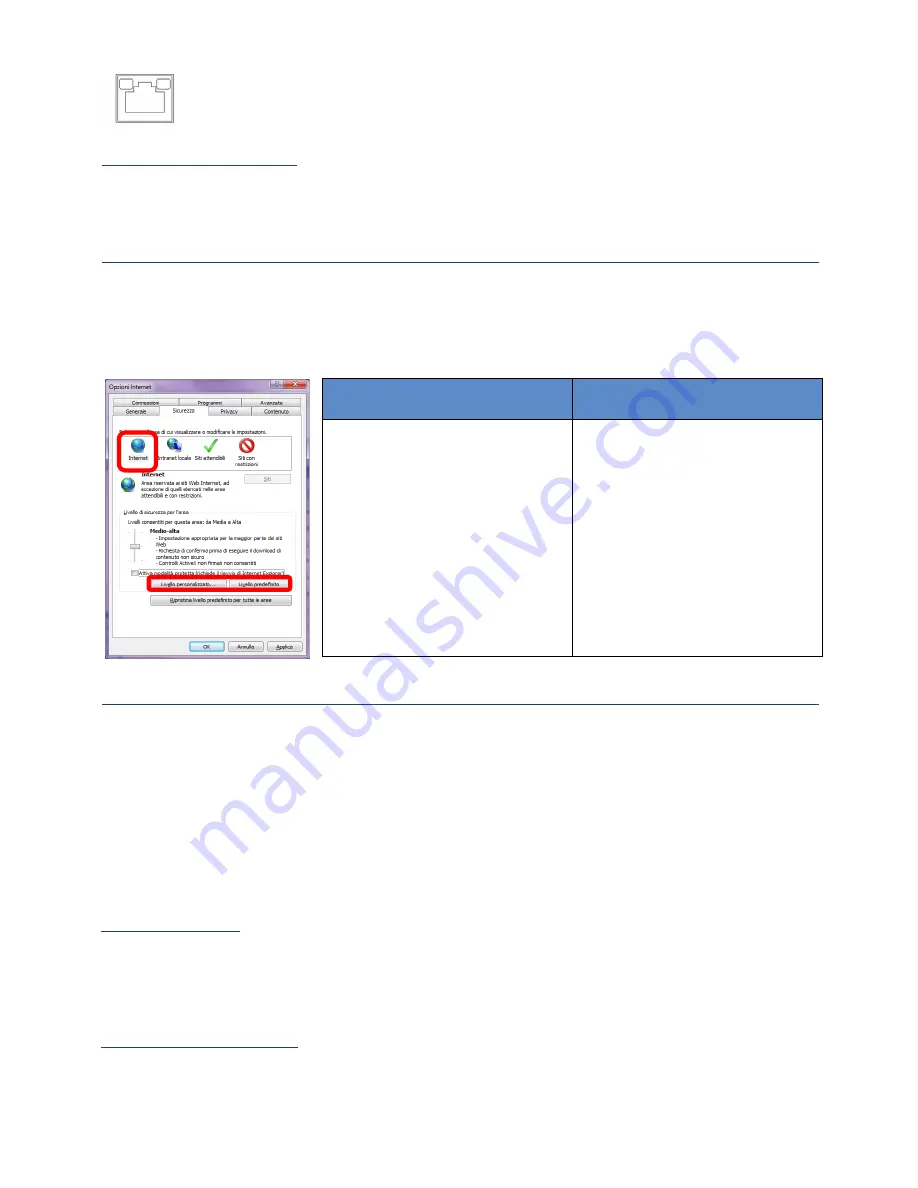
Livello Sicurezza Internet   

Step 1:

 Avviate Internet Explorer (IE). 

Step 2: 

Selezionate <Strumenti> dal 

menu principale del Browser. 
Selezionate <Opzioni Internet>. 

Step 3: 

Selezionate il tab <Sicurezza>, 

cliccate su “Internet”, quindi 
selezionate <Livello Personalizzato> 
per modificare le impostazioni ActiveX. 

Step 4: 

Impostate le voci relative a 

“Controlli ActiveX e plug-in” su <Chiedi 
Conferma> o <Attiva>. 


Step 1:

 Avviate IE. 

Step 2: 

Selezionate <Strumenti> dal 

menu principale del Browser. Quindi 
selezionate <Opzioni Internet>. 

Step 3: 

Cliccate sul tab <Sicurezza> e 

selezionate “Internet”. 

Step 4:

 Nel fondo della pagina, 

premete <Ripristina livello 
predefinito …> quindi <OK>. Chiudete e 
riaprite il browser prima di accedere 
nuovamente al menù telecamera.


IP Camera Login   


Dopo che la telecamera sarà collegata, cercherà un server DHCP nella rete. Se viene rilevato un server 

DHCP, il server assegnerà un indirizzo IP alla telecamera. Se nessun server DHCP sarà rilevato entro 4 

minuti, la telecamera si imposta automaticamente sull’ indirizzo IP di default: 

192.168.1.1 

Per stabilire un primo collegamento con la telecamera con l'indirizzo IP 192.168.1.1 di fabbrica, procedere 

come segue. Impostare l'indirizzo IP del PC con un indirizzo IP che si trova nello stessa classe di indirizzi IP, 

come la fotocamera cioè: 192.168.1.xxx. Si prega di notare che al PC non è consentito avere lo stesso 

indirizzo IP della telecamera. Per esempio: 

Indirizzo IP PC: 192.168.1.100 / Subnet Mask: 255.255.255.0 


Login ID & Password 


Inserite l’indirizzo IP della telecamera nella barra URL del Browser e premete “Invio”.   


Inserite User Name (

admin

) e Password (

1234

) di default.   


Attenzione : login e password sono sensibili alle lettere maiuscole/minuscole. 


Installare il controllo ActiveX 


Appena collegati alla telecamera, apparirà la richiesta di installazione del plug-in sotto la barra URL. 


Cliccate il tasto destro del mouse sopra il messaggio e selezionate <Installa Controllo>. 

Содержание GCI-K1527V-1

Страница 1: ...GRUNDIG IP Camera GCI K1527V 1 Quick Guide DE EN ES FR IT NL PL RU TR...

Страница 2: ...ASP AG Grundig Security 20160607...

Страница 3: ...GRUNDIG IP Kamera GCI K1527V 1 Kurzanleitung Deutsch...

Страница 4: ...larm Eingang 6 SD Karten Slot Schieben Sie die SD Karten in den Karten Slot um Videos und Schnappsch sse zu speichern Entfernen Sie die SD Karte nicht wenn die Kamera eingeschaltet ist NOTE Es wird ni...

Страница 5: ...1 Um eine erste Verbindung zur Kamera mit der Werks IP Adresse 192 168 1 1 herzustellen gehen Sie bitte wie folgt vor Stellen Sie die IP Adresse Ihres PCs so ein dass dieser im gleichen IP Adressraum...

Страница 6: ...und dr cken Sie Find Device Alle angeschlossenen GRUNDIG Kameras werden in einer Liste angezeigt siehe Bild 1 Dr cken Sie mit der rechten Maustaste auf die ausgew hlte Kamera und w hlen Sie Network S...

Страница 7: ...GRUNDIG IP Camera GCI K1527V 1 Quick Guide English...

Страница 8: ...6 SD Card Slot Insert the SD card into the card slot to store videos and snapshots Do not remove the SD card when the camera is powered on NOTE It is not recommended to record with the SD card for 24...

Страница 9: ...r Enable Step 1 Start the Internet Explorer Step 2 Select Tools from the main menu of the browser Then Click Internet Options Step 3 Click the Security tab and select Internet Step 4 Down the page pre...

Страница 10: ...IG cameras will appear in the list below see Picture 1 Right click on the camera and select Network Setup Picture 1 Picture 2 Enter the default user name admin and password 1234 in the prompt request...

Страница 11: ...C mara IP GRUNDIG GCI K1527V 1 Gu a r pida Espa ol...

Страница 12: ...R Dcha 6 Alarm Out Coneccion de alarma 7 Alarm Out 8 Alarm In 9 Alarm In 6 SD Card Slot Introduzca la tarjeta SD para grabar videos y snapshots No remueva la tarjeta SD si la camera esta funcionando N...

Страница 13: ...para cambiar la configuraci n ActiveX Paso 4 Ajuste el elemento Controles y complementos de ActiveX en Aprobado o Habilitar Paso 1 Inicie el Internet Explorer Paso 2 Seleccione Herramientas en el men...

Страница 14: ...Device Encontrar dispositivo Todas las c maras GRUNDIG conectadas le aparecer n en la lista de abajo vea la Imagen 1 Haga clic bot n derecho sobre la c mara y seleccione Network Setup Configurar Red...

Страница 15: ...Cam ra IP GRUNDIG GCI K1527V 1 Installation rapide Fran ais...

Страница 16: ...larme 9 Entr e Alarme 6 Logement carte SD Ins rer la carte SD dans le logement pour enregistrer les vid os et les captures Ne pas ins rer ou retirer la carte SD lorsque la camera est en service ATTENT...

Страница 17: ...Contr le ActiveX et plug ins sur les positions Approuv ou Activ Etape 1 D marrez Internet Explorer Etape 2 S lectionnez Outils dans la barre de menus principale du navigateur Puis cliquez sur Options...

Страница 18: ...nt dans la liste ci dessous voir la Figure 1 Cliquez avec le bouton de droite sur une des cam ras et s lectionnez Network Setup Figure 1 Figure 2 Entrez le nom par d faut admin et le mot de passe 1234...

Страница 19: ...Telecamera IP GRUNDIG GCI K1527V 1 Guida Rapida Italiano...

Страница 20: ...Allarme In 6 SD Card Slot Inserire una SD card nello slot per salvare video e snapshots Non rimuovere la SD card quando la telecamera accesa NOTA Non si raccomanda ri registrar sulla SD card per 24 7...

Страница 21: ...Quindi selezionate Opzioni Internet Step 3 Cliccate sul tab Sicurezza e selezionate Internet Step 4 Nel fondo della pagina premete Ripristina livello predefinito quindi OK Chiudete e riaprite il brow...

Страница 22: ...telecamera e selezionate Network Setup Immagine 1 Immagine 2 Inserite User Name admin e Password 1234 di default vedi Immagine 2 Comparir una finestra vedi Immagine 2 dove potete modificare l indirizz...

Страница 23: ...GRUNDIG IP Camera GCI K1527V 1 Verkorte Handleiding Nederlands...

Страница 24: ...rm In 9 Alarm In 6 Sleuf SD kaart Plaats de SD kaart in de gleuf van het kaartslot om video en snapshots op te slaan Haal de kaart niet uit het slot wanneer de camera aan staat OPMERKING Het is niet a...

Страница 25: ...niveau en klik op OK om de instelling te bevestigen Sluit het browser scherm en open een nieuw scherm om toegang te krijgen tot de IP Camera Stap 1 Start Internet Explorer Stap 2 Selecteer Extra vanui...

Страница 26: ...de Find Device Vind Apparaat knop Alle aangesloten GRUNDIG camera s en apparaten op het netwerk verschijnen in de onderstaande lijst zie Afbeelding 1 Klik met de rechtermuisknop op de camera en select...

Страница 27: ...Kamera IP GRUNDIG GCI K1527V 1 Skr cona instrukcja Polski...

Страница 28: ...j cie P 6 Alarm wej cie Z cza alarmowe 7 Alarm wej cie 8 Alarm wyj cie 9 Alarm wyj cie 6 Slot kart typu SD W kart SD do gniazda karty w celu przechowywania film w oraz zdj Nie nale y wyjmowa karty SD...

Страница 29: ...X i dodatki plug in ustaw elementy do Monituj lub W cz Krok 1 Uruchom Internet Explorer Krok 2 Wybierz Narz dzia z g wnego menu przegl darki Nast pnie kliknij Opcje internetowe Krok 3 Kliknij zak adk...

Страница 30: ...e poni ej patrz Obrazek 1 Kliknij prawym przyciskiem myszy na kamer i wybierz Network Setup Obrazek 1 Obrazek 2 Wprowad domy ln nazw u ytkownika admin i has o 1234 w oknie logowania patrz Obrazek 2 W...

Страница 31: ...IP GRUNDIG GCI K1527V 1...

Страница 32: ...2 BNC 1 GND 2 BNC 3 DC 12V AC 24V 1 AC 24V 1 2 AC 24V 2 3 DC 12V 1 4 DC 12V 2 4 5 1 Audio In L 2 Audio In R 3 GND 4 Audio Out L 5 Audio Out R 6 Alarm Out 7 Alarm Out 8 Alarm In 9 Alarm In 6 SD SD SD S...

Страница 33: ...Explorer ActiveX Internet Explorer IP ActiveX 1 Internet Explorer 2 3 ActiveX 4 ActiveX 1 Internet Explorer 2 3 4 OK IP IP DHCP DHCP DHCP IP DHCP 4 IP 192 168 1 1 IP 192 168 1 1 IP PC IP 192 168 1 xx...

Страница 34: ...ActiveX IP ActiveX ActiveX ActiveX GRUNDIG Viewer Finish GRUNDIG Viewer GRUNDIG Finder IP GRUNDIG Finder Find Device GRUNDIG 1 Network Setup 1 2 admin 1234 2 2 IP Static IP IP DHCP IP Apply IP IP...

Страница 35: ...GRUNDIG IP Kamera GCI K1527V 1 H zl Kurulum K lavuzu T rk e...

Страница 36: ...i Alarm Baglantisi 7 Alarm cikisi 8 Alarm giris 9 Alarm giris 6 Micro SD Kart Yuvs Video Kayit ve Snapshot icin SD kartini kart girisine ekle Kamera calisirken SD kartini cikarma Dikkat Micro SD Kart...

Страница 37: ...ini Sor yada Etkinle tir olarak ayarlay n Ad m 1 Internet Explorer ba lat n Ad m 2 Taray c ana men s nden Ara lar se in nternet Se enekleri t klay n Ad m 3 G venlik sekmesini t klay n ve Internet se i...

Страница 38: ...B t n ba l GRUNDIG kameralar a a da g r len listede g r lecektir bak n z Resim1 Kameran n zerinde sa t klay n ve Network Setup se in Resim 1 Resim 2 stem iste i diyalog penceresinde varsay lan kullan...

Отзывы: