


English (GB)
20
12.1 Preparation before maintenance
1. Close the isolating valve on the discharge side.
2. Close the isolating valve on the suction side.
3. Switch off the power supply via the controller.
Additional procedure for pump set with diesel engine
1. Close the fuel valve on the fuel tank.
2. Disconnect the positive pole first and then the negative pole of
the batteries.
12.2 Maintenance interval
If not otherwise stated in the standard applying to the pump set or
in the installation and operating instructions of the individual
components, we recommend that you observe the following
maintenance intervals:
Complete pump set
Diesel engine
Controller
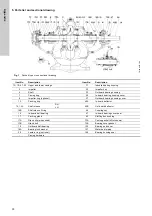
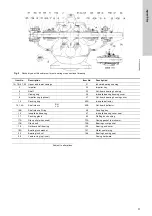
12.3 Pump set
• Check that all screws are tight and not corroded.
• Check all safety devices such as coupling guard.
• Check that all electrical connections are tight and intact.
• Replace defective cables and tighten loose connections.
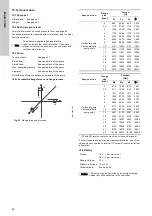
• Check the alignment of the pump and driver. See section
• Carry out a test run according to the standard applying to the
pump set. See section
.
12.4 Shaft seal
Mechanical shaft seals are maintenance-free and almost leak-
free. In case of considerable and increasing leakage, check the
shaft seal immediately. If the seal faces are damaged, replace the
entire shaft seal. See service instructions for the pump and
section
9.1 Shaft seal run-in (stuffing box)
12.5 Bearings
The maintenance-free bearings in the pump are permanently
lubricated.
12.6 Fuel filters
The engine fuel filter must be replaced according to the
installation and operating instructions for the engine. We
recommend that you replace the tank fuel filter at the same time.
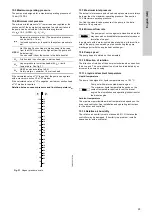
12.7 Battery
The batteries must be dry under all operating conditions.
The liquid level in the batteries must be maintained.
The water used for filling must be distilled water.
Check the health of the battery by using a refractometer or similar
tool.
12.7.1 Battery replacement
If the battery is low on power, leaking or damaged otherwise the
battery must be replaced.
Before you replace the batteries, read the general precautions in
section
must be observed.
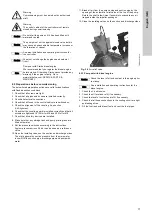
1. Observe the position of the cables.
2. Remove the black minus cables.
3. Remove the red plus cables.
4. Carefully remove the defect battery.
5. Install the new battery.
6. Mount the two red plus cables.
7. Mount the black minus cables.
For further instructions, see section
.
Note
The list below is not complete. See also the standard
applying to the pump set.
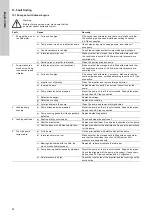
Action
Weekl
y
Monthly
Y
ear
ly
E
ver
y two yea
rs
Check that all screws are tight
x
Check safety devices
x
Check electrical connections
x
Check pump/driver alignment
x
Carry out test run
x
Check for leakages
x
Action
We
ekly
Monthly
Ye
arl
y
Ev
ery
two
year
s
Check fuel level in fuel tank
x
Check fuel system
x
Check exhaust system
x
Check cooling system
x
Change coolant
x
Check battery condition and liquid level
x
Check oil level
x
Change oil and oil filter
x
Replace fuel filters
x
Check V-belt
x
Replace V-belt
x
Check air filter
x
Replace air filter
x
Replace batteries
x
Action type
Weekl
y
Monthly
Y
ear
ly
E
ver
y two yea
rs
Test indicator light
x
Check cables and connections
x
Warning
Too low liquid level can cause overheat and
explosion.


