GROWSPAN
™
ROUND PREMIUM HIGH TUNNELS
9
Revision date: 01.01.20
FRAME ASSEMBLY
Gather the parts:
• All Rafter Assemblies
• Pipe 1.315'' x 75'' swaged (#131S075)
• Pipe 1.315'' x 73.5'' plain (#131P0735)
• 5/16" x 2-1/2" machine bolts (#FAG336B)
• 5/16" Nuts (#FALB02B)
• Lifts, ladders, and assistants
Frame Assembly Procedure
1. Using the proper lifts and with assistance, carefully
stand the first end rafter assembly and place the leg
pipes into the first set of ground posts.
2. Align holes and secure the leg pipes to the ground
posts using the 5/16" x 2-1/2" machine bolts and nuts.
3. Place an interior rafter assembly into a second set of
ground posts and secure the leg pipes to the ground
posts as previously described.
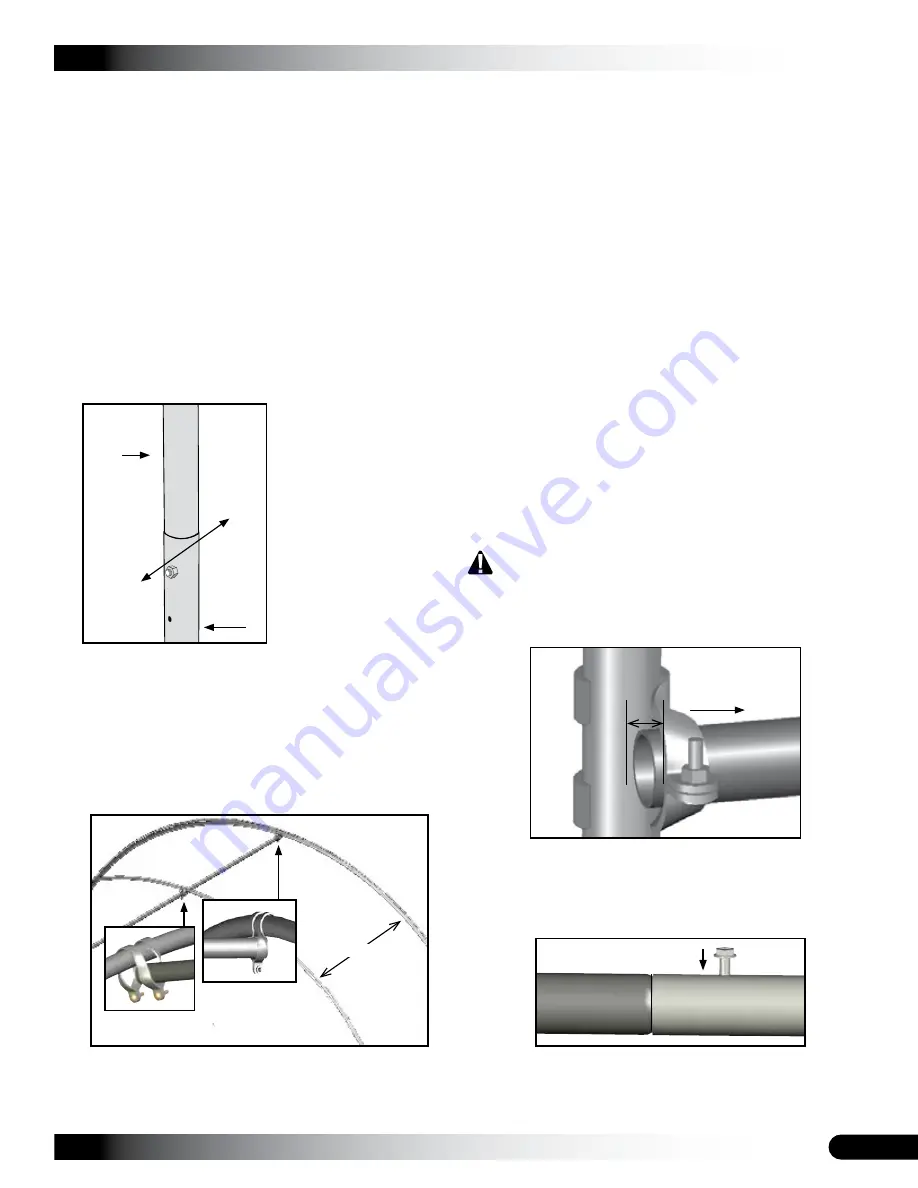
4. Position one (1) cross connectors at the top of the
interior rafter assembly as shown below.
5. Take one (1) swaged 75" purlin section and insert it
through the upper clamp on the end rafter and through
the cross connector at the top of the interior (or second)
rafter as shown above.
6. Verify that both rafters are plumb and properly spaced
(4' on center).
7. Tighten the upper cross connector on the interior rafter
and tighten the end clamp near the top of the end rafter
to secure the first purlin pipe.
NOTE:
The purlin assembly consists of 1.315'' x 75''
(#131S075) swaged pipes (number is determined by
shelter length) and one (1) 1.315'' x 73.5'' (#131P0735)
plain pipe.
8. Continue adding rafters and purlin pipe until the frame
is assembled. Secure all purlin splices using Tek
screws. See Step 10.
9. Finish the purlin run using the plain, shorter pipe
(#131P0735), and use the final end rafter to complete
the assembly.
NOTE:
If the last end rafter is plumb and the purlin
run extends beyond the end of the rafter, cut the last
section of purlin pipe to the required length.
Typically purlin pipes
do not
require cutting.
Verify that
you have the correct plain pipes before you decide to
cut any pipe to complete the purlin runs.
CAUTION:
To prevent cover damage, the ends of the
purlin should extend no more than ½'' past the end
clamp. The bolt side of the end clamps must go toward
the “inside'' of the shelter (the same side as the purlin).
10. Once all rafters are set and the purlin is in place and
secured, return to each pipe splice of the purlin run
and install a Tek screw through the pipes to secure the
joints if this was not completed during the assembly.
4'
center-to-center
11. Return to each rafter and, using Tek screws, secure
the joint between the lower rafter legs (drilled pipe) and
the upper rafter pipes and continue with the following
procedure.
Inside of
Shelter
Outside of
Shelter
Rafter
Ground
Post
IMPORTANT:
Brace
the first rafter in
position as needed to
keep it from moving.
Bracing is removed
after
additional
rafters are installed
and secured to the
other rafters.
To the
inside of
the shelter
1/2''


