


10
H5_30_Wide_HT_Roll_Up
Revision date: 06.28.19
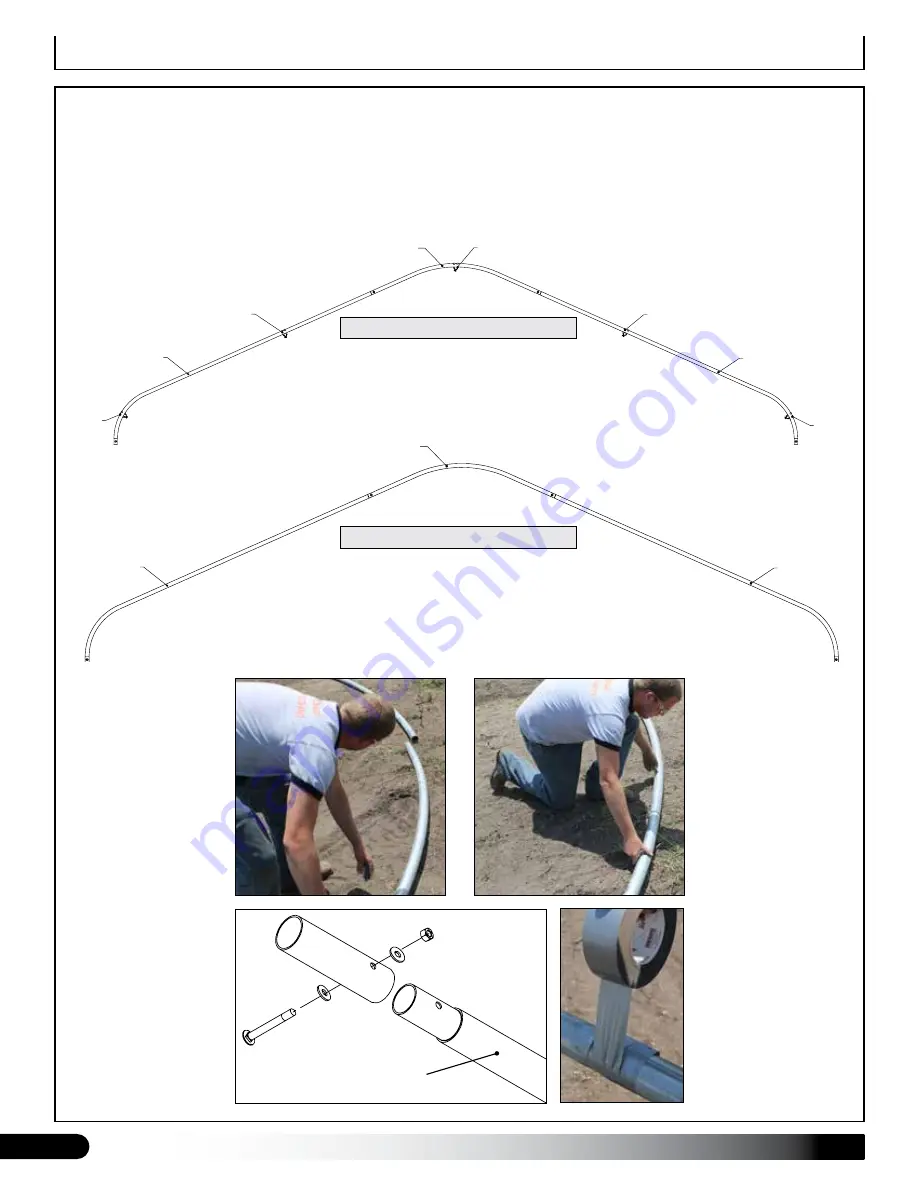
Rafter Assembly — Style A
RAFTER ASSEMBLY
After setting ground posts, continue with rafter assembly. Secure each rafter joint using an
FAH322 (5/16") carriage
bolt (1), FAMF03B flat washers (2), and FALB32B nut (1).
NOTE:
All rafter assemblies consist of three (3) main rafter sections (not including the ground posts). Consult rafter
diagrams in Quick Start section of these instructions before and during rafter assembly process for details. Assistance is
required. Assemble all main sections of rafters as described below and set aside.
1)
Select rafter pipes
to assemble one end
rafter.
3)
Secure each rafter
joint using hardware
noted above.
TIGHTEN ALL BOLTS!
2)
Slide separate pipes
together and align bolt
holes.
NOTE:
Before sliding
pipes together for the
two end rafters, slide
the 102857 end clamps
onto the pipes in the
required areas. There
are five (5) clamps for
each end rafter. See
end rafter diagram
above.
4)
After bolts are
tightened, wrap each
splice and bolt end with
duct tape to protect
cover.
8)
Continue with the
next procedure.
5)
Repeat steps to
construct the remaining
end rafter and set the
two end rafters aside.
6)
Consult the Side
Profile diagram for
your frame length to
determine how many
more Style A rafters to
construct.
7)
Build the Style A mid
rafters and set aside
for frame assembly.
30G190SS502
30G190CPP5
30G190SS502
102857
102857
102857
102857
102857
30' Wide End Rafter with 102857
30G190SS502
30G190CPP5
30G190SS502
30' Wide Mid Rafter — No Clamps
Rafter
Ground Post:
30G190SS501


