background image

39

40

Setting Bluetooth of extern wireless

Setting Zigbee of Intern wireless

Setting Wifi of intern wireless

Setting inverter time

Input password->Setting->Extern Wireless->Bluetooth. Knock three times to save
RS232 .Knock four times to exit the setting.

Input password->Setting->intern Wireless->Zigbee->channel->is set the channel of
intern Zigbee. Double knock the enclosure lid ready to input the Channel. Single
knock to change value of first, double knock enter into next position. Knock three
times to save the channel. Knock four times to exit the setting.
Input password->Setting->intern Wireless->Zigbee->channel->PIN->is set the PIN of
intern Zigbee. Double knock the enclosure lid ready to input the PIN. Single knock to
change value of first, double knock enter into next position. Knock three times to
save the PIN. Knock four times to exit the setting.

Input password->Setting->intern Wireless->wifi. Knock three times to save RS232
.Knock four times to exit the setting.
Set Bluetooth of intern wireless
Input password->Setting->intern Wireless->Bluetooth. Knock three times to save
RS232 .Knock four times to exit the setting.

Inverter provides a system clock; user must set the system time after installation, as
the historical statistic data for a period were based on the clock. User can set the
following time parameters: year, month, day, hour, minute.

Input password->Setting-> 2009/03/27 00:38 ->is the current time. Double knock to
go into setting. Single knock to change time. Konck three times to save time. Knock
four times to exit setting. See Fig 6.3.6 for reference

Power:  3385.1W

2009/03/27  00:38

Fig 6.3.9 current time

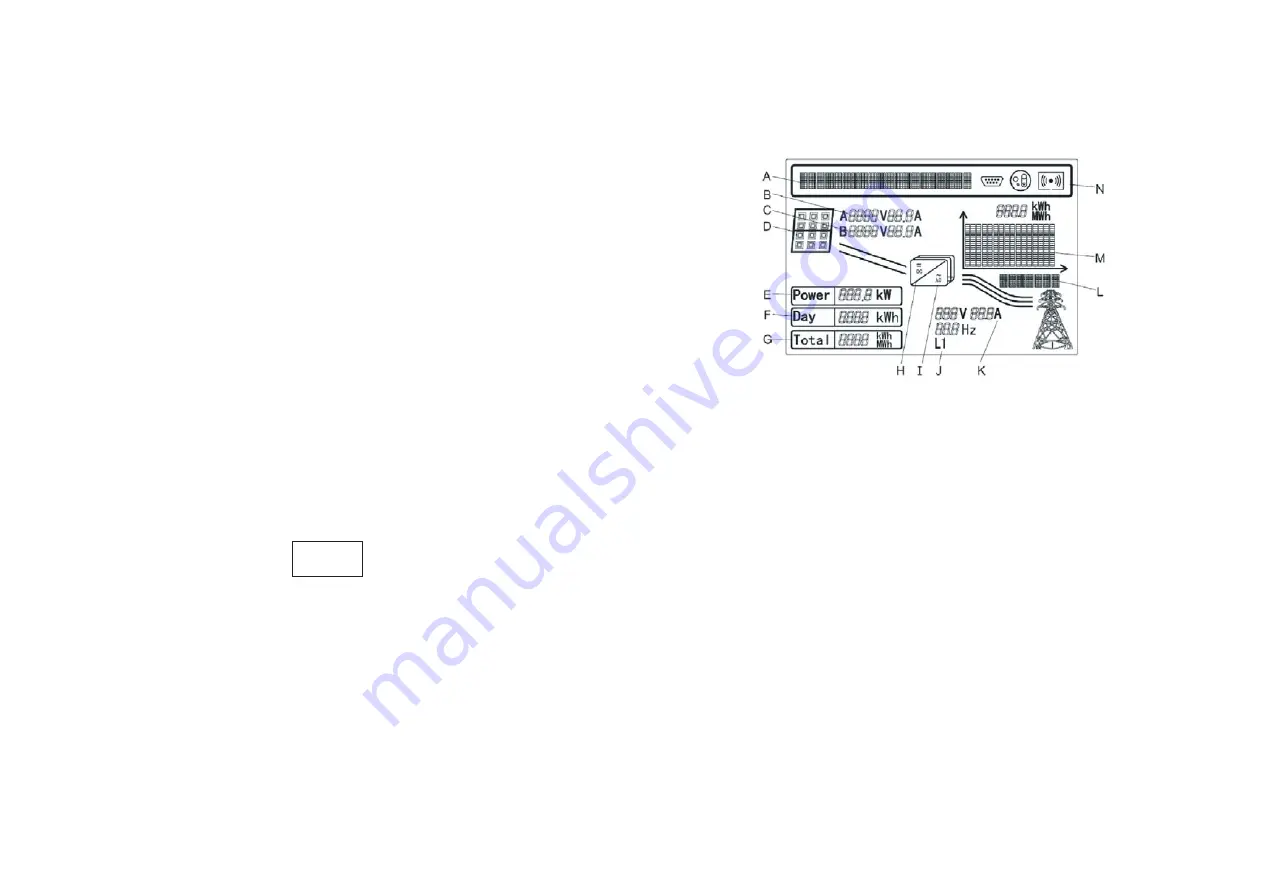
6.4 M3 LCD Display

6.4.1 Graphic display

Position

Detail

A

Text line for displaying an event

B

Input voltage and current of MPPTA

C

Input voltage and current of MPPTB

D

PV array A and B, Light when the array voltage is above
the start voltage(150Vdc)

E

Current power

F

Daily energy

G

Total energy generated since the inverter was installed

H

Light when the array voltage is above the start voltage(150Vdc)

I

Lighted when “H” is lighted and feed-in

Output phase of the line conductor, switch every 5 seconds.

J

Output voltage /current /frequency of the line conductor

K

Graphical display of the inverter energy/power

L
M

Содержание 4000UE

Страница 1: ...stallation Operation Manual Shenzhen Growatt New Energy Technology CO LTD 1st East 3rd Floor Jiayu Industrial Zone Xibianling Shangwu Village Shiyan Baoan District Shenzhen P R China 86 755 2747 1942...

Страница 2: ...g Index 1 2 3 4 2 2 Safety Precautions Installation 5 5 1 Safety instruction 5 2 Selecting the Installation Location 2 3 Assembly Warnings 2 4 Electrical Connection Warnings 2 5 Operation Warnings 2 6...

Страница 3: ...Maintenance and Cleaning 8 8 1 Cleaning the Inverter 8 2 Checking the DC Disconnect Trouble shooting 9 10 1 Dismantling the Inverter 10 2 Packing the Inverter Decommissioning 10 10 3 Disposing of the...

Страница 4: ...he Growatt UE Store this manual where accessible at all times 1 1 1 Validity 1 1 4 Additional Information For further information on special topics in the download area at www ginverter com 1 2 Symbol...

Страница 5: ...r is not intended for mobile use Any other or additional use is not considered as intended use The manufacturer is not responsible for any damages resulting from unintended use Damage caused by such u...

Страница 6: ...ledge unless they have been given supervision or instruction Children are forbidden to play around the Growatt inverter WARNING Make all electrical connections e g conductor termination fuses PE conne...

Страница 7: ...ation is near radio or television receivers In this case the operator is obliged to take proper action to rectify the situation Possible damage to health as a result of the effects of radiation Do not...

Страница 8: ...ax input current per string Max apparent power Norminal output current Norminal output voltage Protection Degree Operation Ambient Temperature AC Frequency range Power Factor Safety Level VDE 0126 1 1...

Страница 9: ...tection Easy to install Unpacking 4 Unpacking 4 Before opening the packing box of Growatt UE please note that whether there are any visible external damages Once open the packing box please check the...

Страница 10: ...the setup location is near radio or television receivers In this case the operator is obliged to take proper action to rectify the situation Never install the inverter near the sensitive equipment e g...

Страница 11: ...ot install the inverter in living area the noise caused by the machine may affect on daily life 14 For security reasons don t install the inverter in place where the children can reach 5 3 Installatio...

Страница 12: ...lance of the Growatt UE Hang the inverter on the bracket through the match hooks on bracket and the back of the inverter After confirming the inverter is fixed reliably fasten two M6 soket head cap sc...

Страница 13: ...be installed the dimensions below should be considered Fig 5 6 19 20 Fig 5 4 Fig 5 5 5 4 Electrical Connections 5 4 1 Safety DANGER Danger to life due to lethal voltages High voltages which may cause...

Страница 14: ...connection unit You must install a separate three phase miniature circuit breaker or other load disconnection unit for each inverter in order to ensure that the inverter can be safely disconnected und...

Страница 15: ...he live components and treat the terminals carefully Information The PV modules should have an IEC61730 Class A rating Please use the same brand male and female PV connectors Under any conditions the...

Страница 16: ...the PV grounding conductor and DC grounding conductor Ground kit If PV modules of the PV system require POSITIVE or NEGATIVE to connect to GROUND the output of inverter should connect to grid with an...

Страница 17: ...f inverter as follow Single knock to Light the backlight State info Thrice knock Inverter info single knock System Time double knock if they are not correct please set them refer to 6 3 5setting inver...

Страница 18: ...rmation After setting the DIP please power on the inverter and check the model display If the last character of the model name is corresponding to the country safety standard as the above table it mea...

Страница 19: ...Greece GTXXXXXXX6 1 2 3 4 NO I VDE AR N 4105 GTXXXXXXX7 1 2 3 4 NO I UK_G83 GTXXXXXXX8 1 2 3 4 NO I Ireland GTXXXXXXX9 1 2 3 4 NO I CGC GTXXXXXXXA 1 2 3 4 NO I Denmark GTXXXXXXXB 1 2 3 4 NO I UK_G59...

Страница 20: ...gle knock will switch LCD screen to a following interface 6 3 5 Data checking and parameters setting Cycle display It is a cycling display bit note that using signal knock to enter next page instead o...

Страница 21: ...Parameters setting Fig 6 3 8 is the setting information Single knock the Text will display the setting Double knock the Text will display input123 000 Single knock to go back Setting page Double knoc...

Страница 22: ...module utside he nverter o t i Bluetooth Bluetooth module utside he nverter o t i Inter Wireless Zigbee Zigbee module he nverter inside t i Wifi Wifi module he nverter inside t i Bluetooth Bluetooth...

Страница 23: ...etting intern Wireless Bluetooth Knock three times to save RS232 Knock four times to exit the setting Inverter provides a system clock user must set the system time after installation as the historica...

Страница 24: ...values The graph shows recent 12 months of power generation and the maximum value power of the 12 values The graph shows recent 16 years of power generation and the maximum value power of the 16 valu...

Страница 25: ...ine switch to the text as follow Com Address 001 2 Double knock the enclosure lid and the lower number text 1 will flash 001 Com Address 002 3 If you want to change it single knock to change it from 0...

Страница 26: ...on the inverter 2012 01 01 12 00 45 46 2 Double knock the enclosure lid and the text will switch to the year 2012 and the two lower numbers 2012 will flash you can change it by single knock 2014 01 0...

Страница 27: ...brated meter 47 48 6 5 Double MPPT of the Growatt UE 6 6 Communication About the software of shinebus and the usage of it please download from the web www growatt comchannel to improve the energy util...

Страница 28: ...for the inverter with the firmware after 0D37 0C30 Information If you want to update firmware online please disconnect AC breaker of the inverter first If you plan to update firmware via RS485 please...

Страница 29: ...s module Data logger Internet 51 52 Plan B Shine Pano Line Computer Shine WebBox Line Computer Shine WebBox Router Internet Computer n Inverters RS 232 Wi Fi Shine WebBox Shine Pano Shine Net Computer...

Страница 30: ...ding layer or no connection Definitions of RS485 PLUG standard as follows Pin4 RS485A Pin5 RS485B Pin6 No connection Pin7 Short with Pin8 Pin8 Short with Pin7 Pin1 RS485A Pin2 Shielding layer or no co...

Страница 31: ...no connection The type of cable is recommended as KVVRP22 2 1 5mm2 Information Pull cables outwards to confirm whether they are installed firmly 3 4 Plug in two terminals Cover the fix board Informat...

Страница 32: ...clogged To clean the air grills or heat sink Ventilation of installation location is poor Choose appropriate installation location before mounting 8 1 Cleaning the Inverter If the inverter is dirty tu...

Страница 33: ...panels in each string Information concerning the PV panels If it is necessary to replace the unit please ship it in the original box 9 2 System fault System fault system faults are mainly caused by sy...

Страница 34: ...ter if problem still exist update the firmware 2 Change control board or COM board if problem still exist contact Growatt Communication board has not received data from control board for 10 seconds Er...

Страница 35: ...he size of the inverter 10 3 Disposing of the Inverter 10 3 Disposing of the Inverter Do not dispose of faulty inverters or accessories together with household waste Please accordance with the disposa...

Страница 36: ...urrent protection yes yes yes Output AC overvoltage Protection Varistor yes yes yes Ground fault monitoring yes yes yes Grid monitoring yes yes yes Integrated all pole sensitive leakage current monito...

Страница 37: ...ificates and approvals CE VDE0126 1 1 N4105 IEC 62109 AS3100 AS4777 EN61000 6 2 EN61000 6 3 2000m 6560ft without derating 11 2 DC connector info H4 Specification Contact size 2 5mm2 14AWG 4mm2 12 AWG...

Страница 38: ...Shine Vision receiver Communication data logger receiver MR00 0000201 Shine Vision emitter Communication data logger emitter MR00 0000601 Zigbee Communication interface 200 0007000 Wi Fi Communication...

Страница 39: ...technical problems concerning our products contact your installer or Growatt During inquiring please provide below information 1 Inverter type 2 Modules information 3 Communication method 4 Serial num...

Отзывы: