


5 OM-EE
8. The outside of the unit may be polished with a stainless steel cleaner such as
“Zepper” from Zep Manufacturing Co.
9. When equipment needs to be sanitized, use a solution equivalent to one that
supplies 200 parts per million available chlorine. Obtain advice on sanitizing
agents from your supplier of sanitizing products. Following the supplier’s
instructions, apply the agent after the unit has been cleaned and drained.
Rinse off the sanitizer thoroughly.
10. It is recommended that the equipment be sanitized just before use.
11. If there is difficulty removing mineral deposits or a film left by hard water
or food residues, clean the kettle thoroughly and use a deliming agent, like
Groen Delimer/Descaler (Part Number 114800) or Lime-Away® from Ecolab,
in accordance with the manufacturer’s directions. Rinse and drain the unit
before further use.
12. If cleaning problems persist, contact your cleaning product representative for
assistance. The supplier has a trained technical staff with laboratory facilities
to serve you.
MAINTENANCE
WARNING: WHEN TESTING, AVOID ANY EXPOSURE TO THE STEAM BLOWING OUT OF
THE SAFETY VALVE. DIRECT CONTACT COULD RESULT IN SEVERE BURNS.
WARNING: STAY AWAY FROM THE STEAM THAT IS BLOWING OUT OF THE SAFETY
VALVE. THE STEAM CAN CAUSE A SEVERE BURN.
WARNING: TO AVOID INJURY, READ AND FOLLOW ALL PRECAUTIONS STATED ON THE
LABEL OF THE WATER TREATMENT COMPOUND.
NOTICE: Contact an authorized representative when repairs are required.
PERIODIC MAINTENANCE
A Maintenance & Service Log is provided at the back of this manual. Each time
there is maintenance performed on your Groen kettle, enter the date the work
was done, what was done, and who did it. Keep this manual on file and available
for operators to use. Periodic inspection will minimize equipment down time and
increase the efficiency of operation. The following points should be checked often:
1. Check the pressure/vacuum gauge every day. The gauge should show a
vacuum of 20 to 30 inches, when the kettle is cold. If it does not, see “Jacket
Vacuum”. The pressure gauge should show a vacuum of 20 to 30 inches when
the kettle is cold.
2. Also check the jacket water level every day. It should be between the marks on
the gauge glass. If the level is low, see “Jacket Filling and Water Treatment”.
3. Test the safety valve at least twice each month. Test the valve with the kettle
operating at 15 psi (105 kPa), by pulling up the test valve chain for at least 5
seconds. Then release the lever and let the valve snap shut. If the valve does
not activate, or there is no evidence of discharge, or the valve leaks, stop using
the kettle and contact a qualified Groen service representative.
JACKET VACUUM
When the kettle is cold, a positive pressure/
vacuum gauge reading or a reading near
zero indicates that there is air in the jacket.
Air in the jacket slows kettle heating. Test the
safety valve at least twice monthly.
To remove air:
1. Start the unit. (Be sure there is water or
product in the kettle when heating).
2. Make sure that the elbow of the safety
valve outlet is turned so that escaping
steam is directed toward the floor.
3. When the pressure/vacuum gauge reaches a positive pressure reading of 5
PSI, release the trapped air and steam by pulling up or out on the safety valve
lever or ring for about 1 second. Repeat this step, then let the pull ring or valve
lever snap back into the closed position.
JACKET FILLING AND WATER TREATMENT
The jacket was charged at the factory with
the proper amount of treated water. You
may need to restore this water because
it was lost as steam during venting or by
draining.
1. If you are replacing water lost as
steam, use distilled water. If you are
replacing treated water that ran out
of the jacket, prepare more treated water as directed in “Water Treatment
Procedure.” Do not use tap water.
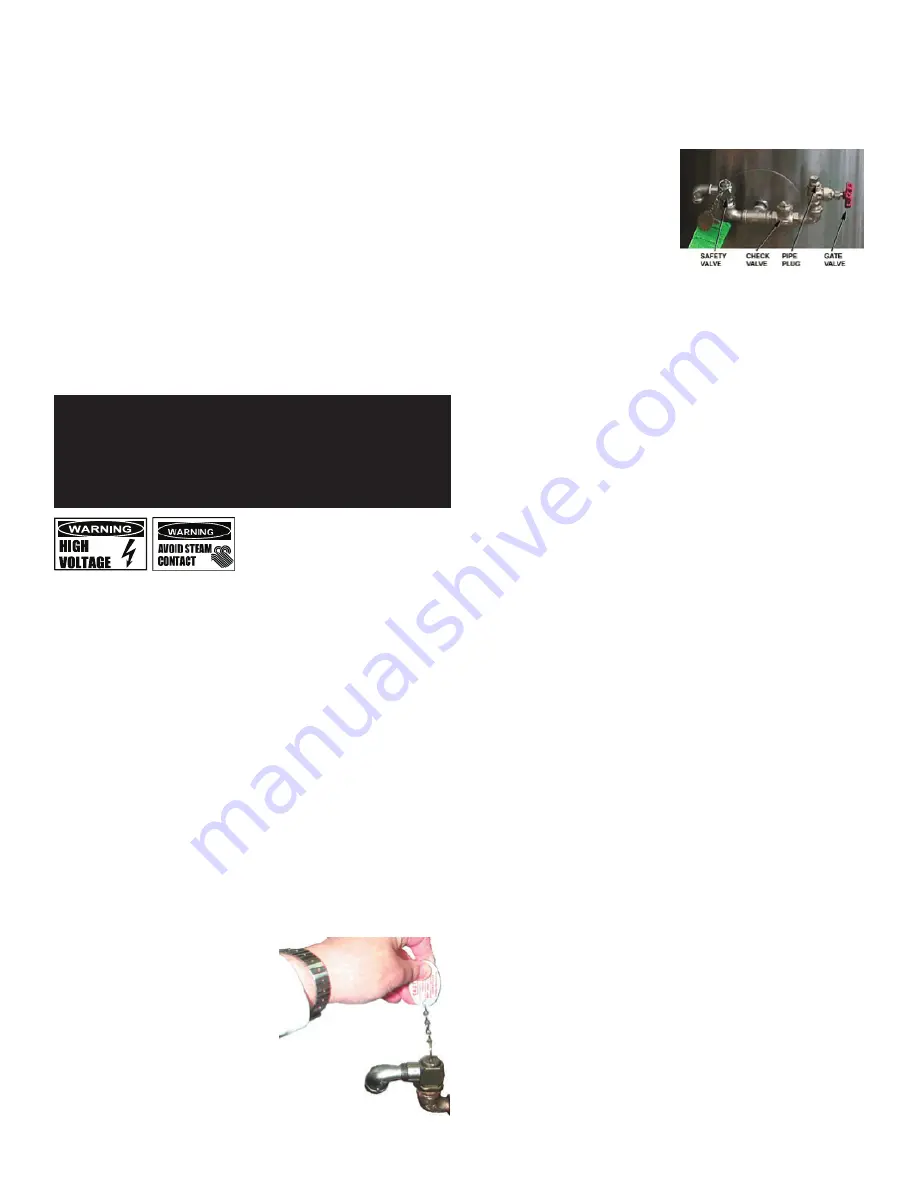
2. Allow the kettle to cool. Remove the pipe plug from the jacket fill assembly.
3. Open the gate valve and pour in the distilled or treated water.
4. Hold the safety valve open to allow air to escape from the jacket while you pour
in the water. Continue to pour until the water level rises to a point between the
marks on the gauge glass.
5. Close the gate valve and replace the pipe plug.
6. Any air introduced into the jacket during filling must be removed to obtain
efficient heating. See “Jacket Vacuum”.
WATER TREATMENT PROCEDURE
1. Obtain water treatment compound and a pH test kit from your Groen distributor.
2. Fill a mixing container with the measured amount of water required. (See
table). Distilled water is recommended.
KETTLE MODEL:
JACKET CAPACITY:
EE-20
3-1/4
Gallons
EE-40
6-1/2
Gallons
EE-60
7-3/4
Gallons
EE-80
10
Gallons
EE-100
10 Gallons
3. Hang a strip of pH test paper on the rim of the container, with about 1 inch of
the strip below the surface of the water.
4. Measure the water treatment compound (One way to do this is to add the
compound from a measuring cup.)
5. Stir the water continuously, while you slowly add water treatment compound,
until the water reaches a pH between 10.5 and 11.5. Judge the pH by
frequently comparing the test strip color with the color chart provided in the
pH test kit. If you are color blind have a person who is not color blind read the
test strip color level.
6. Record the exact amounts of water and treatment compound used. These
amounts may be used again, if the same water sources and compound are
used in the future. However, it is best to check the pH each time treated water
is prepared.
Содержание EE Domestic
Страница 8: ...8 OM EE Parts List...
Страница 10: ...10 OM EE Wiring Diagram EE 20 40 888 994 7636...
Страница 11: ...11 OM EE Wiring Diagram EE 60 80 100 888 994 7636...


