e.
Rinse the pan very well with lukewarm water,
and drain it completely.
f.
As part of the daily cleaning program, clean
all inside and outside surfaces that may
have been soiled. Remember to check such
parts as the undersides of the cover, the
electrical console and other more remote
spots. Clean between the pan body and the
consoles using the brush provided (P/N
058705).
g.
Controls and the control console may be
cleaned with a damp cloth or sprayed with a
garden hose spray connected to city water
supply. Do not use a pressure sprayer
directly on the unit or electrical parts.
h.
To remove materials stuck to the equipment,
use a brush, sponge, cloth, plastic or rubber
scraper, or plastic wool with the cleaning
solution. To make washing easier, let the
cleaning solution sit in the unit and soak into
the residue, or heat the solution briefly. Do
not use any gritty cleaner or metal tool that
might scratch the surface. Scratches make
the surface harder to clean, and also provide
places for bacteria to grow. Do not use steel
wool. Small bit of steel wool left in the
surface of the unit can cause rusting and
pitting.
i.
The outside of the unit may be polished with
a recognized stainless steel cleaner such as
Zepper from the Zep Manufacturing
Company.
j.
When the equipment needs to be sanitized,
use a sanitizing solution equivalent to one
that supplies 100 parts per million available
chlorine. Get advice about the best
sanitizing agent from you supplier of
sanitizing products.
k.
Following supplier instructions, apply the
sanitizing agent after the unit has been
cleaned and drained. Thoroughly drain off
the sanitizer.
CAUTION
NEVER LEAVE A CHLORINE SANITIZER IN
CONTACT WITH STAINLESS STEEL
SURFACES FOR LONGER THAN 30
MINUTES. LONGER CONTACT CAN CAUSE
CORROSION.
l.
After the unit has been cleaned, sanitized and
drained, let all surfaces air dry unless the unit
must be used again right away.
m.
It is recommended that the unit be sanitized
just before use. Follow the directions of the
sanitizer supplier.
n.
About once a week (more often if the water is
very hard), use a heavy duty cleaner to
remove any mineral deposits or film left by
hard water or foods. Follow the supplier’s
directions very carefully, and rinse the unit off
thoroughly, as soon as cleaning is finished.
CAUTION
KEEP CAUSTIC COMPOUNDS SUCH AS
FRYER BOILOUT CLEANERS AWAY FROM
ALUMINUM PARTS OF THE LID HINGE
SYSTEM AND THE COUNTERBALANCE
ASSEM B L Y . H I G H L Y C AU S T I C
COMPOUNDS COULD DAMAGE THIS
MATERIAL.
o.
If especially difficult cleaning problems
persist, contact your cleaning product supplier
for help. The supplier has a trained technical
staff with laboratory facilities to serve you.
OM-BMP-E 13
Содержание Eclipse BPM-30E
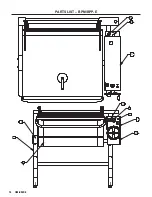
Страница 18: ...18 OM BMP E PARTS LIST BPM BPP E 8 9 17 1 2 3 5 13 18 20 21 ...
Страница 19: ...OM BMP E 19 PARTS LIST BPM BPP E 4 6 7 10 11 12 19 22 23 14 15 16 ...
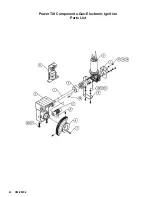
Страница 22: ...22 OM BMP E OM BPM BPP G 27 OM BPM G Power Tilt Components Gas Electronic Ignition Parts List 27 OM BPM G 27 ...
Страница 24: ...24 OM BMP E WIRING DIAGRAM BPM 30E ...
Страница 25: ...OM BMP E 25 WIRING DIAGRAM BPP 30E ...
Страница 26: ...26 OM BMP E WIRING DIAGRAM BPM 40E ...
Страница 27: ...OM BMP E 27 WIRING DIAGRAM BPP 40E ...
Страница 30: ...30 OM BMP E ...
Страница 31: ...OM BMP E 31 ...
Страница 32: ...32 OM BMP E ...
Страница 33: ...NOTES OM BMP E 33 ...
Страница 34: ...NOTES 34 OM BMP E ...
Страница 35: ...NOTES OM BMP E 35 ...


