background image

G1495 Heavy-Duty Wood Lathe

-11-

Pre-assembly

Assembly of the G1495 is straightforward. We
have organized the assembly process into steps.
Please follow them in sequence.

Tools Required: Only a few common tools are
needed to assemble this machine. Specifically,
two 12mm open end wrenches, a 6mm Allen

®

wrench (supplied), a Phillips

®

screwdriver and a

plumb bob.

SECTION 4: ASSEMBLY

Stand

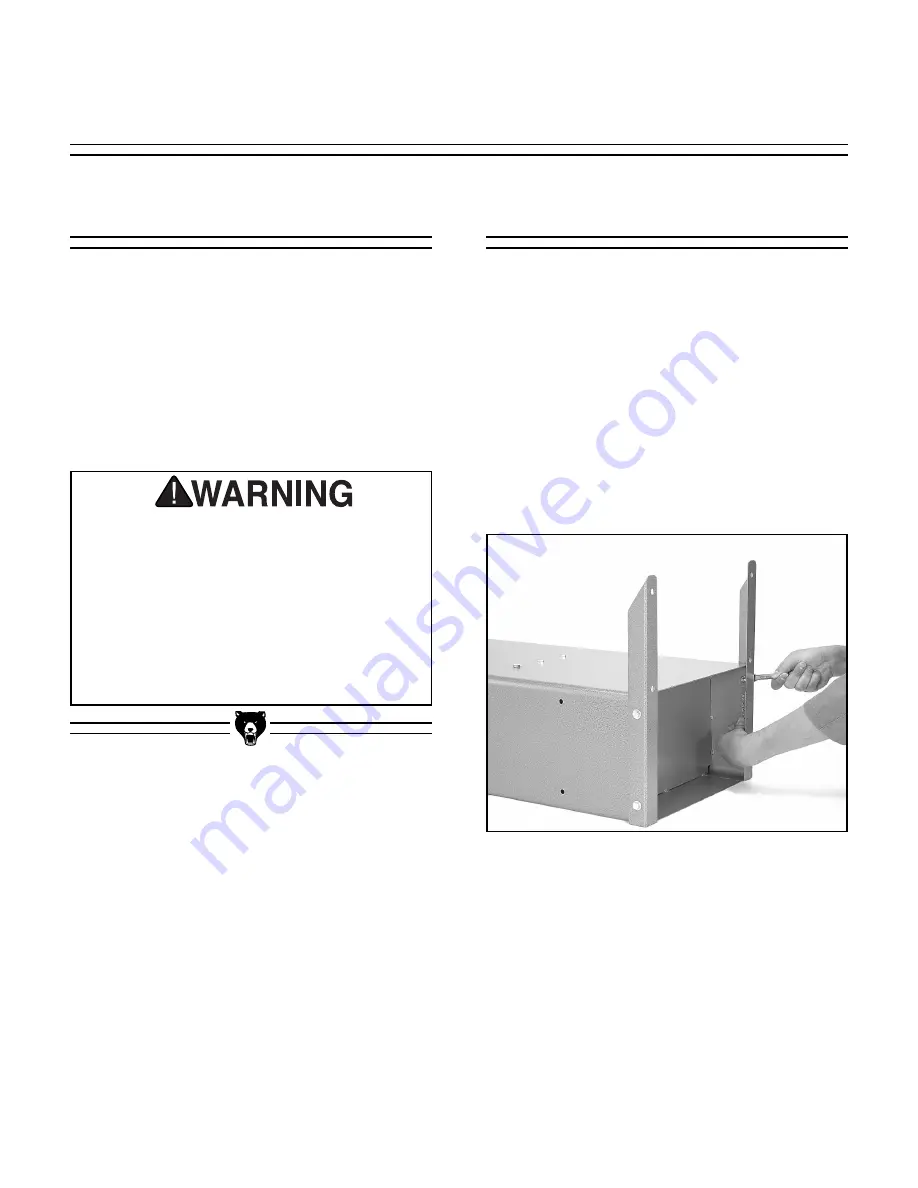
Figure 4. Attaching base brackets to stand.

(Stand is lying down on its front)

The stand components are most easily assem-
bled on their sides, then stood up and joined
together:

1. Attach the two base brackets to the base of

the cabinet using four (4) 

5

16

'' - 18 x 

3

4

'' bolts

and nuts. Use two (2) washers for each bolt,
one under the head of the bolt, one next to
the nut. These brackets are used when the
lathe is going to be bolted to the floor or
other type of support structure. See Figure
4.

All die-cut metal parts have a sharp edge
(called “flashing”) on them after they are
formed. This is generally removed at the fac-
tory. Sometimes a bit of flashing might
escape inspection, and the sharp edge may
cause cuts or lacerations when handled.
Please examine the edges of all die-cut
metal parts and file or sand the edge to
remove the flashing before handling.

2. Attach the third base bracket to the right

hand stand using two (2) 

5

16

'' - 18 x 

3

4

''

bolts, washers and nuts.

Содержание G1495

Страница 1: ...1495 INSTRUCTION MANUAL COPYRIGHT 1999 BY GRIZZLY INDUSTRIAL INC WARNING NO PORTION OF THIS MANUAL MAY BE REPRODUCED IN ANY SHAPE OR FORM WITHOUT THE WRITTEN APPROVAL OF GRIZZLY INDUSTRIAL INC REVISED OCTOBER 1999 PRINTED IN U S A ...

Страница 2: ...10 4 ASSEMBLY PRE ASSEMBLY 11 STAND 11 13 TOOL REST 13 TAILSTOCK 14 GUARD ASSEMBLY 14 5 ACCESSORIES INTRODUCTION 15 SANDING ATTACHMENTS 15 16 SPUR CENTER 16 TAILSTOCK 17 TAILSTOCK LIVE CENTER 17 18 FACEPLATE 18 OUTBOARD TOOL REST 19 ACCESSORY REMOVAL 19 6 OPERATIONS INTRODUCTION 20 TEST RUN 20 TURNING TOOLS 21 SPEED SELECTOR 22 TURNING SPEEDS 22 SPINDLE TURNING 23 FACEPLATE TURNING 24 INDEXING 25 ...

Страница 3: ...mable or noxious fumes may exist Keep work area well lighted For Your Own Safety Read Instruction Manual Before Operating This Equipment Indicates an imminently hazardous situation which if not avoided WILL result in death or serious injury Indicates a potentially hazardous situation which if not avoid ed COULD result in death or serious injury Indicates a potentially hazardous situation which if ...

Страница 4: ...P RATING 25ft 50ft 100ft 0 6 18 16 16 7 10 18 16 14 11 12 16 16 14 13 16 14 12 12 17 20 12 12 10 21 30 10 10 No Safety Instructions For Power Tools 13 DON T OVERREACH Keep proper footing and balance at all times 14 MAINTAIN TOOLS WITH CARE Keep tools sharp and clean for best and safest performance Follow instructions for lubri cating and changing accessories 15 DISCONNECT TOOLS before servicing an...

Страница 5: ...DEXING PIN before turning lathe on 6 SELECT THE TURNING SPEED which is appropriate for the type of work Allow the lathe to gain its full speed before beginning turning 7 ALWAYS OBSERVE THE CONDITION of the materials you are turning Pay particu lar attention to knots splits and other potentially dangerous conditions 8 NEVER OPERATE THE LATHE WITH DAMAGED OR WORN PARTS Maintain your lathe in proper ...

Страница 6: ... 220V outlet configurations Grounding This equipment must be grounded Verify that any existing electrical outlet and circuit you intend to plug into is actually grounded If it is not it will be necessary to run a separate 12 A W G copper grounding wire from the outlet to a known ground Under no circumstances should the grounding pin from any three pronged plug be removed Serious injury may occur I...

Страница 7: ...hart in Section 1 Safety Instructions to determine the minimum gauge for the extension cord The extension cord must also contain a ground wire and plug pin Always repair or replace extension cords when they become worn or damaged Extension Cords Notes We have covered some basic electrical requirements for the safe operation of your Lathe These requirements are not neces sarily comprehensive You mu...

Страница 8: ...ations and cover general operating procedures It repre sents our effort to produce the best documenta tion possible If you have any comments regard ing this manual please write to us at the address below Grizzly Industrial Inc C O Technical Documentation P O Box 2069 Bellingham WA 98227 2069 Most importantly we stand behind our machines If you have any service questions or parts requests please ca...

Страница 9: ...ments Flap Sander 1 Pneumatic Drum 1 Aluminum Sanding Disc 1 Garnet Sanding Disc 1 Arbor for Mounting Sanding Acc Tilting Work Table Work Table Support Spindle Outboard Tool Rest Bracket w 3 Bolts Outboard Tool Rest Support Outboard Tool Rest Post w Nut Faceplate Miter Gauge Tool Rest Holder Tool Rest Knockout Bar Allen Wrench 6mm Hardware Bag Hex Bolts 5 16 18 x 3 4 18 Flat Washers 5 16 36 Cap Sc...

Страница 10: ...Most commercial or home shop floors should be sufficient to carry the weight of the machine If you question the strength of your flooring check with a qualified architect or building engineer to determine if rein forcement is required WORKING CLEARANCES Working clearances can be thought of as the dis tances between machines and obstacles that allow safe operation of every machine without limitatio...

Страница 11: ... two base brackets to the base of the cabinet using four 4 5 16 18 x 3 4 bolts and nuts Use two 2 washers for each bolt one under the head of the bolt one next to the nut These brackets are used when the lathe is going to be bolted to the floor or other type of support structure See Figure 4 All die cut metal parts have a sharp edge called flashing on them after they are formed This is generally r...

Страница 12: ...e 7 Loosen the upper hex nuts on the motor adjustment bolts to allow the motor to pivot upward freely See Figure 7 Place the V belt over the lower pulley and lift up on the motor while slipping the V belt over the upper pulley in the headstock 3 Lay the right hand stand on its side so the two shelves can be more easily assembled to it See Figure 5 The two shelves differ by the location of the bolt...

Страница 13: ...o align the pulleys set the speed control lever mid way between high and low so the upper and lower pulleys are spread approximately the same amount Ensure that the lathe is sitting level Use a plumb bob to check the side of the pulleys in rela tion to each other See Figure 8 If the pulleys are not in alignment loosen the motor mounting bolts and move the motor on its mounting plate The lathe asse...

Страница 14: ...lar bracket onto the bar so the pivot hinge faces forward See Figure 12 Ensure that the spacer tube bevel is against the lathe bed positioned so the bar will be level and parallel to the bed 3 Secure the other end of the bar to the back of the lathe bed as described in Step 1 4 Fasten the clear plastic guard to the sliding bracket using the four 4 Phillips head screws already attached to the mount...

Страница 15: ...nd on the shaft Loosely tighten the setscrews for now Sanding Attachments The G1495 Lathe can be used for a wide variety of woodturning applications There are a number of accessories which are used for specific proce dures In this section the installation and basic operation of these accessory items is described In Section 6 Operations you will find more spe cific information about the actual turn...

Страница 16: ... when turning The spur center is used in conjunction with the tailstock live center Install the spur center by inserting into the hole in the inboard spindle Figure 15 See Section 5 Operations Spindle Turning section for complete detail on how to properly seat the spur center To remove insert the knockout bar provided into the outboard spindle and tap with the palm of your hand while carefully hol...

Страница 17: ...tailstock barrel bot toms out in the tailstock housing This causes the center to be forced out of the barrel Be sure to catch the center with your other hand as it drops out to avoid damaging the center See Figure 18 Tailstock Live Center Figure 17 Tailstock assembly Quick release lever Lever Stop Reinstall by turning the handwheel clockwise until the tailstock barrel sticks out of the tailstock h...

Страница 18: ...stock barrel lock handle must always be locked down while the lathe is in use The workpiece can be thrown from the lathe if this step is not observed 2 The tail stock barrel should not protrude from the tailstock housing more than 2 Serious per sonal injury may occur Figure 19 Locking lever on tailstock spindle A drill chuck not supplied can also be installed in the tailstock arbor as long as it i...

Страница 19: ...ch 2 Attach the tool rest support to the bracket with the 3 4 10 x 21 2 bolt and nut as shown in Figure 21 This is hand tightened only to allow movement 3 Insert the threaded end of the tool rest post into the cast boss and secure with the 3 4 hex nut This also is only hand tightened 4 The tool rest can now be placed into the end of the support post and secured with the setscrew To remove accessor...

Страница 20: ...cribes some of the basic infor mation required to use your G1495 Heavy Duty Wood Lathe It concentrates on methods of mounting the workpiece to the machine for the various operations We do not go into great detail about specific turning procedures here because there are a wide variety of tools and methods to achieve the needs of a particular project We recommend you consult one of the many fine ref...

Страница 21: ...ove shapes Measurement is across the overall width of the blade but the radius of the end is also generally called out Turning chisels are available in a variety of styles and sizes which are specialized for different turn ing applications For general purposes we will describe the five basic types of chisels to get you started There are a wide variety of other chisel configurations and tools for s...

Страница 22: ...h is too fast for your par ticular application Turning Speeds NOTICE Remember to choose the correct speed for your particular turning project As a gener al rule the larger the workpiece diameter the slower the speed Always start on slow speed NOTICE To change speeds the lathe must be on Attempting to change speeds without the spindle turning can result in damage to the belt drive mechanism Speed S...

Страница 23: ...d while controlling the chisel with the other hand See Figure 26 7 Cycle the lathe on and off rapidly to ensure the workpiece is firmly seated Spindle turning is the most common type of work done with a wood lathe It involves turning a work piece between two centers and removing stock to achieve a specific contour To mount a workpiece between centers 1 Locate the center point on both ends of the w...

Страница 24: ...other For easy removal later glue a piece of heavy paper e g a grocery bag between the stock and the backing block Make sure there is a strong bond before starting the turning operation After the turning is com plete the two pieces can be separated with a parting tool or a hammer and chisel to break the glue joint Faceplate Turning Figure 27 Typical faceplate turning setup 3 Mount the faceplate an...

Страница 25: ... uneven spots which can effectively be removed by sanding Sanding is also necessary to prepare the project for final finish application When sanding it is best to proceed through a pro gression of abrasive grits typical grit sizes are 60 80 100 120 150 180 220 240 280 320 360 400 500 and 600 If your turning is fairly rough start at 60 and work up If it is smoother you may be able to start at the 8...

Страница 26: ...n necessary 1 Loose mounting bolts 2 Worn switch 3 Worn or damaged cords and plugs 4 Damaged V belt 5 Any other condition that could hamper the safe operation of this machine General Lathe Bed The bed ways and other non painted surfaces on the Model G1495 should be protected against rusting and pitting Wiping the saw clean after every use ensures that moisture from wood dust isn t allowed to trap ...

Страница 27: ... current catalog for complete information regarding Grizzly s warranty and return policy If you need additional technical information relating to this machine or if you need general assistance or replacement parts please contact the Service Department listed in Section 3 General Information Additional information sources are necessary to realize the full potential of this machine Trade journals wo...

Страница 28: ...all be tried in the State of Washington County of Whatcom We shall in no event be liable for death injuries to persons or property or for incidental contingent special or consequential damages arising from the use of our products To take advantage of this warranty contact us by mail or phone and give us all the details We will then issue you a Return Number which must be clearly posted on the outs...

Отзывы: