Although some figures might not exactly
represent your machine, this process is the
same on the G0945, G0946, and G0947.
The knives/indexable inserts are very sharp
and can easily cut your hands. ALWAYS
use caution when making adjustments near
these parts to reduce risk of personal injury.
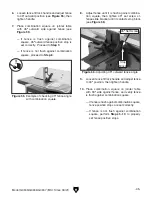
Figure 53. Example of checking 90º fence angle
with combination square.
Figure 54. Location of 90º fence angle
adjustment components.
-44-
Model G0945/G0946/G0947 (Mfd. Since 06/21)
Checking/Adjusting
Fence Positive Stops
The fence has adjustable positive stops at the 90º
and 45º outward (135º) positions for quickly and
accurately setting the desired fence angle.
Note: To ensure accurate results when jointing,
check the accuracy of these settings frequently
(every month at a minimum).
Items Needed
Qty
Hex Wrench 2.5mm ........................................... 1
Combination Square .......................................... 1
To check/adjust fence positive stops:
1. DISCONNECT MACHINE FROM POWER!
2. Loosen fence slide lock handle and slide
fence to desired position, then tighten handle.
3. Loosen fence tilt lock handle and adjust fence
to 90º position, then tighten handle.
Note: Both lock handles can be repositioned
by pulling up on the handle and sliding the
square nut underneath to desired position.
4. Place combination square on jointer table
with 90º side against fence (see
Figure 53).
— If fence is flush against combination
square, 90º fence positive stop is set cor-
rectly. Proceed to
Step 6.
— If fence is not flush against combination
square, proceed to
Step 5.
5. Adjust fence until it is flush against combina-
tion square, then tighten 90º set screw on
fence slide bracket until it contacts stop block
(see
Figure 54).
Stop
Block
90º Set Screw
Содержание G0945
Страница 60: ......


