Grizzly G0690 Скачать руководство пользователя страница 35

Model G0690/G0691 (Mfd. 6/15+)

-33-

Basic Controls

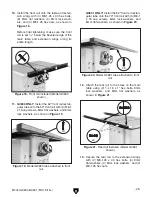
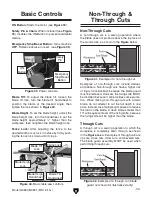
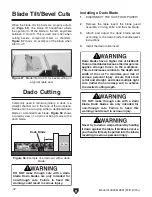
ON Button: Starts the motor (see Figure 39).

Safety Pin & Chain: When installed (see Figure 

39), disables the ON Button to prevent accidental 
startup.

Emergency Stop/Reset Button: Turns machine 

OFF. Rotate clockwise to reset. (see Figure 39).

Figure 39. Power controls. 

ON 

Button

Safety 

Pin

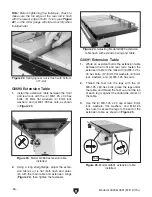
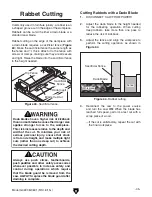
Blade Tilt:  To  adjust  the  blade  tilt,  loosen  the 
blade  tilt  lock,  turn  the  blade  tilt  handwheel  to 
position  the  blade  at  the  desired  angle,  then 
tighten the lock shown in 

Figure 40.

Blade Height: To set the blade height, unlock the 
blade  height  lock,  turn  the  handwheel  to  set  the 
blade  height  approximately 

1

4

"  higher  than  the 

workpiece, then re-tighten the blade height lock.

Fence Lock: After  adjusting  the  fence  to  the 
desired width of cut, lock it in place by firmly push-
ing the fence lock down until it stops.

Figure 40. Basic table saw controls.

Blade Height 

Lock

Blade Tilt 

Lock

Fence Lock

Blade Height 

Handwheel

Blade Tilt 

Handwheel

Non-Through & 

Through Cuts

Examples  of  non-through  cuts  include  dadoes 
and rabbets. Non-through cuts have a higher risk 
of injury from kickback because the blade guard 
must be removed. However, the riving knife MUST 
be installed because it still provides some protec-
tion. When making non-through cuts with a dado 
blade, do not attempt to cut the full depth in one 
pass. Instead, take multiple light passes to reduce 
the load on the blade. A dado blade smaller than 
10

"

 will require removal of the riving knife, because 

the riving knife will be higher than the blade.
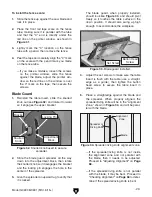
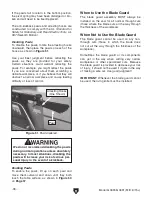
Non-Through Cuts

Figure 41. Example of a non-through cut.

A  non-through  cut  is  a  sawing  operation  where 
the blade does not protrude above the top face of 
the wood stock, as shown in the 

Figure below.

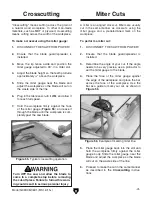
Figure 42. Example of a through cut (blade 

guard not shown for illustrative clarity).

Through Cuts

A through cut is a sawing operation in which the 
workpiece is completely sawn through, as shown 
in the 

Figure below. Examples of through cuts are 

rip cuts, cross cuts, miter cuts, and beveled cuts. 
The blade guard assembly MUST be used when 
performing through cuts.

Emergency 

Stop/Reset 

Button

Содержание G0690

Страница 1: ...G0690 COPYRIGHT NOVEMBER 2008 BY GRIZZLY INDUSTRIAL INC REVISED NOVEMBER 2015 WK WARNING NO PORTION OF THIS MANUAL MAY BE REPRODUCED IN ANY SHAPE OR FORM WITHOUT THE WRITTEN APPROVAL OF GRIZZLY INDUS...

Страница 2: ...g grinding tool integrity and the usage of personal protective equipment The manufacturer will not be held liable for injury or property damage from negligence improper training machine modifications...

Страница 3: ...ade Selection 34 Blade Installation 36 Blade Guard Assembly 37 Riving Knife 39 Ripping 40 Crosscutting 41 Miter Cuts 41 Blade Tilt Bevel Cuts 42 Dado Cutting 42 Rabbet Cutting 45 Resawing 47 SECTION 5...

Страница 4: ...de every effort to be exact with the instruc tions specifications drawings and photographs in this manual Sometimes we make mistakes but our policy of continuous improvement also means that sometimes...

Страница 5: ...tch Leg Blade Tilt Handwheel Table Tilt Scale 4 Dust Port For Your Own Safety Read Instruction Manual Before Operating Saw a Wear eye protection b Use saw blade guard and spreader for every operation...

Страница 6: ...Type Cardboard Box on Wood Skids Content Machine Weight 462 lbs Length x Width x Height 33 x 30 x 40 in Must Ship Upright Yes Carton 2 Type Cardboard Box Content Fence Weight 24 lbs Length x Width x...

Страница 7: ...meter 11 300 FPM Table Information Floor to Table Height 34 in Table Size with Extension Wings Width 40 in Table Size with Extension Wings Depth 27 in Distance Front of Table to Center of Blade 17 1 4...

Страница 8: ...Yes Certified by a Nationally Recognized Testing Laboratory NRTL Yes Features Quick Release Blade Guard and Spreader Quick Release Riving Knife Hinged Motor Cover 4 Dust Port Heavy Duty Handwheels Hea...

Страница 9: ...ton 1 Type Cardboard Box on Wood Skids Content Machine Weight 465 lbs Length x Width x Height 24 x 30 x 42 in Must Ship Upright Yes Carton 2 Type Cardboard Box Content Fence Weight 26 lbs Length x Wid...

Страница 10: ...er 11 300 FPM Table Information Floor to Table Height 34 in Table Size with Extension Wings Width 74 3 4 in Table Size with Extension Wings Depth 27 in Distance Front of Table to Center of Blade 17 1...

Страница 11: ...ationally Recognized Testing Laboratory NRTL Yes Features Quick Release Blade Guard and Spreader Quick Release Riving Knife Hinged Motor Cover 4 Dust Port Heavy Duty Handwheels Heavy Duty T Slot Miter...

Страница 12: ...of DANGEROUS ENVIRONMENTS Do not use machinery in areas that are wet cluttered or have poor lighting Operating machinery in these areas greatly increases the risk of accidents and injury MENTAL ALERTN...

Страница 13: ...moving parts or flying debris Make sure they are properly installed undamaged and working correctly BEFORE operating machine FORCING MACHINERY Do not force machine It will do the job safer and better...

Страница 14: ...ns in this manual CUTTING CORRECT MATERIAL Cutting metal glass stone tile etc increases risk of operator injury due to kickback or flying particles Only cut natural and man made wood products laminate...

Страница 15: ...gh cut Making a deep non through cut will greatly increase the chance of kickback Preventing Kickback Statistics show that most common acci dents among table saw users can be linked to kickback Kickba...

Страница 16: ...e and table sur face Kerf The resulting cut or gap in the workpiece after the saw blade passes through during a cutting operation Kickback An event in which the workpiece is propelled back towards the...

Страница 17: ...ng or fire may result especially if connected to an undersized circuit To reduce the risk of these hazards avoid over loading the machine during operation and make sure it is connected to a power supp...

Страница 18: ...re If repair or replacement of the power cord or plug is nec essary do not connect the equipment grounding wire to a live current carrying terminal Check with a qualified electrician or service per so...

Страница 19: ...Needed for Setup Your machine was carefully packaged for safe transportation Remove the packaging materials from around your machine and inspect it If you discover any damage please call us immediatel...

Страница 20: ...18 Model G0690 G0691 Mfd 6 15 Hardware Recognition Chart...

Страница 21: ...Stick 1 Q Saw Blade 10 x 40T 1 Hardware Not Shown Qty Phillips Head Screw M6 1 x 12 Mag Switch 1 Hex Bolts M6 1 x 12 Mag Switch 2 Lock Washers 6mm Mag Switch 3 Flat Washers 6mm Mag Switch 3 The follow...

Страница 22: ...t Rail Tube 3 Lock Washers Front Rail Tube 3 Hex Bolts M8 1 25 x 40 Front Rear Rails 6 Flat Washers 8mm Front Rear Rails 14 Lock Washers 8mm Front Rear Rails 8 Hex Nuts M8 1 25 Front Rear Rails 6 Hex...

Страница 23: ...er optional Basic steps for removing rust preventative 1 Put on safety glasses 2 Coat the rust preventative with a liberal amount of cleaner degreaser then let it soak for 5 10 minutes 3 Wipe off the...

Страница 24: ...r best results operate this machine in a dry environment that is free from excessive moisture hazardous chemi cals airborne abrasives or extreme conditions Extreme conditions for this type of machiner...

Страница 25: ...x 5 x 40 key in the handwheel shaft and slide the handwheel onto the shaft on the front of the table saw Use the included 2 5mm hex wrench to tight en the set screw see Figure 11 on the side of the ha...

Страница 26: ...to shim the extension wing down Figure 17 Note After reinstalling wings remove all excess masking tape with a razor blade Figure 17 Masking tape location for adjusting the extension wing down Figure...

Страница 27: ...ash ers and 4 M8 1 25 hex nuts as shown in Figure 18 Before final tightening make sure the front rail is set 3 16 below the beveled edge of the main table and extension wings along its entire length F...

Страница 28: ...sion wings Figure 24 then tighten the fasteners Figure 23 Model G0690 extension table installed Figure 24 Adjusting Model G0690 extension table flush with extension wing and table G0691 Extension Tabl...

Страница 29: ...re 26 Figure 26 Fence assembled 2 Place the fence on the rails on the right hand side of the blade Note Make sure the cam foot contacts the cam on the fence lock handle before you place the fence on t...

Страница 30: ...lel with the blade proceed to Fence Scale If the fence is not parallel to the blade miter slot then you MUST adjust the fence as described in Fence Adjustments on Page 69 so that it is parallel to the...

Страница 31: ...ate the workpiece 4 Adjust the set screws to make sure the table insert is flush with the table use a straight edge as a guide then tighten the button head screw to secure the table insert in place 5...

Страница 32: ...ect a dust collection hose 1 Fit a 4 dust hose over the dust port as shown in Figure 35 and tightly secure in place with a hose clamp 2 Tug the hose to make sure it does not come off Note A tight fit...

Страница 33: ...rations before operating the machine further Always disconnect the machine from power when investigating or correcting potential problems 5 Turn the machine OFF 6 Insert the switch disabling pin throu...

Страница 34: ...view is to provide the novice machine operator with a basic understand ing of how the machine is used during a typical operation so the controls components discussed later in this manual are easier to...

Страница 35: ...wheel Non Through Through Cuts Examples of non through cuts include dadoes and rabbets Non through cuts have a higher risk of injury from kickback because the blade guard must be removed However the r...

Страница 36: ...or cementitious backer board creates extremely fine dust and may reduce the life of the motor bearings This machine is NOT designed to cut metal glass stone tile etc cutting these materials with a tab...

Страница 37: ...lywood or veneer 40 80 teeth Triple chip tooth profile Very shallow gullet Triple Chip Blade Thin Kerf Blade A blade with thinner kerf than a standard blade Since the spreader riving knife included wi...

Страница 38: ...sen and remove the arbor nut flange and blade Note The arbor nut has right hand threads turn it counterclockwise to loosen The saw blade is sharp Use extra care or wear gloves when handling the blade...

Страница 39: ...s or dust The guard is designed to lift as the workpiece is pushed into the blade remain in contact with the workpiece during the cut then return to a resting position against the table when the cut i...

Страница 40: ...e installed on the saw for all normal through cuts those where the blade cuts all the way through the thickness of the workpiece When Not to Use the Blade Guard The blade guard cannot be used on any n...

Страница 41: ...r through cutting operations the blade guard assembly offers far more injury protection and risk reduction than the riving knife Therefore we strongly recommend that you use the blade guard assembly i...

Страница 42: ...devices 9 Plug the saw into the power source turn it ON and allow it to reach full speed Ripping means cutting with the grain of a natu ral wood workpiece In other man made materials such as MDF or pl...

Страница 43: ...t the face of the miter gauge Figure 55 and ease it through the blade until the workpiece is com pletely past the saw blade Figure 55 Typical crosscutting operation Crosscutting Miter Cuts A miter is...

Страница 44: ...ough cuts Failure to heed this warning could result in serious injury Installing a Dado Blade 1 DISCONNECT THE SAW FROM POWER 2 Remove the table insert the blade guard assembly or riving knife and the...

Страница 45: ...oss the workpiece use the miter gauge and carefully line up the desired cut with the dado blade DO NOT use the fence in combination with the miter gauge 3 Reconnect the saw to the power source 4 Turn...

Страница 46: ...then perform the cutting operation 7 Repeat the cutting operation on the other side of the dado channel as shown in Figure 61 8 Make additional cuts see Figure 62 in the center of the dado to clear ou...

Страница 47: ...LWAYS replace the blade guard after dadoing is complete Dado blades have a higher risk of kickback than normal blades because their larger size applies stronger forces to the workpiece This risk incre...

Страница 48: ...width of the rabbet cut on the edge of the workpiece so you can clearly identify the intended cut while it is laying flat on the saw table 4 Raise the blade up to the desired depth of cut depth of ra...

Страница 49: ...ing or movement of the workpiece away from the fence will cause kickback Be certain that stock is flat and straight Failure to follow these warnings could result in serious personal injury 8 x 2 Wood...

Страница 50: ...igure 68 Auxiliary fence Fence Facing Fence Body Auxiliary Fence To perform resawing operations 1 DISCONNECT SAW FROM POWER 2 Remove the standard table insert and the blade guard assembly 3 Install a...

Страница 51: ...me side against the fence and run the workpiece through the blade 6 Lower the blade completely below the table and slide the workpiece over the blade to make sure it moves smoothly and fits between th...

Страница 52: ...n Most featherboards are 10 28 long and 3 6 wide Make sure the wood grain runs paral lel with the length of the featherboard so the fingers you will create in Step 3 will bend without breaking Feather...

Страница 53: ...3 8 wide slot 4 5 long in the workpiece and 1 2 from the short end of the featherboard see Figure 72 Figure 72 Slot routed in featherboard 1 2 4 5 1 4 3 8 Slot Side View Wing Nut Miter Bar Featherboa...

Страница 54: ...he workpiece Mounting Featherboards w Clamps 4 Secure the featherboard to the table with a clamp 5 Check the featherboard by pushing it with your thumb to ensure it is secure If the featherboard moves...

Страница 55: ...ck Push Stick Prohibition Zone Store Push Stick Here for Easy Access Supporting A second push stick can be used to keep the workpiece firmly against the fence while cutting When using a push stick in...

Страница 56: ...ing a Push Block A push block can be used in place of or in addi tion to a push stick for feeding workpieces into the blade Due to their design push blocks allow the operator to apply firm downward pr...

Страница 57: ...fence and push block system shown in this section is an example of a specialty jig that can be made to increase the safety of very narrow rip cuts 2 Pre drill and countersink eight pilot holes 3 8 fro...

Страница 58: ...or death Turn OFF the saw and allow the blade to come to a complete stop before removing the cut off piece Failure to follow this warn ing could result in serious personal injury Auxilliary Fence Bla...

Страница 59: ...kback when crosscutting Figure 90 Example of crosscut sled Crosscut Sled Crosscut Sled One of the best accessories for improving the safety and ease of using a table saw is simply plac ing a large tab...

Страница 60: ...rt for an extension table or similar device Allows the whole machine and extension to move as one unit Adjustable length up to 453 4 and legs can be adjusted front to back Very versatile Figure 92 Mod...

Страница 61: ...th no bottom splinter at moderate feed rates Double hard and 40 stronger C4 carbide will give up to 300 longer life between sharpenings Ends blade changing one blade does rip combo and crosscut second...

Страница 62: ...ro Clearance Insert for G0690 91 Made especially for our G0690 and G0691 Table Saws Height is easily adjustable Special pheno lic material Figure 99 Model T20916 Zero Clearance Insert D4206 Clear Flex...

Страница 63: ...from the motor housing and trunnions Clean the pitch and resin from the saw blade with a cleaner like OxiSolv Blade Bit Cleaner Monthly Maintenance Check tighten the belt tension Page 73 Schedule Cle...

Страница 64: ...runnion Slides and Orientation Gears Worm Gears Trunnion and Bearing Housing Teeth Trunnion Slides Orientation Gears Clean the trunnion slides out with mineral spirits and a rag and brush a dollop of...

Страница 65: ...d ensure moisture is below 20 3 Straighten or replace workpiece adjust fence 4 Use correct blade reduce feed rate or depth of cut 5 Test repair replace 6 Tension replace belt Page 73 7 Wire motor corr...

Страница 66: ...lean sawdust off stop bolt Blade hits insert at 45 1 45 stop bolt is out of adjustment 2 Sawdust stuck on stop bolt 3 Hole in insert is inadequate 4 Table out of alignment 5 Blade position is incorrec...

Страница 67: ...e 105 Make sure a blade tooth does not obstruct the placement of the square Figure 106 Tilt indicator arrow If the blade is 90 to the table then adjust ments do not need to be made Make sure the tilt...

Страница 68: ...the blade is not 45 to the table you will need to adjust the 45 stop screw Proceed to the next step 4 Tilt the blade to 15 so there is room for the stop bolt to move 5 Remove the dust port to access...

Страница 69: ...lel 7 Tighten the table mounting cap screws in a criss cross alternating manner The saw blade is dangerously sharp Use extra care or wear gloves when handling the blade or working near it Figure 112 T...

Страница 70: ...ignment zone Alignment Zone Spreader or Riving Knife Blade If the spreader riving knife is not parallel with the blade and inside the alignment zone then it needs to be adjusted Proceed to Adjusting A...

Страница 71: ...the fence square height parallelism and clamping pres sure Keep in mind that these adjustments are interconnected and some trial and error may be needed to achieve satisfactory results Tools Needed Qt...

Страница 72: ...he rear side of the front bracket as necessary until the clamping pres sure is strong enough that the fence will not move as pressure is applied against it Figure 118 Location of set screws used to ad...

Страница 73: ...tipped marker 6 Rotate the blade to the other end of the table insert Figure 119 and recheck the distance between the fence and the blade to ensure they are parallel Fence Scale Calibration The fence...

Страница 74: ...t the same time then proceed to Step 5 5 Loosen the button head cap screws on the positive stop knob block see Figure 123 adjust the miter body until it is flush with the square then tighten the screw...

Страница 75: ...Roll the V belts off of the arbor and motor pulleys 4 While continuing to raise the motor install a new matching set of V belts onto the pulleys lower the motor to tension the V belts then tighten the...

Страница 76: ...t at the time of printing but may not match your machine If you find this to be the case use the wiring diagram inside the motor junction box CAPACITORS INVERTERS Some capacitors and power inverters s...

Страница 77: ...un Capacitor 25MFD 370VAC 3L2 5L3 13NO 2T1 4T2 6T3 A1 A2 14NO TEST H 97 NO 98 NO 14 12 18 16 95 NC 96 NC 2T1 4T2 6T3 OFF CHINT NR2 25 1L1 CHINT NCI 18 220V 60HZ M5 A2 ON CHINT NP2 Hot Hot Ground 220 V...

Страница 78: ...PARTS 55V2 55 1 55 2 55 3V2 55 5 55 6 8 9 9 56 10 10 68 69 70 71 55 4 1 2 3 4 5 6 7 8 9 14 15 18 19 20 21 22 23 24 25 26 27 27 28 29 30 31 32 32 33 33 34 36 40 41 42 43 44 45 46 46 1 46 2 47 48 49 50...

Страница 79: ...690021 FLAT WASHER 8MM 55V2 P0690055V2 MAG SWITCH ASSY CHINT V2 10 13 22 P0690022 LOCK WASHER 8MM 55 1 P0690055 1 CONTACTOR CHINT NC1 1810 23 P0690023 HEX NUT M8 1 25 55 2 P0690055 2 OL RELAY CHINT NR...

Страница 80: ...1 132 132 133 134 134 1 134 2 134 3 134 4 134 5 134 6 134 7 135 136 137 138 138 139 140 141 142 143 144 145 146 152 153 153 154 155 155 157 158 159 163 164 165 166 167 168 169 170 171 172 173 174 175...

Страница 81: ...HEX NUT M8 1 25 121 P0690121 LOCK WASHER 18MM 169 P0690169 HIGH SHAFT 122 P0690122 COPPER WASHER 18MM 170 P0690170 KEY 6 X 6 X 50 123 P0690123 WORM 171 P0690171 GEARED BEARING HOUSING 124 P0690124 SE...

Страница 82: ...CAP SCREW M8 1 25 X 20 213 P0690213 LOCK WASHER 5MM 234 P0690234 TRUNNION 214 P0690214 CAP SCREW M5 8 X 25 235 P0690235 PIN KNOB 215 P0690215 GEAR 236 P0690236 COMPRESSION SPRING 216 P0690216 CAP SCR...

Страница 83: ...0323 PHLP HD SCR M6 1 X 25 347 P0690347 LOCK NUT M5 8 324 P0690324 FLAT WASHER 6MM 348 P0690348 FLAT WASHER 5MM 326 P0690326 TOP GUARD 349 P0690349 PAWL 327 P0690327 PHLP HD SCR M4 7 X 6 350V2 P069035...

Страница 84: ...P0690414 POINTER MITER GAUGE 405 P0690405 MITER RING 415 P0690415 FLAT WASHER 4MM 406 P0690406 FLAT HD SCR M5 8 X 8 416 P0690416 LOCK WASHER 4MM 407 P0690407 MITER BODY PIVOT PIN 417 P0690417 PHLP HD...

Страница 85: ...0503 CAP SCREW M6 1 X 16 514 P0690514 HEX BOLT M10 1 5 X 45 504 P0690504 GLIDE PAD 515 P0690515 LOCK NUT M10 1 25 505 P0690505 FENCE SCALE WINDOW 516 P0690516 CAM FOOT 506 P0690506 SET SCREW M12 1 75...

Страница 86: ...0690609 LOCK WASHER 8MM 602 P0690602 GUIDE TUBE 610 P0690610 FLAT WASHER 8MM 603V2 P0690603V2 SCALE V2 04 11 611 P0690611 REAR RAIL 604 P0690604 FRONT RAIL 612 P0690612 HEX BOLT M8 1 25 X 40 605 P0690...

Страница 87: ...HEX BOLT M8 1 25 X 40 603V2 P0690603V2 SCALE V2 04 11 613 P0690613 HEX NUT M8 1 25 604 P0690604 FRONT RAIL 614V2 P0690614V2 TABLE BOARD V2 11 13 605 P0690605 CAP SCREW M6 1 X 16 615 P0690615 HEX BOLT...

Страница 88: ...grizzly com to order new labels Labels and Cosmetics 701 702 703 704 705 706 707 708 709 710 712 REF PART DESCRIPTION REF PART DESCRIPTION 701 P0690701 FENCE LABEL 708 P0690708 MODEL LABEL G0690 702 P...

Страница 89: ...metalworker ____ 0 2 Years ____ 2 8 Years ____ 8 20 Years ____20 Years 6 How many of your machines or tools are Grizzly ____ 0 2 ____ 3 5 ____ 6 9 ____10 7 Do you think your machine represents a good...

Страница 90: ...LINE FOLD ALONG DOTTED LINE GRIZZLY INDUSTRIAL INC P O BOX 2069 BELLINGHAM WA 98227 2069 Place Stamp Here Name_______________________________ Street_______________________________ City______________S...

Страница 91: ...tried in the State of Washington County of Whatcom We shall in no event be liable for death injuries to persons or property or for incidental contingent special or consequential damages arising from...

Страница 92: ......

Отзывы: