


-26-
Model G0690/G0691 (Mfd. 6/15+)
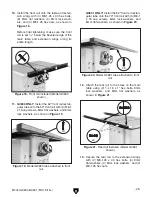
Note: Before tightening the fasteners, check to
make sure the top edge of the rear rail is flush
with the lowest edge of both T-slots (see
Figure
22), so the miter gauge will slide smoothly when
installed later.
Figure 22. Verifying rear rail is flush with bottom
of T-slot.
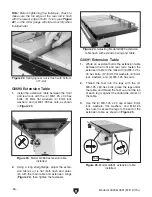
G0690 Extension Table
1. Install the extension table between the front
and rear rails with the (4) M8-1.25 x 30 hex
bolts, (8) 8mm flat washers, (4) 8mm lock
washers, and (4) M8-1.25 hex nuts, as shown
in
Figure 23.
2. Using a long straightedge, adjust the exten-
sion table so it is flat (both flush and paral-
lel) with the main table and extension wings
(
Figure 24), then tighten the fasteners.
Figure 23. Model G0690 extension table
installed.
Figure 24. Adjusting Model G0690 extension
table flush with extension wing and table.
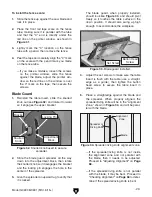
G0691 Extension Table
1. While an assistant holds the extension table
between the front and rear rails, fasten the
extension table to the rails with (6) M8-1.25 x
30 hex bolts, (12) 8mm flat washers, (6) 8mm
lock washers, and (6) M8-1.25 hex nuts.
2. Thread the feet into the legs with the (2)
M8-1.25 x 60 hex bolts, place the legs under
the table, and thread the feet out until the top
of each leg is against the underside corner of
the table.
3. Use the (4) M8-1.25 x 20 cap screws, 8mm
lock washers, flat washers, and M8-1.25
hex nuts to secure the legs to the end of the
extension table, as shown in
Figure 25.
Figure 25. Model G0691 extension table
installed.
x4
Foot
Содержание G0690
Страница 20: ...18 Model G0690 G0691 Mfd 6 15 Hardware Recognition Chart...
Страница 92: ......