background image

30

FR BE

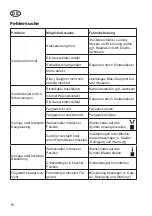
Dépistage des dysfonctionnements

Problème

Cause possible

Solution

L’appareil ne dé-

marre pas

Il n’est pas branché sur le 

réseau

Contrôle de la prise, du câble, de 

la conduite, de la fiche et du fu

-

sible, réparation éventuelle par un 

électricien.

L’interrupteur est défectueux

Réparation par service après-

vente

Le balai de charbon est usé
Le moteur est défectueux

Tubulure de soufflage / d’ad

-

mission non complètement 

montée

Monter correctement les deux 

éléments de la tubulure de souf-

flage / d’admission

L’appareil fonc-

tionne avec des 

interruptions

Câble de réseau endom-

magé

Contrôle et éventuellement chan

-

gement de câble

Faux-contact interne

Réparation par service après-

vente

Interrupteur défectueux

Capacité d’aspira-

tion faible ou nulle

Sac-réservoir plein

Changement sac-réservoir

Sac-réservoir sale

Nettoyage sac-réservoir

Sélecteur de mode  mal po-

sitionné

Positionnement du sélecteur  


sur le symbole aspirer

L’appareil bouché ou bloqué 

par des corps étrangers

Elimination des bouchons ou blo-

cages (cf. chap. « nettoyage et 

entretien »)

Capacité de souf-

flage faible ou nulle

Sélecteur de mode  mal po-

sitionné

Positionnement du sélecteur   

sur le symbole souffler

Régulateur de vitesse dans 

une fausse position

Tourner vers le haut le régulateur 

de vitesse.

La roue à ailettes 

reste immobile

Roue à ailettes bloquée par 

des corps étrangers

Elimination du blocage  

(cf. « Nettoyage et entretien »)

Содержание ELS 2614 E

Страница 1: ...g Traduction de la notice d utilisation originale Vertaling van de originele CE conformiteitsverklaring Traduzione delle istruzioni per l uso in originale Tradução do manual de instruções original Traducción de la Declaración de conformidad CE original Az eredeti használati útmutató fordítása Tłumaczenie oryginalnej instrukcji obsługi Translation of the original EC declaration of conformity Překla...

Страница 2: ...ar com esta máquina Guarde o manual em lugar bem seguro para que possa ter acesso a qualquer momento a todas as infor mações necessárias Traducción de la Declaración de conformidad CE original 73 Lea estas instrucciones de uso atentamente antes de la primera puesta en marcha del aparato tanto para garantizar su seguridad como también la seguridad de terceros Con serve las instrucciones apropiadame...

Страница 3: ...usmüll Schutzklasse II Garantierter Schallleistungspegel Inhalt Sicherheitshinweise 3 Bildzeichen auf dem Gerät 3 Bildzeichen in der Anleitung 4 Allgemeine Sicherheitshinweise 4 Verwendungszweck 7 Allgemeine Beschreibung 7 Funktionsbeschreibung 7 Übersicht 8 Montageanleitung 9 Auspacken 9 Montieren 9 Bedienung 10 Inbetriebnahme 10 Arbeiten mit dem Gerät 11 Reinigung und Wartung 12 Reinigung 13 Ver...

Страница 4: ...ester Sohle eine robuste lange Hose Handschuhe Schutz brille und einen Gehörschutz Benutzen Sie das Gerät nicht wenn Sie barfuß gehen oder offene Sandalen tragen Tragen Sie einen Atemschutz um sich vor Staub zu schützen Tragen Sie keine Kleidung oder Schmuck die am Lufteingang an gesaugt werden könnten Tragen Sie bei langem Haar eine schüt zende Kopfbedeckung Überprüfen Sie regelmäßig die Funkti o...

Страница 5: ...n Inspizieren Sie die zu reinigende Flä che sorgfältig und beseitigen Sie alle Drähte Steine Dosen und sonstige Fremdkörper Lösen Sie Fremdkörper vor Blas Saugbeginn mit einem Rechen oder einem Besen Verwenden Sie den gesamten Blasdü senaufsatz damit der Luftstrom nah am Boden arbeiten kann Befeuchten Sie bei sehr trockenen Be dingungen die Oberfläche leicht oder verwenden Sie ein Sprühgerät um di...

Страница 6: ...r Bewahren Sie das Gerät an einem tro ckenen Ort und außerhalb der Reich weite von Kindern auf Behandeln Sie Ihr Gerät mit Sorgfalt Reinigen Sie regelmäßig die Lüftungs schlitze und befolgen Sie die War tungsvorschriften Halten Sie alle Einlässe für die Kühlluft von Unrat frei Elektrische Sicherheit Achten Sie darauf dass die Netzspan nung mit den Angaben des Typen schildes übereinstimmt Schließen...

Страница 7: ...rd kann zu Schäden am Gerät führen und eine ernsthafte Gefahr für den Benutzer darstellen Das Gerät darf nicht in Bereichen mit gesund heitsgefährdenden Stäuben oder als Nasssauger verwendet werden Das Gerät ist zum Gebrauch durch Er wachsene bestimmt Jugendliche über 16 Jahre dürfen das Gerät nur unter Aufsicht benutzen Die Benutzung des Gerätes bei Regen oder feuchter Umgebung ist verboten Der B...

Страница 8: ...chtbar 18a 18b Fangsack Schlaufen 19 Gebläseöffnung 20 Ansaugöffnung 1 Führungsrollen 2a 2b Zweiteiliges Blas Saugrohr 3a 3b Rohr Befestigungsschrauben nicht sichtbar 4 Zusatzgriff 5 Tragegurt 6 Befestigungsöse für den Tragegurt 7 Drehzahlregler 8 Ein Ausschalter 9 Gehäusegriff 10 Lüftungsöffnungen Bild 1 10 11 12 16 13 18b 14 15 17 2a 2b 1 4 5 6 7 8 9 18a 19 20 3a 3b ...

Страница 9: ...e das Verpackungsmaterial ordnungsgemäß Montieren Betreiben Sie das Gerät nur wenn das Blas Saugrohr kom plett montiert sowie verschraubt ist und Fangsack und Tragegurt montiert sind Blas Saugrohr montieren 1 Stecken Sie die beiden Teile des Blas Saugrohres 2a b ineinander und verschrauben Sie diese miteinan der 3a 2 Stecken Sie das obere Blas Saugrohr 2b in die Gebläse Ansaugöffnung am Motorgehäu...

Страница 10: ...ften Betreiben Sie das Gerät nur zu vernünftigen Zeiten nicht früh morgens oder spät abends wenn andere gestört werden könnten Nach dem Ausschalten des Ge rätes dreht sich das Flügelrad noch einige Zeit weiter Verletzungsgefahr durch sich dre hendes Werkzeug Inbetriebnahme Bild 3 Achten Sie vor dem Einschalten da rauf dass das Gerät keine Gegen stände berührt Achten Sie auf einen sicheren Stand Da...

Страница 11: ...für den Benutzer darstellen Achten Sie beim Arbeiten darauf nicht mit dem Gerät gegen harte Gegenstände zu stoßen die Schä den verursachen können Saugen Sie keine Festkörper wie Steine dicke Äste oder Astabschnitte Tannenzapfen oder ähnliches an da diese das Gerät insbe sondere das Häckselwerk beschädigen könnten Reparaturen dieser Art unterliegen nicht der Garantie Schalten Sie das Gerät aus und ...

Страница 12: ...bsarten Wahlschalter auf das Symbol siehe Inbetriebnahme Ein optimales Ergebnis beim Einsatz des Gebläses erhalten Sie mit einem Abstand zum Boden von 5 10 cm Beginnen Sie die Arbeit mit der höch sten Blasleistung um die herumlie genden Blätter rasch zu sammeln Eine niedrigere Blasleistung wählen Sie um den zuvor zusammengetra genen Laubhaufen zu verdichten Lösen Sie vor dem Blasen am Boden anhaft...

Страница 13: ...hseln Sie einen defekten Fangsack aus Verwenden Sie nur einen Original Fangsack siehe Kapitel Ersatzteile an sonsten erlischt der Garantieanspruch beschädigte Teile korrekten Sitz von Schrauben oder anderer Teile Tauschen Sie beschädigte Teile aus Überprüfen Sie regelmäßig den Fangsack auf Verschleiß oder Beschädigung Führen Sie folgende Wartungs und Reini gungsarbeiten regelmäßig durch Dadurch is...

Страница 14: ...Laubsauger ELS 2614 E Nenneingangsspannung 230 240V 50Hz Leerlaufdrehzahl 8000 14000 min 1 Schutzklasse II Schutzart IP20 Nennleistung max 2600 W Luftaustrittsgeschwindigkeit max 160 270 km h Saugleistung max 14 m3 min Inhalt Fangsack 40 l Häckselleistung max 1 10 Gewicht ca 3 4 kg Schalldruckpegel LpA 92 dB A KpA 3 dB A Schallleistungspegel LwA garantiert 106 dB A gemessen 102 8 dB A KwA 2 07 dB ...

Страница 15: ...ad Fangsack und Kohlebürsten sofern die Beanstandungen nicht auf Materialfehler zurückzuführen sind Voraussetzung für Garantieleistungen ist zudem dass die in der Betriebsanleitung angegebenen Hinweise zur Anwendung Reinigung und Wartung eingehalten wur den Schäden die durch Material oder Herstellerfehler entstanden sind werden unentgeltlich durch Ersatzlieferung oder Re paratur beseitigt Vorausse...

Страница 16: ...ontakt Reparatur durch Kundendienst Ein Ausschalter defekt Geringe oder fehlende Saugleistung Fangsack ist voll Fangsack leeren Fangsack ist verschmutzt Fangsack reinigen Wahlschalter in falscher Position Wahlschalter auf das Symbol Ansaugen stellen Gerät ist verstopft oder durch Fremdkörper blockiert Verstopfungen oder Blockie rungen beseitigen s Kapitel Reinigung und Wartung Geringe oder fehlend...

Страница 17: ...on II Niveau de performance sonore garanti Table des matières Consignes de sécurité 17 Symboles sur l appareil 17 Symboles utilisés dans le mode d emploi 18 Consignes générales de sécurité 18 Fins d utilisation 21 Description générale 21 Description des fonctions 21 Schéma d ensemble 22 Instructions de montage 23 Déballage 23 Montage 23 Utilisation 24 Mise en service 24 Comment travailler avec l a...

Страница 18: ...ssent un fonction nement sans problèmes de l appareil Portez une tenue de travail adaptée et des chaussures solides munies d une semelle antidérapante un pantalon long robuste des gants des lunettes de protection et un casque antibruit N utilisez pas l ap pareil si vous êtes pieds nus ou si vous portez des sandales ouvertes Portez un masque de protection respiratoire pour vous protéger de la pouss...

Страница 19: ...e position de travail en particulier sur terrain en pente Tenez toujours l appareil ferme ment avec les deux mains et portez la sangle réglée à vos mesures Ne vous tenez pas trop loin et faites attention à ne pas perdre l équilibre Examinez attentivement la surface à nettoyer et éliminez tous les fils pierres boîtes en aluminium et autres corps étrangers Avant de commencer à souffler aspirer retir...

Страница 20: ...ns des pièces fermées ou mal aérées N utilisez pas l appareil à proximité de liquides inflammables ou de gaz Si ces consignes ne sont pas observées il y a danger d incendie ou d explosion Conservez l appareil dans un endroit sec et hors de la portée des enfants Prenez soin de votre appareil Net toyez régulièrement les fentes de ventilation et conformez vous aux ins tructions d entretien Maintenez ...

Страница 21: ...as expressément permise dans cette notice peut conduire à endommager l appareil et représenter un grave danger pour l utilisateur L appareil ne doit pas être utilisé dans des endroits où il y a des poussières nocives à la santé ni pour aspirer des liquides L appareil est conçu pour des utilisateurs adultes Les adolescents à partir de 16 ans ne peuvent l utiliser que sous sur veillance Il est inter...

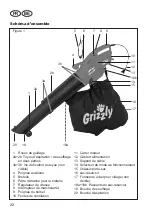
Страница 22: ... de vitesse 8 Interrupteur de marche arrêt 9 Poignée du boîtier 10 Fentes de ventilation 11 Carter moteur 12 Câble d alimentation 13 Support de câble 14 Sélecteur de mode de fonctionnement 15 Châssis porte sac 16 sac réservoir 17 Fermeture éclair pour vidage non visible 18a 18b Passants du sac réservoir 19 Bouche de soufflage 20 Bouche d aspiration 10 11 12 16 13 18b 14 15 17 Figure 1 2a 2b 1 4 5 ...

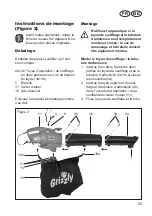
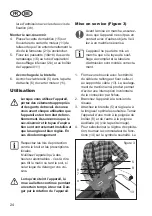
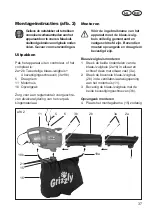
Страница 23: ... Montage N utilisez l appareil que si le tuyau de soufflage et la tubulure d admission sont complètement montés et vissés le sac de ramassage et la bretelle doivent être également montés Monter le tuyau de soufflage la tubu lure d admission 1 Insérez l une dans l autre les deux parties du tuyau de soufflage et de la tubulure d admission 2a b et vissez les ensemble 3a 2 Insérez le tuyau supérieur d...

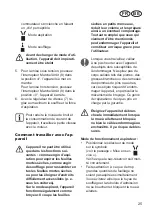
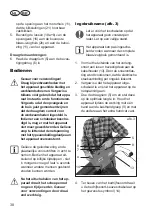
Страница 24: ...s heures raisonnables c est à dire pas tôt le matin ou tard le soir si cela risque de déranger vos voi sins Lorsqu on éteint l appareil la roue à ailettes continue pendant un certain temps à tourner Dan ger par la rotation de l appareil Mise en service Figure 3 Avant la mise en marche assurez vous que l appareil ne soit pas en contact avec d autres objets Veil lez à un maintien sécurisé L appareil...

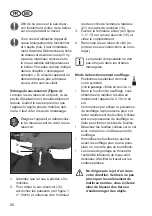
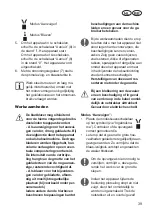
Страница 25: ...me broyeur Il coupe les feuilles sèches en petits morceaux réduit leur volume et les prépare ainsi à un éventuel compostage Tout autre emploi que ceux qui viennent d être mentionnés peut endommager l appareil et constituer un risque grave pour l utilisateur Lorsque vous travaillez veillez à ne pas heurter avec l appareil des objets durs susceptibles de l endommager N aspirez pas de corps solides t...

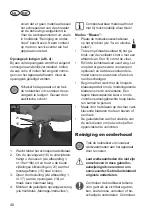
Страница 26: ...cs de fermeture latéraux 21 du cadre de maintien 15 3 Ouvrez la fermeture éclair voir figure 1 n 17 sur le sac réservoir 16 et videz le complètement 4 Remontez le sac réservoir vidé re portez vous aux instructions de mon tage Le matériel compostable ne doit pas être jeté dans les ordures ménagères Mode de fonctionnement soufflage Positionnez le sélecteur de mode sur le symbole voir le passage Mise...

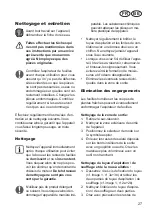
Страница 27: ...appareil de manière irré parable Les substances chimiques peuvent attaquer les pièces en ma tière plastique de l appareil Nettoyer régulièrement le boîtier le tuyau d aspiration et les fentes de ven tilation avec une brosse douce ou un chiffon Ne nettoyez jamais l appareil sous l eau courante Lorsque vous avez fini d utiliser l appa reil ôtez le sac réservoir retournez le et brossez le soigneuseme...

Страница 28: ... réglementation relative à la protection de l environnement recyclage pour l élimination de l appareil des acces soires et de l emballage Il ne faut pas se débarrasser des machines par le biais des ordures ménagères Portez l appareil à un point de recyclage Les différents composants en plastique et en métal peuvent être séparés selon leur nature et subir un recyclage Informez vous sur cette questi...

Страница 29: ...a durée de la garantie est écourtée Les dommages dûs à une usure naturelle à une surcharge ou à une utilisation non conforme aux instructions sont exclus de la garantie Certains éléments subissent une usure normale et restent exclus de la garantie en particulier la roue à ailettes le sac réservoir et le balai de charbon dans la mesure où les manques ne sont pas à imputer à des défauts de matériel ...

Страница 30: ...entuellement chan gement de câble Faux contact interne Réparation par service après vente Interrupteur défectueux Capacité d aspira tion faible ou nulle Sac réservoir plein Changement sac réservoir Sac réservoir sale Nettoyage sac réservoir Sélecteur de mode mal po sitionné Positionnement du sélecteur sur le symbole aspirer L appareil bouché ou bloqué par des corps étrangers Elimination des boucho...

Страница 31: ...n 41 Opvangzak uitwisselen 42 Bewaring 42 Afvalverwerking en milieubescher ming 42 Technische gegevens 42 Reserveonderdelen 43 Garantie 43 Opsporing van fouten 44 Vertaling van de originele CE conformiteitsverklaring 142 Explosietekening 146 Grizzly Service Center 147 Veiligheidsinstructies Deze paragraaf behandelt de essentiële veiligheidsvoorschriften bij het werk met het apparaat Symbolen op he...

Страница 32: ... van het apparaat Draag geschikte werkkledij zoals vast schoeisel met slipvrije zool een stevige lange broek beschermende handschoenen beschermen de bril en een gehoorbescherming Gebruik het apparaat niet wanneer u op blote voeten bent of open sandalen draagt Draag een stofmas ker indien u in een stoffige omgeving werkt Draag geen kleding of sierrade die aan de luchtingang kunnen worden aangezogen...

Страница 33: ...gin met een hark of een bezem Gebruik het aan te brengen blaasmond stuk opdat de luchtstroom dichtbij de grond kan werken Bevochtig bij zeer droge omstandighe den het oppervlak lichtjes om de stofbe lasting te verminderen Houd vingers en voeten op een veilige afstand van de opening van de aanzuig buis en de waaier Er bestaat gevaar voor verwondingen Werk niet met apparaat indien u moe of on ge con...

Страница 34: ...araat zoveel mogelijk slechts op één stopcontact met be schermingsinrichting voor een correcte stroom FI schakelaar met een geme ten stroom van niet meer dan 30 mA aan Controleer telkens vóór gebruik het apparaat en de netaansluitleiding met stekker op beschadigingen Vermijd aanrakingen van het lichaam met on derdelen die met de aarde verbonden zijn bijvoorbeeld metalen omheiningen metalen palen D...

Страница 35: ...onder toezicht gebruiken De gebruikmaking van het apparaat bij regen of in een vochtige omgeving is verboden De operator of gebruiker is voor ongevallen of schade aan andere mensen of aan hun eigendom verantwoordelijk De fabrikant kan niet aansprakelijk gesteld worden voor schade die door een in strijd met de bepalingen zijnde toepassing of door een foutieve bediening veroorzaakt werd Algemene bes...

Страница 36: ...sregelaar 8 Schakelaar Aan uit 9 Kasthandgreep 10 Ventilatieopeningen 11 Motorhuis 12 Voedingskabel 13 Kabelhouder 14 Moduskeuzeschakelaar 15 Montageframe voor opvangzak 16 Opvangzak 17 Ritssluiting voor het ledigen niet zichtbaar 18a 18b Bevestigingslussen voor op vangzak 19 Opening van de blazer 20 Aanzuigopening 10 11 12 16 13 18b 14 15 17 2a 2b 1 4 5 6 7 8 9 18a 19 20 3a 3b afb 1 ...

Страница 37: ...re ven afvalverwijdering van het verpak kingsmateriaal Monteren Vóór de ingebruikname van het apparaat moet de blaas zuig buis volledig gemonteerd en vastgeschroefd zijn Bovendien moeten opvangzak en draagriem bevestigd zijn Blaas zuigbuis monteren 1 Steek de beide onderdelen van de blaas zuigbuis 2a b in elkaar en schroef deze met elkaar vast 3a 2 Steek de bovenste blaas zuigbuis 2b in de ventila...

Страница 38: ... Bedien het apparaat uit sluitend op billijke tijdstippen niet s morgens vroeg of laat s avonds wanneer andere mensen gestoord zouden kunnen worden Na het uitschakelen van het ap paraat draait het schoepenrad nog een tijdje verder Gevaar voor verwondingen door draai end werktuig Ingebruikname afb 3 Let er vóór het inschakelen op dat het apparaat geen voorwerpen raakt Let op een veilige stand Het a...

Страница 39: ...auto s Iedere andere dan de hierboven beschreven toepassingen kan tot beschadigingen aan de machine leiden en een gevaar voor de ge bruiker betekenen Bij de werkzaamheden dient u erop te letten dat u met het apparaat niet stoot tegen harde voorwerpen die beschadigingen kunnen veroor zaken Zuig geen vaste objecten zoals stenen dikke of afgesneden takken sparappels of dergelijke aan omdat deze het a...

Страница 40: ...mposteerbaar materiaal hoort niet bij huishoudelijk afval thuis Modus Blazen Plaats de moduskeuzeschakelaar op het symbool zie In en uitscha kelen Tot een optimaal resultaat bij het ge bruik van de ventilator komt u met een afstand van 5 tot 10 cm tot de vloer Richt de luchtstraal van uzelf weg Let erop dat er geen zware voorwerpen opstuiven en dat deze zodoende ie mand kunnen verwonden of iets ku...

Страница 41: ...erd werden draai de opvangzak om en borstel hem grondig schoon Zo voorkomt u het ontstaan van schimmel en een onaan gename geur Maak het uitlaatbereik van eventuele opgehoopte resten vrij Verstoppingen verhelpen Gebladerte en vers afgesneden planten kunnen het apparaat eventueel doen ver stoppen Uitlaatbereik reinigen 1 Verwijder de opvangzak 2 Reinig het buitenste uitlaatbereik aan het apparaat 3...

Страница 42: ...rwijdering van uw defecte inge zonden apparaten voeren wij gratis door Technische gegevens Bladblazer ELS 2614 E Nominale ingangsspanning 230 240V 50Hz Toeren bij niet belasting 8000 14000 min 1 Krachtontneming 2600 W Veiligheidsklasse II Beschermingsklasse IP 20 Luchtsnelheid max 160 270 km h Luchtcapaciteit max 14 m3 min Inhoud van de opvangzak 40 l Versnippering max 1 10 Gewicht ca 3 4 kg Gelui...

Страница 43: ...n die door materiaal of fabricagefouten ontstaan zijn worden gratis door schadeloosstel ling of door een herstelling verholpen Voorwaarde is dat het apparaat niet gede monteerd is de buis opvangzak en het brede zuigmondstuk mogen gedemonteerd worden meegeleverd en met aankoop en garan tiebewijs bij ons servicecenter wordt ingeleverd Herstellingen die niet onder de garantie ressorteren kunt u tegen...

Страница 44: ...t Herstelling door klantenserviceaf deling Schakelaar Aan uit defect Gering of ont brekend zuigend vermogen Opvangzak is vol Opvangzak ledigenleeren Opvangzak is verontreinigd Opvangzak reinigen Keuzeschakelaar in verkeer de stand Keuzeschakelaar op sym bool Aanzuigen plaatsen Aparaat verstopt of door vreemde voorwerpen geblok keerd Verstoppingen of blokkeringen uit de weg ruimen zie hoofdstuk Rei...

Страница 45: ... protezione Livello sonoro garantito L apparecchio non è un aspiraliquidi Evitare di aspirare materiale bagna to fogliame e sporcizia in quanto ciò potrebbe causare l intasamen to della camera di triturazione ed una riduzione delle prestazioni In tal caso sarà necessario smonta re completamente e pulire l appa recchio L intervento dovrà essere eseguito da un elettricista e non è coperto da garanzi...

Страница 46: ...e chiuse con suola antiscivolo pantaloni robusti e lunghi guanti mezzi di protezione degli occhi e dell udito Non usare l apparecchiatura a piedi nudi o con sandali aperti Usare una protezio ne respiratoria per proteggersi dalla polvere Non indossare abiti o gioielli che potrebbero essere aspirati dalla bocca di aspirazione Se avete i capelli lunghi usare una protezione per il capo Verificare peri...

Страница 47: ...aspirazione median te un rastrello o una scopa Usare l intero inserto ugello di soffiatu ra in modo tale che la corrente d aria possa lavorare il più vicino possibile al suolo In condizioni estremamente secche inumidire leggermente la superficie per ridurre l esposizione alla polvere Tenere le dita e i piedi lontani dall a pertura di aspirazione e dalla girante Pericolo di ferite Non lavorare con ...

Страница 48: ...zia Sicurezza elettrica Prima della messa in funzione veri ficare che la tensione riportata sulla targhetta dell apparecchio corrisponda a quella di rete Collegare l apparecchio solo a una presa con protezione differenziale in terruttore FI non superiore a 30 mA Controllare prima di ogni uso il cavo di alimentazione e la prolunga per verificare la presenza di eventuali danneggiamenti o usura Non u...

Страница 49: ...sentito l uso dell apparecchio in zone con polveri dannose per la salute o come aspiraliquidi L apparecchio è destinato all uso da parte di adulti Ragazzi con età superiore a 16 anni potranno utilizzare l ap parecchio solo sotto sorveglianza È vietato l uso dell apparecchio in caso di pioggia o in ambiente umido L operatore o fruitore è responsabile per incidenti o danni a persone o cose Il produt...

Страница 50: ...i per sacco di raccolta 19 Apertura ventola 20 Apertura di aspirazione 1 Rotelle di guida 2a 2b Tubo di aspirazione soffiatura in due pezzi 3a 3b Viti di fissaggio tubo non a vista 4 Impugnatura supplementare 5 Cinghia di trasporto 6 Occhiello di fissaggio per la cinghia di trasporto 7 Regolatore del numero di giri 8 Interruttore di accensione ON e di spegnimento OFF 9 Impugnatura della scatola 10...

Страница 51: ...ccolta Smaltire il materiale di imballaggio secondo le disposizioni Montaggio Azionare l apparecchio solo con il tubo di soffiaggio aspirazione completamente montato e av vitato e il sacco di raccolta e la tracolla montati Montaggio tubo di soffiaggio aspira zione 1 Inserire una nell altra le due parti del tubo di aspirazione soffiatura 2a b e avvitarle insieme 3a 2 Inserire il tubo di aspirazione...

Страница 52: ... ad altri Dopo aver disinserito l apparec chio la girante girerà ancora per qualche momento Pericolo di fe rite a causa dell attrezzo rotante Messa in funzione figura 3 Prima di accendere l apparecchio fare attenzione che il medesimo non tocchi nessun oggetti Fare attenzio ne di essere bene in equilibrio L apparecchio si accende solo quan do il tubo di soffiaggio aspirazione completo è montato cor...

Страница 53: ...pezzi di rami pigne o oggetti simili perché cosi fa cendo si potrebbe danneggiare l ap parecchio e in particolare il tritatore Riparazioni dovute a tali danni non sono coperte da garanzia Spegnere l apparecchio e sfilare immediatamente la spina dalla presa di corrente se la girante si blocca o se il cavo è danneggiato o aggrovigliato Modalità di uso Aspirazione Posizionare l interruttore di selezi...

Страница 54: ...iziare il lavoro con la massima po tenza di soffiaggio per raccogliere ra pidamente le foglie sparse Scegliere una potenza di soffiaggio bassa per compattare il mucchio di foglie prece dentemente preparato Prima di procedere con la soffiatura staccare il fogliame aderente al suolo con una scopa Inumidire il fogliame particolarmente secco prima di procedere con la sof fiatura in modo tale da evitar...

Страница 55: ...lire la parte esterna della zona di scarico dell apparecchio 3 Posizionare l interruttore di selezione modalità di uso sul simbolo Aspirazione 4 Eliminare i resti di sporco presenti nella parte interna della zona di scarico con una spazzola piatta o con attrezzo simi le Eliminare i corpi estranei di grosse dimensioni con un attrezzo smussato e non tagliente Pulizia del tubo di soffiaggio d aspiraz...

Страница 56: ...esumere il numero relativo al pezzo dalle viste particolari smontati Dati tecnici Aspiratore soffiatore ELS 2614 E Tensione nominale d ingresso 230 240V 50Hz Numero di giri a vuoto 8000 14000 min 1 Classe di protezione II Tipo di protezione IP20 Potenza nominale max 2600 W Velocità aria max 160 270 km h Potenza d aspirazione max 14 m3 min Capacità sacco di raccolta 40 l Potenza di triturazione max...

Страница 57: ...er la garanzia è inoltre l aver seguito le indica zioni riportate in questo manuale al capi tolo Pulizia e Manutenzione I danni che siano risultati da errori del materiale o di costruzione verranno eliminati senza alcun costo tramite sostituzione del prodotto o la riparazione dello stesso Premessa essen ziale è che l apparecchio venga restituito al rivenditore non smontato e presentando la prova d...

Страница 58: ...istenza L interruttore ON OFF è difettoso La potenza di aspira zione è minima o man ca del tutto Il sacco di raccolta è pieno Svuotare il sacco di raccolta Il sacco di raccolta è sporco Pulire il sacco di raccolta L interruttore di selezione è sulla posizione sbagliata Posizionare l interruttore di selezione sul simbolo Aspirazione L aspirafoglie è otturato o bloccato da corpi estranei Eliminare l...

Страница 59: ...nual Símbolos de perigo com infor mações sobre a prevenção de danos pessoais e materiais Símbolos de ordens ao invés do símbolo de interrogação a ordem é esclarecida com informações sobre a prevenção de danos Avisos de instrução com informa ções sobre o melhor manusea mento com o aparelho Indice Indicações de segurança 59 Símbolos colocados no manual 59 Símbolos colocados no aparelho 60 Indicações...

Страница 60: ...rcaça do motor Indicações gerais de segurança Antes de iniciar o trabalho fami liarize se com todas as partes do aparelho e com a maneira correcta de operá lo Certifique se de que poderá desligá lo imediatamente em caso de emergência A utiliza ção incorrecta do aparelho pode causar ferimentos graves Atenção Ao utilizar o aparelho tenha em conta as seguintes me didas básicas de segurança para prote...

Страница 61: ...erá haver acidentes se o seu dedo estiver no interruptor ao carregar o aparelho ou se ele estiver ligado à rede eléctrica Durante o funcionamento não direc cione o aparelho principalmente o jac to de ar a pessoas desprotegidas no meadamente aos olhos e às orelhas Familiarize se com o ambiente de tra balho e tenha em conta os possíveis riscos que sob determinadas condi ções podem não ser ouvidos du...

Страница 62: ...onta própria a menos que possua formação especial para isso Todos os serviços que não se encontram descritos neste manual de instruções só devem ser executados pelos centros de assistên cia técnica por nós autorizados Não utilize o aparelho em ambientes fechados ou mal arejados Não utilize o aparelho próximo a líqui dos ou gases inflamáveis A inobser vância deste regulamento implica risco de incên...

Страница 63: ...privados e a ser utili zado para jardinagem de hobby Qualquer outra aplicação contrária àquela que foi autorizada pode levar a danos no apare lho e constituir um perigo sério para o seu utente O aspirador soprador para folhas não pode ser utilizado em áreas que conte nham poeiras perniciosas para a saúde nem pode ser usado com aspirador de líquidos Este aparelho destina se a ser utilizado por adul...

Страница 64: ...fixação do saco de recolha 19 Orifício de sopro 20 Orifício de aspiração 1 Rolos de guia 2a 2b Tubo de sopro aspiração de duas peças 3a 3b Parafusos de fixação do tubo não visível 4 Pega auxiliar 5 Cinta para transporte 6 Olhal de fixação para a cinta de transporte 7 Regulador do número de rotações 8 Interruptor liga desliga 9 Pega da caixa 10 Orifícios de ventilação 10 11 12 16 13 18b 14 15 17 2a...

Страница 65: ... Eliminar a embalagem de maneira apro priada Montagem Trabalhe com o aparelho somen te se o tubo de sopro aspiração estiver completamente montado e aparafusado e se o saco de recolha e a cinta de transporte estiverem montados Montagem do tubo de sopro aspiração 1 Encaixe as duas peças do tubo de sopro aspiração 2a b uma na outra e aparafuse as 3a 2 Encaixe o tubo de sopro aspiração 2b superior na ...

Страница 66: ...ão sonora e às regras locais Utilize o aparelho apenas em horá rios razoáveis e não cedo pela ma nhã ou no final da noite para não incomodar as outras pessoas Depois de desligar o aparelho a roda hélice continua a girar por algum tempo Perigo de ferimen tos devido a ferramenta rotativa Colocação em funcionamento figura 3 Prestar atenção antes de ligar para que o aparelho não toque em nenhum object...

Страница 67: ...o equipamento e repre sentar riscos ao utilizador Quando estiver a trabalhar preste atenção para não encalhar com o aparelho em objectos duros que poderão causar danos ao aparelho Não aspire objectos sólidos tais como pedras galhos ou troços de ramos pinhas ou objectos pareci dos pois estes poderão danificar o aparelho especialmente a tritura dora Reparações deste tipo estão excluídas da garantia ...

Страница 68: ...tico Função de Sopro Rode o botão de selecção de funções até este chegar ao símbolo desejado Conseguirá óptimos resultados desta função de sopro se manter o aparelho a uma distância de 5 10 cm do chão Inicie o trabalho na maior potência de sopro para juntar rapidamente as folhas secas espalhadas Seleccione uma po tência de sopro mais baixa para juntar os montes de folhas secas previamente reunidos...

Страница 69: ...um serviço de assistência técnica à clientela autorizado 5 Monte novamente e aparafuse o tubo de sopro aspiração Controle o aparelho sempre antes de utilizá lo quanto à existência de avarias evidentes como peças sol tas gastas ou avariadas posição correcta de parafusos e de outras peças Substitua as peças danifica das Verifique regularmente o saco de recolha quanto ao desgaste e à existência de av...

Страница 70: ...ra tal dirija se aos nossos Serviços de Assistência Técnica A elimina ção do aparelhos inutilizado que nos enviar será realizada por nós gratuitamente Dados Técnicos Aspirador de folhagem ELS 2614 E Tensão nominal de entrada 230 240V 50Hz Rotação à vazio 8000 14000 min 1 Classe de protecção II Tipo de protecção IP20 Potência nominal máx 2600 W Velocidade de saída do ar 160 270 km h Potência de asp...

Страница 71: ... respeitadas Danos que tenham sido causados por defeitos de material ou de fabrico serão nesse caso substituídas as peças ou reparadas gratui tamente A condição prévia para a concessão da garantia prevê que o aparelho não des montado e acompanhado da prova de compra e de garantia seja devolvido ao comerciante Poderá encarregar os nossos Serviços de Assistência Técnica de efectuar reparações que nã...

Страница 72: ...tá cheio Esvaziar o saco de recolha Saco de recolha está sujo Limpar o saco de recolha Selector colocado am posição errada Mover o selector até ao símbolo de aspiração O aparelho obstruído ou blo queado por corpos estranhos Desobstruir ou desbloquear o aparelho ver capítulo Limpeza e Manutenção O rendimento de sopro falta ou é in suficiente Selector colocado em posição errada Mover o selector até ...

Страница 73: ...te la aspiración de materiales húme dos hojas y suciedad así como ramas trozos de ramas conos de abetos pasto tierra arena sustan cias orgánicas de corteza pajaza etc No aspire sobre superficies mojadas o húmedas de pasto cés ped o prados En caso dado faltas en la aplicación pueden causar ob turaciones en la cámara trituradora llevando así a una reducción de la capacidad del aparato En este caso d...

Страница 74: ...nte montadas en la carca sa del motor Instrucciones generales de seguridad Antes de iniciar el trabajo debe familiarizarse con todas las piezas del aparato y con el manejo del aparato Asegúrese de poder des activar el aparato en forma inme diata en caso de una emergencia La operación inadecuada puede causar graves lesiones Atención Al usar herramientas eléctricas deben tenerse en cuenta las siguie...

Страница 75: ...n cuando no se encuen tra en su posición de trabajo Evite una puesta en marcha involunta ria Cerciórese de que el aparato esté desactivado antes de conectarlo a la alimentación de corriente de cogerlo o transportarlo Si usted tiene puesto el dedo en el inte rruptor mientras transporta el aparato o lo conecta a la alimentación de corrien te estando activado esto puede causar accidentes Durante la o...

Страница 76: ...puesto suministrados y recomendados por nuestro Centro de Servicio Retire el enchufe de la caja de enchufe al no utilizar el aparato o bien al transportarlo o dejarlo sin supervi sión al controlar el aparato o bien al lim piarlo o retirar los bloqueos al proceder con trabajos de limpie za y mantenimiento o bien al reem plazar los accesorios en caso de estar dañada o enreda da la línea de conexión ...

Страница 77: ... el cable de energía mien tras no se haya retirado el enchufe del tomacorriente Si se dañase la línea conectora de este aparato deberá ser reemplazada por el fabricante su servicio técnico o por una persona cualificada de forma análoga por una línea conectora especial para evitar cualquier peligro No utilice el dispositivo cuando no resulta posible activar y desactivar el conmutador Los conmutador...

Страница 78: ...parada 7 Regulador de caudal 9 Empuñadura de caja 10 Aberturas de ventilación 11 Carcasa del motor 12 Cable de red 13 Soporte para cable 14 Conmutador selector para modos de operación 15 Bastidor de sujeción para saco reco lector 16 Saco recolector 17 Cierre de cremallera para el vaciado no visible 18a 18b Lazos de sujeción para saco recolector 19 Abertura de soplado 20 Abertura de aspiración 10 1...

Страница 79: ... guía en la parte inferior del tubo Para una mejor protección del usuario puede utilizarse el dispositivo sola mente cuando el tubo de soplado y aspiración de 2 piezas se encuentra completamente montado El dispo sitivo cuenta con un aislamiento de protección y no requiere de una puesta a tierra La función de las piezas de mando se in dica en las siguientes descripciones Instrucciones de montaje fi...

Страница 80: ...5 en el travesaño de fijación 6 Utilización de la sopladora de hojas Existe peligro de lesiones En los trabajos debe llevarse ropa de trabajo y guantes de tra bajo apropiados Antes de cada utilización debe controlarse el aparato por su funcionalidad Asegúrese que el saco recolec tor y el tubo estén correctamente montados y que la cinta de trans porte esté correctamente ajusta da No debe continuars...

Страница 81: ... la conexión de enchufe eléctrica 2 Asegúrese que el aparato esté des activado A continuación conecte el aparato con la tensión de red 3 Póngase la cinta de transporte 5 y ajústela a la longitud adecuada Durante el funcionamiento sujete el aparato con una mano en la empuña dura de caja 9 y con la otra en la em puñadura adicional 4 4 Para la selección del modo de opera ción debe girarse el selector...

Страница 82: ...ciarse el saco recolector Desactive el aparato y retire el en chufe del tomacorriente antes de vaciar el saco recolector Peligro de descarga eléctrica Trabajar con el soplador de hojas El soplador de hojas solo puede utilizarse para las tareas siguien tes Como aspiradora para aspirar hojas secas Funcionando como aspiradora el aparato también sirve como picadora Las hojas secas son trituradas se re...

Страница 83: ...e seleccionar una potencia de soplado menor para densificar las hojas previamente acumuladas Antes de proceder al soplado soltar las hojas pegadas al suelo mediante una escoba o un rastrillo Las ruedas guías en el extremo del tubo sirven para facilitar el trabajo en superficies planas Mantenimiento y limpieza Antes de iniciar cualquier trabajo en el aparato retire el enchufe del tomacorriente Los ...

Страница 84: ...ción y el molinete 1 Suelte los 4 tornillos de sujeción del tubo ver la figura 1 Nº 3a 3b y desmonte ambas partes del tubo de soplado aspi ración ver la figura 1 Nº 2a 2b 2 Limpie el interior del tubo de soplado aspiración de dos partes 3 Elimine cuidadosamente los residuos de suciedad del molinete con una escobilla para botellas o algo similar y los objetos voluminosos con una he rramienta achata...

Страница 85: ...rmas y prescripciones indica das en la Declaración de Conformidad Los estados funcionales durante la me dición y los procesos aplicados para la misma son según EN 15503 Anexo A y Anexo B Queda reservada la aplicación de modifi caciones técnicas y ópticas sin aviso pre vio en el marco del perfeccionamiento Por lo tanto no se asume la responsabilidad para las dimensiones indicaciones y ob servacione...

Страница 86: ...ite adjuntar el tubo el saco receptor y la tobera superficial en estado desmontado adjuntando adicionalmente el comprobante de compra y garantía Reparaciones que no están sujetas a garantía pueden ser realizadas contra facturación en nuestros centros de ser vicio técnico Nuestro centro de servicio técnico elaborará gustosamente un presu puesto para usted Sólo podremos recibir aparatos que ha yan s...

Страница 87: ...trolar el cable reemplazar en caso dado Contacto intermitente in terno Reparación por servicio técnico Interruptor de arranque pa rada defectuoso Potencia de aspira ción baja o insufi ciente Saco recolector lleno Vaciar el saco recolector Saco recolector sucio Limpiar el saco recolector Selector en posición erró nea Colocar el selector en el símbolo de Aspiración Aparato obstruida o blo queada por...

Страница 88: ...gyelmeztető jel a személyi sérülések és anyagi károk elkerülése érdekében Tilalmi jel a felkiáltó jel helyett a tilalom magyarázata a károk elhá rítására vonatkozó adatokkal Utaló jelek a készülék jobb kezelé sére vonatkozó információkkal Tartalom Biztonsági tudnivalók 88 Az utasításban található szimbó lumok 88 A készüléken található képjelek 89 Általános biztonsági tudnivalók 89 Alkalmazási célo...

Страница 89: ...nyi részével és helyes kezelésével Biztosítsa hogy a készüléket vész esetben azonnal le tudja állítani A szakszerűtlen használat súlyos sérülésekhez vezethet Figyelem A készülékek használata során az áramütés a sérülés és a tűzveszély elleni védelem érdeké ben következő alapvető biztonsági intézkedéseket kell figyelembe venni Biztonságos munkavégzés A személyi védőfelszerelések védik a saját és má...

Страница 90: ...szüléket személyekre különösen ne irányítsa a légáramot a szemre és a fülre Ismerkedjen meg környezetével és ügyeljen az olyan lehetséges veszé lyekre melyeket munkavégzés köz ben esetleg nem hall Ügyeljen arra hogy a munkavégzés közben biztonságosan és stabilan áll jon főként lejtőkön Mindig két kézzel tartsa a készüléket és csak megfelelő en beállított tartóhevederrel dolgozzon Ne nyújtsa meg a ...

Страница 91: ...hatalmazott vevőszolgálati egységek hajthatnak végre Ne használja a készüléket zárt vagy rossz szellőzésű helyiségekben Ne használja a készüléket gyúlékony folyadékok vagy gázok közelében Az előírás figyelmen kívül hagyása esetén tűz vagy robbanásveszély áll fenn A készülék tárolása száraz és gyer mekek által el nem érhető helyen tör ténjen Készülékét kezelje gondosan Rend szeresen tisztítsa meg a...

Страница 92: ...zerszámgép csak száraz levelek fú vására és szívására alkalmas házi és hobbikertekben Minden más használat amely ebben az utasításban nincs kifeje zetten megengedve a gép károsodásá hoz vezethet és a felhasználó számára komoly veszélyt jelenthet A gépet nem szabad egészségre káros por vagy folyadék beszívására használni A szerszámgépet felnőttek által való hasz nálatra tervezték 16 éven felüli fia...

Страница 93: ...ató 18a 18b Gyűjtőzsák hurkok 19 Légfúvó szerkezet nyílása 20 Szívónyílás 1 Vezetőgörgők 2a 2b Kétrészes fúvó szívócső 3a 3b Cső rögzítő csavarok nem lát ható 4 Kiegészítő nyél 5 Tartóheveder 6 A tartóheveder rögzítő füle 7 Fordulatszám szabályozó 8 Be kikapcsoló 9 Burkolatnyél 10 Szellőzőnyílások 10 11 12 16 13 18b 14 15 17 2a 2b 1 4 5 6 7 8 9 18a 19 20 3a 3b 1 abra ...

Страница 94: ...rű hulladékként történő elhelyezé séről Összeszerelés Csak akkor működtesse a beren dezést ha a fúvó szívócsövet teljesen felszerelték valamint összecsavarozták és a gyűjtő zsákot és a hevedert felszerelték A fúvó szívócső felszerelése 1 Dugja össze a fúvó szívócső 2a b két részét és csavarozza össze azokat 3a 2 Dugja be a felső fúvó szívócsövet 2b a fúvó szívónyílásba a motorhá zon 11 3 Rögzítse ...

Страница 95: ...yi előírásokat A készüléket csak elfogadható időben használja nem korán reggel vagy késő este ha másokat zavarna A gép kikapcsolása után a já rókerék még egy ideig tovább forog Sérülésveszély forgó szer szám miatt Üzembe helyezés 3 ábra Bekapcsolás előtt ügyeljen arra hogy a készülék ne érintkezzen tárgyakkal Ügyeljen arra hogy Ön biztonságosan és stabilan álljon A berendezést csak akkor lehet bek...

Страница 96: ... arra hogy a gép ne ütközzön kemény tárgyak ba amelyek kárt okozhatnának Ne szívjon fel kemény tárgyakat mint kövek ágak vagy ágdarabok fenyőtoboz vagy hasonlók mivel ezek a gép károsodásához vezet hetnek különösen a szecskázó berendezésen Az ebből adódó ja vítások nem tartoznak garancia alá A szárnyaskerék blokkolása és a kábel sérülése vagy összeku szálódása esetén azonnal ki kell húzni a hálóza...

Страница 97: ... ményt akkor válasszon ha a korábban összehordott lombkupacot összenyomja Az elfújás előtt a talajra tapadó leve leket egy seprűvel vagy gereblyével távolítsa el Annak érdekében hogy ne verődhes sen fel por a nagyon száraz lombot az elfújás előtt nedvesítse be A cső végén lévő vezetőgörgők sima felületeken megkönnyítik a munka végzését A légsugarat magától ellenkező irányba terelje Ügyeljen arra h...

Страница 98: ...osan A gyűjtő zsák tisztításához vegye azt le ürítse ki és langyos semleges szappanos vízben mossa ki A megszáradt gyűjtő zsákot szerelje ismét fel Általános tisztítási munkák Tisztítsa meg gépét azonnal min den használat után mert különben a szennyes levélmaradványok megkeményednek és odaragad nak és esetleg nem távolíthatók el anélkül hogy szétszerelnénk a motorházat Az ilyen tisztítási munkálat...

Страница 99: ...rt II Védelmi mód IP20 Levegőkilépés sebessége 160 270 km h Szívóteljesítmény max 14 m3 min Gyűjtőzsák űrtartalma 40 l Aprítási arány max 1 10 Tömeg tartozékrészekkel együtt 3 4 kg Hangnyomásszint LpA 92 dB A KpA 3 dB A Hangteljesítményszint LwA garantált 106 dB A mért 102 8 dB A KwA 2 07 dB A Vibrálás an 4 268 m s2 K 1 5 m s2 Hang és vibráció A zaj és vibrálási érté kek a konformitás nyilatkozatb...

Страница 100: ...artásra vonatkozó utasítások betartása Azok a károsodások amelyek anyag vagy gyártáshiba folytán keletkez tek díjmentesen el lesznek hárítva pót szállítmány vagy javítás formájában Ennek előfeltétele hogy a készüléket összeszerelt állapotban a vásárlást és garanciát igazoló bizonylattal együtt adják vissza a kereskedőnek A garancia alá nem tartozó javításokat szervizközpontunkban számla ellenében ...

Страница 101: ...za Javíttatás szervizünkben Ki bekapcsoló hibás Gyenge vagy hiány zó szívóteljesítmény Gyűjtőzsák megtelt Gyűjtőzsák ürítése Gyűjtőzsák piszkos Gyűjtőzsák tisztítása Üzemmód választás téves Üzemmód választó kapcsolót szívás szimbólumra állítani Gép eldugult vagy idegen tárgy miatt leblokkolt Dugulás vagy leblokkolás elhárítá sa lásd Tisztítás és karbantartás fejezetet Gyenge vagy hiány zó fúvótelj...

Страница 102: ...Przed rozpoczęciem prac konserwa cyjnych i naprawczych wyjmij wtyczkę z gniazdka Wyjmij wtyczkę urządzenia z sieci je żeli przewód jest uszkodzony 8 Nie wystawiaj urządzenia na działanie wilgoci Nie pracuj podczas deszczu 9 Zachowuj odstęp bezpieczeństwa co najmniej 5 m od innych osób 10 Noś osłonę oczu i uszu Urządzeń elektrycznych nie należy wy rzucać razem z odpadami domowymi Klasa zabezpieczen...

Страница 103: ...eli jesteś boso lub masz na sobie otwarte sandały Noś maskę na usta gdy pracujesz w otoczeniu o dużym na tężeniu pyłu Noś maskę na twarz aby zabezpieczyć się przed pyłem Nie zakładaj odzieży albo biżuterii która może zostać wessana do wlotu powietrza Jeżeli masz długie włosy noś ochronne nakrycie gło wy Regularnie sprawdzaj czy urządzenie jest sprawne i nieuszkodzone aby wy kluczyć zagrożenia dla ...

Страница 104: ...e puszki i inne ciała obce Nie wychylaj ciała za daleko części ciała i uważaj żeby nie stracić równo wagi Przed rozpoczęciem zdmuchiwania odsysania usunąć ciała obce za po mocą grabi lub zmiotki Zastosować nasadkę dyszy żeby prąd powietrza znajdował się blisko podło ża W bardzo suchych warunkach nale ży lekko nawilżyć powierzchnię aby zmniejszyć pylenie Noś odpowiednią odzież roboczą jak mocne obu...

Страница 105: ...eci Obchodź się z urządzeniem ostrożnie Przestrzegaj przepisów dotyczących jego konserwacji Starannie obchodź się z urządzeniem Regularnie oczyszczaj szczeliny wlo tów powietrza i przestrzegaj przepisów konserwacji Utrzymuj wloty powietrza chłodzącego w czystości Bezpieczeństwo elektryczne Upewnij się że napięcie sieci elek trycznejodpowiada napięciu podanym na tabliczce typologicznej urządzenia U...

Страница 106: ...erane w worku na liście Przy pomocy dyszy płaskiej możliwe jest wsysanie liści i zanieczyszczeń z dużych powierzchni W trybie dmuchania liście można szybko gromadzić w jednym miejscu lub wydmu chiwać z trudno dostępnych miejsc Prowadzenie rury ssącej po podłożu uła twia rolka znajdująca się na dolnym końcu rury ssącej Wymogi bezpieczeństwa użytkownika stanowią że urządzenia wolno używać tylko z za...

Страница 107: ...ulator obrotów 8 Włącznik wyłącznik 9 Uchwyt osłony 10 Otwory napowietrzania 11 Część silnikowa 12 Kabel sieciowy 13 Uchwyt kabla 14 Przełącznik wyboru trybu eksploatacji 15 Rama nośna do worka wyłapującego 16 Worek wyłapujący 17 Zamek błyskawiczny do opróżniania niewidoczny 18a b Pętle worka wyłapującego 19 Otwór dmuchawy 20 Otwór ssący 10 11 12 16 13 18b 14 15 17 2a 2b 1 4 5 6 7 8 9 18a 19 20 3a...

Страница 108: ...posegreguj i usuń materiały opakowania Montaż Urządzenie wolno uruchamiać tylko z całkowicie zamontowaną i przykręconą rurą wydmucho wo ssącą i zamontowanym wor kiem oraz pasem Montaż rury wydmuchowej ssącej 1 Wciśnij obie części rury wydmuchowo ssącej 2a b jedna w drugą i skręć je ze sobą 3a 2 Wsuń górną rurę wydmuchowo ssącą 2b do otworu wydmuchowo ssącego w obudowie silnika 11 3 Zamocuj rurę wy...

Страница 109: ...iązujących przepisów lokal nych Urządzenia należy używać w roz sądnych godzinach nie wcześnie rano lub późno wieczorem kiedy mogłoby to przeszkadzać innym Po wyłączeniu silnika wirnik obraca się jeszcze przez pewien czas Niebezpieczeństwo urazu ze względu na obracające się narzędzie Uruchomienie rys 3 Proszę przed włączeniem zwrócić uwagę na to aby urządzenie nie dotykało żadnych przyrządów Proszę...

Страница 110: ...żej sposoby stosowania urządzenia mogą prowadzić do uszkodzenia urządzenia i sta nowić źródło zagrożeń dla użyt kownika Podczas pracy uważaj by nie uderzać urządzeniem w twarde przedmioty które mogłyby spowo dować uszkodzenia Nie wsysaj żadnych ciał stałych takich jak ka mienie grube gałęzie czy kawałki gałęzi szyszki jodłowe i podobne ponieważ mogłyby one uszkodzić urządzenie a przede wszystkim j...

Страница 111: ...takich jak luźne zużyte lub uszkodzone części prawidłowe osadzenie śrub lub innych części Zużyte części wymieniaj na nowe Regularnie sprawdzaj czy worek na liście nie jest zużyty lub uszkodzony pracuje zwróć się do odpowied niego punktu serwisowego Opróżnianie worka na liście rys 4 Przy pełnym worku moc ssania znacznie się redukuje gdy worek na liście jest peł ny lub jeżeli moc ssania urządzenia m...

Страница 112: ...i Liście lub świeże części obciętych roślin mogą ewentualnie zapchać urządzenie Oczyszczanie strefy wylotu 1 Zdejmij worek na liście 2 Oczyść zewnętrzną strefę wylotu urzą dzenia 3 Ustaw przełącznik trybów pracy na symbol wsysanie 4 Usuń resztki brudu w wewnętrznej strefie wylotu przy pomocy szczotki do mycia butelek a większe przedmioty przy pomocy zaokrąglonego tępego urządzenia Czyszczenie rury...

Страница 113: ...ności zamówienia dalszych części zamiennych numery można odczy tać na rysunkach samorozwijających Dane techniczne Dmuchawa do liści ELS 2614 E Napięcie znamionowe wejściowe 230 240V 50Hz Prędkość obrotowa przy pracy jałowej 8000 14000 min 1 Moc znamionowa maks 2600 W Klasa zabezpieczenia II Typ zabezpieczenia IP20 Prędkość powietrza 160 270 km h Moc ssania maks 14 m3 min Pojemność worka na liście ...

Страница 114: ...nika worka na liście i szczo tek węglowych o ile ich braki nie zostały spowodowane wadliwością materiałów Warunkiem skorzystania ze świadczeń gwarancyjnych jest ponadto przestrze ganie podanych w instrukcji obsługi wskazówek dotyczących oczyszczania i konserwacji urządzenia Uszkodzenia spowodowane wadliwością materiałów lub wadami produkcyjnymi będą naprawiane bezpłatnie przez dostarczenie zastępc...

Страница 115: ...urządzenia Naprawa w punkcie serwisowym Uszkodzony włącznik wyłącznik Zbyt niska lub moc ssania brak ssania Worek na liście jest pełen Opróżnij worek na liście Worek na liście jest zanie czyszczony Oczyść worek na liście Przełącznik trybów pracy w niewłaściwej pozycji Przesuń przełącznik trybów pracy na symbol Urządzenie jest zatkana lub zablokowana przez ciała obce Usuń niedrożność lub blokadę zo...

Страница 116: ...fekeeping 126 Technical Data 126 Waste disposal and environmental protection 127 Guarantee 127 Trouble shooting 128 Spare parts 128 Translation of the original EC declaration of conformity 145 Exloded Drawing 146 Grizzly Service Center 147 Notes on safety This section deals with the basic safety regulations to be observed when working with the machine Symbols on the device 1 2 3 4 5 6 7 8 9 10 1 C...

Страница 117: ...n ing use of the appliance by a person responsible for their safety Children should be supervised to en sure that they do not play with the ap pliance The user is responsible for accidents and risks to other people and their property Do not allow other persons to touch the device or the extension cord Keep For safety reasons the de vice can be switched on only if both parts of the pipes are correc...

Страница 118: ...ign bodies with a broom or rake Use the entire blow nozzle so the air flow can work close to the ground In very dry conditions dampen the surface slightly in order to reduce the strain from dust Keep fingers and feet away from the suction tube opening and impeller wheel There is a danger of injury Do not work with the device if you are tired or lack concentration or after the consumption of alcoho...

Страница 119: ... not use the appliance if the on off switch does not work properly Always have a damaged switch repaired by our Service Centre Do not overload your device Work transporting it or leaving it unat tended when you are checking the device cleaning it or removing blockages when you are carrying out cleaning or maintenance work or replacing accessories when the power or extension cable is damaged after ...

Страница 120: ...r is not liable for damage which is caused through inappropriate use or incorrect operation General description Function description The garden vacuum has a blowing vacuuming unit for the blowing and suc tion functions In blowing mode you can quickly blow together fallen leaves or blown them out of places that are difficult to reach In suction mode the leaves are shredded to save space and blown o...

Страница 121: ... regulator 8 On OFF switch 9 Casing handle 10 Ventilation openings 11 Motor casing 12 Mains cable 13 Cable retainer 14 Operating mode selection switch 15 Collection bag frame 16 Collection bag 17 Zip fastener for emptying not visible 18a 18b Retainer loops for collection bag 19 Blower opening 20 Suction opening 10 11 12 16 13 18b 14 15 17 2a 2b 1 4 5 6 7 8 9 18a 19 20 3a 3b picture 1 ...

Страница 122: ...the packaging material cor rectly Mounting Before putting the device into operation the blower suc tion tube must be completely mounted and screwed tight and the collection bag and carrying strap must be attached Fitting the blower suction tube 1 Plug the two sections of the blower suction tube 2a b into each other and screw them together 3a 2 Plug the upper blower suction tube 2b into the blowing...

Страница 123: ...device only at reason able times not early in the morn ing or late in the evening when others could be disturbed After switching off the device the impeller wheel continues to rotate for some time Danger of injury due to rotating tool Initial Operation picture 3 Before switching on device make sure it is not in contact with any objects Ensure stable positioning The device can only be switched on i...

Страница 124: ... these can damage the device in particular the shredding mechanism Repairs of this type are not covered by the guarantee Pull out mains plug immediately if the impeller wheel is blocked or if the cable is damaged or gets wound around something Danger of electric shock Suction operating mode Set the operating mode selector switch to the symbol see Initial Operation Check whether the collection bag ...

Страница 125: ... The guide rollers at the end of the tube make it easier to work on flat surfaces Cleaning and mainte nance Pull out the power plug before all work on the device Leave all work not described in this manual to our Service Cen tre Only use original parts Before every use check the foliage vacuum for obvious deficiencies such as loose worn or damaged parts and for correct seating of the parts Replace...

Страница 126: ...customer service centre 5 Refit the blower suction tube and screw it in place Replacing the collection bag Replace a defective collection bag Em ploy only original collection bags see Spare Parts otherwise the guarantee claim is invalid Safekeeping Keep the foliage vacuum in a dry frost free location which is inaccessible to children Do not store the device in direct sun light store it in dark or ...

Страница 127: ...ement ed Ask your Service Center about this Defective units returned to us will be dis posed of for free Guarantee This appliance has a 24 month guaran tee Damage due to natural wear and tear overload or incorrect use is excluded from the guarantee Certain compo nents are subject to normal wear and tear and are excluded from the guaran tee These include in particular impel ler collection bag and c...

Страница 128: ...bag is full Empty collection bag Collection bag is dirty Clean collection bag Selector switch in incorrect position Set selector switch to the suction symbol Device clogged up or blocked by foreign bodies Remove plug or blockages see Cleaning and Maintenance Small or missing blowing power Selector switch in incorrect position Set selector switch to the blowing symbol Airstream regulator in incor r...

Страница 129: ... Výstražné značky s údaji pro zabránění škodám na zdraví anebo věcným škodám Příkazové značky namísto výkřič níku je vysvětlován příkaz s údaji pro prevenci škod Informační značky s informacemi pro lepší zacházení s nástrojem Obsah Bezpečnostní pokyny 129 Symboly v návodu 129 Obrázkové znaky na přístroji 130 Všeobecné bezpečnostní pokyny 130 Účel použití 133 Obecný popis 133 Funkční popis 133 Přeh...

Страница 130: ...stroje a správnou obsluhou Zajistěte abyste přístroj mohli v případě potřeby ihned zastavit Neodborné použití může vést k těžkým zraně ním Pozor Při používání přístrojů je třeba pro ochranu proti úrazu elek trickým proudem nebezpečí pora nění a požáru dodržet následující zásadní bezpečnostní opatření Bezpečnost práce Prostředky pro ochranu osob chrání Vaše vlastní zdraví a zdraví jiných osob a zaj...

Страница 131: ... případně přeslechnout Dbejte při práci na to abyste bezpeč ně stáli zejména na svazích Přístroj vždy držte pevně oběma rukama a pracujte jen se správně nastaveným popruhem Nenatahujte se příliš daleko a dávejte pozor abyste neztratili rovnováhu Pečlivě zkontrolujte čištěnou plochu a odstraňte všechny dráty kameny ple chovky a jiná cizí tělesa Před zahájením foukání sání uvolněte cizí těleso hrábě...

Страница 132: ...icího vzduchu čisté a průchodné Elektrická bezpečnost Dbejte na to aby síťové napětí sou hlasilo s údaji na typovém štítku Připojte přístroj dle možnosti pouze do zásuvky s ochranným zařízením proti chybnému proudu FI spínač s jme novitým chybným proudem ne větším než 30 mA Zkontrolujte před každým použitím síťový přívod a prodlužovací kabel zda se nevyskytují škody a stárnutí Zabraňte tomu aby se...

Страница 133: ...m prachem nebo jako mokrý vysavač Přístroj je určen pro dospělé uživatele Mladiství nad 16 let mohou přístroj užívat pouze pod dohledem Užívání přístroje za deště nebo ve vlhkém prostředí je zaká záno Obsluha nebo uživatel je odpovědný za nehody nebo škody způsobené jiným oso bám nebo jejich majetku Výrobce neručí za škody které byly způ sobeny nepředpisovým použitím nebo nesprávnou obsluhou Obecn...

Страница 134: ...ení vidět 18a 18b Poutka pro sběrný pytel 19 Otvor dmýchadla 20 Nasávací otvor 1 Vodicí kolečka 2a 2b Dvoudílná foukací sací trubka 3a 3b Šrouby pro upevnění trubky není vidět 4 Přídavná rukojeť 5 Popruh 6 Upevňovací oka pro popruh 7 Regulátor otáček 8 Zapínač vypínač 9 Rukojeť přístroje 10 Větrací otvory 10 11 12 16 13 18b 14 15 17 2a 2b 1 4 5 6 7 8 9 18a 19 20 3a 3b obr 1 ...

Страница 135: ...ontáž Používejte přístroj pouze za předpokladu že je kompletně namontována a našroubována foukací sací trubka a je nasazen sběrný pytel a popruh Montáž foukací sací trubky 1 Nasaďte do sebe oba díly foukací sací trubky 2a b a sešroubujte je 3a 2 Nasaďte horní foukací sací trubku 2b do otvoru dmychadla na skříni motoru 11 3 Upevněte foukací sací trubku pomocí obou upevňovacích šroubů 3b Montáž sběr...

Страница 136: ...tože byste mohli rušit okolí Po vypnutí přístroje se lopatko vé kolo ještě nějaký čas otáčí Nebezpečí zranění otáčejícím se nástrojem Uvedení do provozu obr 3 Před zapnutím dbejte na to aby se přístroj nedotýkal jakýchkoliv před mětů Dbejte na bezpečný postoj Přístroj je možné aktivovat pouze za předpokladu že je správně namonto vaná kompletní foukací sací trubka 1 Na konci prodlužovacího kabelu v...

Страница 137: ... poněvadž tyto by mohly poškodit přístroj zejména však sekací zařízení Opravy těchto škod nepodléhají záruce Při zablokování lopatkového kola a poškození nebo zamotání kabelu ihned vytáhněte síťovou zástrčku Nebezpečí úrazu elek trickým proudem Provozní režim sání Umístěte voličový spínač pro vozního režimu na symbol viz Uvedení do provozu Zkontrolujte zda je sběrný pytel správ ně namontovaný Dbej...

Страница 138: ...ráce na rovných plochách Směřujte proud vzduchu pryč od sebe Dbejte na to abyste nerozvířili těžké předměty a tím někoho neporanili nebo něco nepoškodili Čištění a údržba Před prováděním prací na přístroji vytáhněte zástrčku Nechejte práce které nejsou popsány v tomto návodu pro vést námi zmocněným zákaz nickým střediskem Používejte pouze originální díly Zkontrolujte přístroj před každým použitím ...

Страница 139: ... středisku Likvidaci vašich zaslaných poškozených přístrojů provádíme bezplatně Po skončení práce sejměte záchytný vak převraťte jej naruby a pořádně jej vykartačujte Takto zabránite vzniku plísně a nepříjemného zápachu Z výfukové části odstraňte případné zbytky rozsekaného listí Jak odstranit ucpání Listí a čerstvé odřezky rostlin mohou pří stroj příp ucpat Čištění výfukové oblasti 1 Sejměte zách...

Страница 140: ...Záruka Pro tento přístroj poskytujeme záruku po dobu 24 ti měsíců Tato záruka platí pouze vůči prvnímu kupujícímu a není přenosná Dle zákonných předpisů platí pro živnostenské použití a pro vyměně né přístroje zkrácená záruční doba 12 ti měsíců Škody které jsou způsobeny příro zeným opotřebováním přetížením anebo nesprávnou obsluhou jsou ze zá ruky vylou čeny Určité součástí podléhají normálnímu o...

Страница 141: ...rázdnit záchytný vak Znečištěný záchytný vak Vyčistit záchytný vak Volič v nesprávné poloze Volič nastavit na symbol nasávání Ucpaný anebo cizím před mě tem blokovaný přístroj Odstranit ucpání anebo blokování viz kapitulu Čištění a údržba Nízký anebo žádný vyfukovací výkon Volič v nesprávné poloze Volič nastavit na symbol vyfukování Regulátor otáček v ne správné poloze Zvyšte výkon na regulátoru o...

Страница 142: ...stemming te waarborgen werden de hierna volgende in overeen stemming gebrachte normen en nationale normen en be palingen toegepast EN 60335 1 A14 2010 IEC 60335 2 100 2002 EN 15503 2009 EN 62233 2008 EN 55014 1 A2 2011 EN 55014 2 A2 2008 EN 61000 3 2 A2 2009 EN 61000 3 3 2008 Zusätzlich wird entspre chend der Geräuschemis sionsrichtlinie 2000 14 EC bestätigt Schallleistungspegel Garantiert 106 dB ...

Страница 143: ...ionais Para garantizar la confor midad se aplicaron las siguientes normas armoni zadas así como las normas y regulaciones nacionales EN 60335 1 A14 2010 IEC 60335 2 100 2002 EN 15503 2009 EN 62233 2008 EN 55014 1 A2 2011 EN 55014 2 A2 2008 EN 61000 3 2 A2 2009 EN 61000 3 3 2008 Si dichiara inoltre in con formità alla direttiva 2000 14 EC sull emissione acustica ambientale Livello di potenza sonora...

Страница 144: ...lkalmaztuk W celu zapewnienia zgodności z ww norma mi zastosowano następujące normy harmoni zujące oraz normy i przepisy krajowe EN 60335 1 A14 2010 IEC 60335 2 100 2002 EN 15503 2009 EN 62233 2008 EN 55014 1 A2 2011 EN 55014 2 A2 2008 EN 61000 3 2 A2 2009 EN 61000 3 3 2008 Ezenkívül a 2000 14 EC zajkibocsátásról szóló irányelv szerint igazoljuk Hangteljesítményszint garantált 106 dB A mért 102 8 ...

Страница 145: ...st bylo použito nás ledujících harmonizovaných norem jakož i národních norem a předpisů EN 60335 1 A14 2010 IEC 60335 2 100 2002 EN 15503 2009 EN 62233 2008 EN 55014 1 A2 2011 EN 55014 2 A2 2008 EN 61000 3 2 A2 2009 EN 61000 3 3 2008 We additionally confirm the following in ac cordance with the 2000 14 EC emissions guideline Guaranteed sound power level 106 dB A Measured sound power level 102 8 dB...

Страница 146: ... Explosietekening Disegno esploso Designação de explosão Plano de explosión Robbantott ábra Rysunek samorozwijający Exploded Drawing Rozvinutý výkres informativ informatif informatief informativo informatív pouczający informative informační ...

Страница 147: ...partado 1421 4471 909 Maia Tel 022 960 9000 Fax 022 960 0032 e mail geral alfacomer pt 92 S A c Bristol 32 34 Parque Empresarial Europolis 28232 Las Rozas Madrid Tel 91 6409 950 Fax 91 6407 135 e mail comercial 92sa com Green Fields Kereskedelmi és Szolgáltató Kft Kendergyári u 214 4 7100 Szekszárd Tel 06 70 3400 337 Fax 06 74 311 771 e mail info green fields hu Biuro Handlowo Uslugowe Andrzej Kry...

Страница 148: ......
Отзывы: