background image

operation. A guard or other part that is damaged should
be properly repaired or replaced by an authorized service
center unless indicated elsewhere in this manual.

Remove or disconnect battery before servicing, cleaning
or removing material from the gardening appliance.

Do not modify or attempt to repair the appliance or the
battery pack (as applicable) except as indicated in the
instructions for use and care. Use appliances only with
specifically designated battery packs. Use of any other
battery packs may create a risk of injury and fire. Use
only Greenworks 29652 battery or other BAF series.

Recharge only with the charger specified by the
manufacturer. A charger that is suitable for one type of
battery pack may create a risk of fire when used with
another battery pack. Use only Greenworks 29692
charger or other CAF series.

When battery pack is not in use, keep it away from other
metal objects, like paper clips, coins, keys, nails, screws
or other small metal objects, that can make a connection
from one terminal to another. Shorting the battery
terminals together may cause a fire.

Under abusive conditions, liquid may be ejected from the
battery; avoid contact. If contact accidentally occurs,
flush with water. If liquid contacts eyes, additionally seek
medical help. Liquid ejected from the battery may cause
irritation or burns.

Do not use a battery pack or appliance that is damaged or
modified. Damaged or modified batteries may exhibit
unpredictable behavior resulting in fire, explosion or risk
of injury.

Do not expose a battery pack or appliance to fire or
excessive temperature. Exposure to fire or temperature
above 265 °F (130 °C) may cause an explosion.

Do not dispose of the batteries in a fire. The cells may
explode. Check with local codes for possible special
disposal instructions.

Do not open or mutilate the batteries. Released electrolyte
is corrosive and may cause damage to the eyes or skin. It
may be toxic if swallowed.

Exercise care in handling batteries in order not to short
the battery with conducting materials such as rings,
bracelets, and keys. The battery or conductor may
overheat and cause burns.

Follow all charging instructions and do not charge the
battery pack or appliance outside of the temperature range
specified in the instructions. Charging improperly or at
temperatures outside of the specified range may damage
the battery and increase the risk of fire.

Have servicing performed by a qualified repair person
using only identical replacement parts. This will ensure
that the safety of the product is maintained.

Keep guards in place and in working order.

Keep hands and feet away from cutting area.

Disconnect the battery pack from the appliance before
making any adjustments, changing accessories, or storing
appliance. Such preventive safety measures reduce the
risk of starting the appliance accidentally.

Use only with the nylon cutting line of 0.065" (1.65 mm)
diameter. Do not use heavier lines than recommended by
the manufacturer and line materials of other types – for
example, metal wire, rope, and the like.

SAVE THESE INSTRUCTIONS

3

SYMBOLS ON THE MACHINE

Some of the following symbols can be used on this machine.
Please study them and learn their definition. Proper
interpretation of these symbols will let you operate the tool
better and safer.

Symbol

Explanation

V

Voltage

A

Current

Hz

Frequency (cycles per second)

W

Power

min

Time

/min

Revolutions, strokes, surface speed, or-
bits etc., per minute

Direct current

Precautions that involve your safety.

Read and understand all instructions be-
fore you operate the machine, and follow
all warnings and safety instructions.

Always wear safety glasses with side
shields marked to comply with ANSI
Z87.1 when you operate this machine.

Do not expose the machine to rain or
moist conditions.

Keep all bystanders at least 15m away.

Do not install or use any type of blade on
the machine or displaying this symbol.

Thrown objects can ricochet and result in
personal injury or property damage.

4

RISK LEVELS

The following signal words and meanings are intended to
explain the levels of risk associated with this product.

5

English

EN

Содержание STF309

Страница 1: ...STF309 www greenworkstools com EN OPERATOR MANUAL STRING TRIMMER FR MANUEL D OPÉRATEUR COUPE HERBE ...

Страница 2: ......

Страница 3: ... 8 8 Operation 8 8 1 Start the machine 8 8 2 Stop the machine 8 8 3 Operation tips 8 8 4 Cutting tips 9 8 5 Adjust the length of the cutting line 9 8 6 Adjust the length of the cutting line manually 9 8 7 Adjust the cutting diameter 9 8 8 Change to the edging mode 9 8 9 Adjust the length of the shaft 10 9 Maintenance 10 9 1 General information 10 9 2 Clean the machine 10 9 3 Replace the spool 11 9...

Страница 4: ...mmended when working outdoors Wear protective hair covering to contain long hair Use right Appliance Do not use appliance for any job except that for which it is intended Avoid Unintentional Starting Don t carry appliance with finger on switch Be sure switch is off when battery is plugged in Don t Force Appliance It will do the job better and with less likelihood of a risk of injury at the rate fo...

Страница 5: ...in handling batteries in order not to short the battery with conducting materials such as rings bracelets and keys The battery or conductor may overheat and cause burns Follow all charging instructions and do not charge the battery pack or appliance outside of the temperature range specified in the instructions Charging improperly or at temperatures outside of the specified range may damage the ba...

Страница 6: ...al WARNING If the battery pack cracks or breaks with or without leaks do not recharge it and do not use Discard it and replace with a new battery pack DO NOT TRY TO REPAIR IT To prevent injury and risk of fire explosion or electric shock and to avoid damage to the environment Cover the terminals of the battery with heavy duty adhesive tape DO NOT try to remove or destroy any of the battery pack co...

Страница 7: ...Put the guard 9 onto the trimmer head 3 Align the screw holes on the guard with the screw holes on the trimmer head 4 Tighten the screws 7 4 ASSEMBLE THE SHAFT 1 Push the lower shaft into the upper shaft 2 Align the groove on the lower shaft with the prominent part in the upper shaft 3 Slide the shafts until the release button 13 locks into the positioning hole in the upper shaft 4 Tighten the cou...

Страница 8: ...hold the battery release button 14 2 Remove the battery pack from the machine 8 OPERATION IMPORTANT Before you operate the machine read and understand the safety regulations and the operation instructions WARNING Be careful when you operate the machine 8 1 START THE MACHINE 1 Pull back on the lock out button 2 and pull the trigger 1 8 2 STOP THE MACHINE 1 Release the trigger to stop the machine 8 ...

Страница 9: ...il the line reaches the cut off blade and the cut off blade cuts the excess length 8 6 ADJUST THE LENGTH OF THE CUTTING LINE MANUALLY 1 Stop the machine 2 Push the line release button and pull on cutting line to manually advance the cutting line 3 After you extend new cutting line always return the machine to its normal position before you start it again LINE RELEASE BUTTON 8 7 ADJUST THE CUTTING ...

Страница 10: ...larly that you install the handles tightly IMPORTANT Use only the replacement parts and accessories of the initial manufacturer 9 1 GENERAL INFORMATION IMPORTANT Only your dealer or approved service center can do the maintenance that is not given in this manual Before the maintenance operations Stop the machine Remove the battery pack Cool the motor Store the machine in cool and dry place Use corr...

Страница 11: ...position 9 4 REPLACE THE CUTTING LINE NOTE Remove the remaining cutting line on the spool NOTE Use only with the nylon cutting line of 0 065 1 65 mm diameter 1 Cut a piece of cutting line approximately 3m long 2 Bend one end of the line 1 4 of an inch 6 35mm 3 Insert the line into the anchor hole of the spool 4 Wind the cutting line around the spool tightly in the indicated direction 5 Put the cut...

Страница 12: ...y pack is disconnected from the tool Install the battery pack again The battery pack is depleted Charge the battery pack Problem Possible Cause Solution The line does not ad vance Lines are welded to themselves Lubricate with silicone spray Not enough line on spool Install more line Lines are worn too short Advance the cutting line Lines are tangled on spool 1 Remove the lines from the spool 2 Win...

Страница 13: ...d or rented for industrial commercial use and that have been maintained in accordance with the instructions in the owners manual supplied with the product from new ITEMS NOT COVERED BY WARRANTY 1 Any part that has become inoperative due to misuse commercial use abuse neglect accident improper maintenance or alteration or 2 The unit if it has not been operated and or maintained in accordance with t...

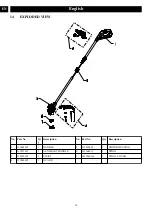
Страница 14: ...No Qt y Description No Part No Qty Description 1 311062492 1 HANDLE 5 311052492 1 MOTOR HOUSING 2 311051419 1 AUXILIARY HANDLE 6 3411646A 1 SPOOL 3 311032492 1 SHAFT 7 3411546A 6 1 SPOOL COVER 4 311042492 1 GUARD 14 English EN ...

Страница 15: ... bloc batterie 20 8 Utilisation 20 8 1 Démarrez la machine 20 8 2 Arrêtez la machine 20 8 3 Conseils sur l utilisation 20 8 4 Conseils de coupe 21 8 5 Réglez la longueur de la ligne de coupe 21 8 6 Réglez manuellement la longueur de la ligne de coupe 21 8 7 Réglez le diamètre de coupe 22 8 8 Passage au mode de coupe bordure 22 8 9 Réglez la longueur de l arbre 22 9 Entretien 23 9 1 Informations gé...

Страница 16: ...e augmente le risque de choc électrique N utilisez pas sous la pluie Tenez tous les curieux les enfants et les animaux domestiques à une distance d au moins 15 m Habillez vous correctement Ne portez pas de vêtements amples ou de bijoux Ils pourraient se coincer dans les pièces en mouvement Le port de gants en caoutchouc et de chaussures adaptées est recommandé pour travailler à l extérieur Portez ...

Страница 17: ...gé ou modifié Les batteries endommagées ou modifiées peuvent présenter un fonctionnement imprévisible et provoquer un incendie une explosion ou un risque de blessure N exposez pas une batterie ou un appareil à un feu ou à une température excessive L exposition au feu ou une température supérieure à 130 C 265 F peut provoquer une explosion Ne jetez pas les batteries au feu Les cellules peuvent expl...

Страница 18: ...che pour réparation Utilisez uniquement des pièces de rechange et des accessoires identiques du fabricant 6 ÉLIMINATION DES BATTERIES SANS DANGER POUR L ENVIRONNEMENT Les matières toxiques et corrosives ci dessous se trouvent dans les batteries utilisées dans cette machine Lithium ion une substance toxique AVERTISSEMENT Éliminez toutes les substances toxiques d une manière spécifiée afin de préven...

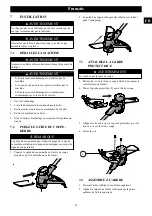
Страница 19: ...îte et l emballage en respectant les règlements locaux 7 2 POSEZ LE GUIDE DU COUPE HERBE REMARQUE Le guide du coupe herbe peut limiter la plage de coupe de la machine et diminuer le risque de dommages causés par la ligne de coupe rotative 1 Poussez le guide du coupe herbe sur la tête de coupe jusqu à ce qu il s enclenche dans les fentes 2 Le guide du coupe herbe peut être rabattu vers le haut pour...

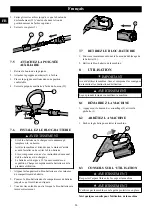
Страница 20: ...tion 1 Alignez les languettes du bloc batterie avec les rainures du compartiment de batterie 2 Poussez le bloc batterie dans le compartiment de batterie jusqu à ce qu il soit bien encliqueté 3 Vous devriez entendre un clic lorsque le bloc batterie sera inséré correctement 7 7 RETIREZ LE BLOC BATTERIE 1 Poussez et maintenez enfoncé le bouton de déblocage de la batterie 14 2 Retirez le bloc batterie...

Страница 21: ... COUPE SENS DE ROTATION 8 5 RÉGLEZ LA LONGUEUR DE LA LIGNE DE COUPE REMARQUE La machine est équipée d une tête d auto alimentation Cela endommagera la machine si vous frappez la tête pour essayer d avancer la ligne REMARQUE Si la ligne de coupe n avance pas automatiquement elle peut être emmêlée ou vide 1 Lorsque la machine est en marche relâchez la gâchette 2 Attendez deux secondes puis tirez de ...

Страница 22: ... REMARQUE La machine peut être utilisée en combinaison avec le guide du coupe herbe pour le bordage des trottoirs et des chemins 1 Arrêtez la machine et rabattez le guide du coupe herbe vers le bas à partir de la position de rangement 2 Tirez le coupleur de coupe et tournez la tête de coupe de 180 degrés jusqu à ce que la tête de coupe se verrouille en position r 3 Relâchez le coupleur de coupe 8 ...

Страница 23: ...dans un détergent neutre N utilisez pas de détergents ou de solvants agressifs pour nettoyer les pièces en plastique ou les poignées Gardez la tête de coupe exempte d herbe de feuilles ou de graisse excessive Gardez les évents d aération propres et exempts de débris pour éviter la surchauffe et les dommages au moteur ou à la batterie Ne pulvérisez pas de l eau sur le moteur et les composants élect...

Страница 24: ...MACHINE Retirez le bloc batterie de la machine Assurez vous que les enfants ne peuvent pas s approcher de la machine Gardez la machine loin des agents corrosifs tels que les produits chimiques de jardin et les sels de déglaçage Protégez la machine pendant le transport pour éviter tout dommage ou blessure Nettoyez la machine et vérifiez qu elle n est pas endommagée 11 DÉPANNAGE Problème Cause possi...

Страница 25: ...upe Les lignes sont emmêlées sur la bobine 1 Retirez les lignes de la bobine 2 Enroulez les lignes Problème Cause possible Solution La ligne ne cesse de se briser La machine n est pas utilisée cor rectement 1 Coupez avec le bout de la ligne évitez les pierres les murs et autres objets durs 2 Avancez régulièrement la ligne de coupe pour conserver toute la largeur de coupe L herbe s enroule autour d...

Страница 26: ...urni avec le produit neuf ARTICLES NON COUVERTS PAR LA GARANTIE 1 Toute pièce qui est devenue inopérante en raison d une mauvaise utilisation d une utilisation commerciale d un abus d une négligence d un accident d un entretien inapproprié ou d une modification ou 2 L appareil s il n a pas été utilisé et ou entretenu conformément au manuel du propriétaire ou 3 Usure normale sauf comme indiqué ci d...

Страница 27: ...tion No No de pièce Qté Description 1 311062492 1 GUIDON 5 311052492 1 BOÎTIER DU MOTEUR 2 311051419 1 POIGNÉE AUXILIAIRE 6 3411646A 1 BOBINE 3 311032492 1 ARBRE 7 3411546A 6 1 COUVERCLE DE BOBINE 4 311042492 1 GARDE PROTECTRICE 27 Français FR ...

Страница 28: ......

Отзывы: