background image

23

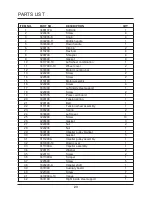
  ITEM NO. 

PART NO. 

DESCRIPTION 

QTY


3490137A 

Soft grip 

1


3220436 

Screw 

4


3410835-8 

Knob 

4


3330299-11 

Middle handle 

1


3330399-11 

Down handle 

1


3290135 

Clip pin 

2


3110299 

Hex bolt 

4


3290799 

Shrapnel 

4


3290699 

Gasket 

4


10 

3411799-10 

Left wheel combination 

1


11 

3411799C-10 

Wheel cover 

2


12 

3330398 

Motor mounting bar 

1


13 

3220299 

Screw 

2


14 

3220598 

Screw 

2


15 

3118199 

Motor assembly 

1


16 

3220299 

Screw 

4


17 

3331099 

Left inside steel support 

1


18 

3220999 

Screw 

2


19 

3411535 

Press cord board 

1


20 

3390198 

Tension spring 

1


21 

3290198 

Belt 

1


22 

3111198 

Tension wheel assembly 

1


23 

3390298 

Spring 

2


24 

3330999 

Left cover 

1


25 

3220298 

Screw 

10


26 

3290499 

Gasket 

3


27 

3220998 

Nut 

2


28 

3220236 

Nut 

1


29 

3330198 

Impeller pulley bracket 

1


30 

3220898 

Gasket 

5


31 

3111298A 

Impeller pulley assembly 

1


32 

3410399-10 

Down cover 

1


33 

3111399A 

Impellor assembly 

1


34 

3290173 

Washer 

2


35 

3220110 

Screw 

2


36 

3411399A 

Scraper 

1


37 

3225599 

Screw 

5


38 

3320299-A 

Impeller shaft 

1


39 

3331399 

Auxiliary board 

1


40 

3221099 

Screw 

7


41 

3410999A-10 

Vanes 

4


42 

3331199 

Right inside steel support 

1

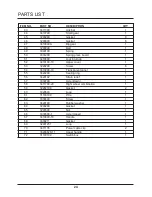
PARTS LIST

Содержание 26022

Страница 1: ...Read all safety rules and instructions carefully before operating this tool Owner s Manual TOLL FREE HELPLINE 1 888 90WORKS 888 909 6757 10 Amp Electric Snow Shovel 26022 ...

Страница 2: ...4 19 Troubleshooting 20 Warranty 21 Exploded View 22 Parts List 23 24 Notes 25 PRODUCT SPECIFICATIONS 10 AMP ELECTRIC SNOW SHOVEL Motor 120 V 60 Hz 10 A No load speed Up to 2 600 RPM Clearing width 16 in 40 6 cm Clearing depth 6 in 15 2 cm Impeller size 14 in 35 6 cm Discharge distance Up to 25 ft 7 6 m Wheels 6 in 15 2 cm Weight 24 5 lbs 11 1 kg CONTENTS ...

Страница 3: ...op offs etc without properly adjusting the angle of the snow discharge Keep children and pets away from the work area Do not force or overload the Snow Shovel The Snow Shovel will perform better and safer when it is used at the rate that it was designed to work at Do not operate the Snow Shovel at high speeds on slippery surfaces Look behind and exercise caution when backing up Do not direct the d...

Страница 4: ...moving traffic Allow the Snow Shovel to run for a few minutes after clearing snow in order to prevent moving parts from freezing Use only the manufacturer s original replacement parts and accessories for this Snow Shovel The use of unauthorized parts or accessories could lead to serious injury to the user or damage the Snow Shovel and will void the warranty Do not use the Snow Shovel in the hand h...

Страница 5: ...e insulated construction min Per Minute Revolutions strokes surface speed orbits etc per minute Wet Conditions Alert Do not expose to rain or use in damp locations Read The Operator s Manual To reduce the risk of injury user must read and understand operator s manual before using this product Eye and Head Protection Wear eye and head protection when operating this equipment Ricochet Thrown objects...

Страница 6: ...The operation of any power tool can result in foreign objects being thrown into your eyes which can result in severe eye damage Before beginning power tool operation always wear safety goggles or safety glasses with side shields and when needed a full face shield We recommend Wide Vision Safety Mask for use over eyeglasses or standard safety glasses with side shields Always use eye protection whic...

Страница 7: ...njury when servicing the Snow Shovel use only identical replacement parts GROUNDING INSTRUCTIONS IN THE EVENT OF A MALFUNCTION OR BREAKDOWN grounding provides the path of least resistance for electrical current and reduces the risk of electric shock This tool is equipped with an electric cord that has a POLARIZED plug The plug MUST be plugged into a matching outlet that is properly installed and g...

Страница 8: ...omplete stop and disconnect the Snow Shovel from the power supply in order to prevent accidental start ups before cleaning or performing any inspections or repairs Do not abuse the extension cord Do not carry the Snow Shovel by the power cord or pull on the cord in order to disconnect it from the receptacle Keep the extension cord away from heat oil and sharp edges in order to prevent damage If th...

Страница 9: ...ompare the illustration in Figure 2 to your snow shovel in order to familiarize yourself with the location of various controls and adjustments Save this manual for future reference Upper Handle Discharge Directional Control Middle Handle Wheels Cover Screws Switch Vanes Scraper Impeller Belt Cover Lower Handle ...

Страница 10: ... assistance PACKING LIST Snow shovel Owner s Manual W A R N I N G If any parts are damaged or missing do not operate this product until the parts are replaced Failure to heed this warning could result in serious personal injury W A R N I N G Do not connect to power supply until assembly is complete Failure to comply could result in accidental starting and possible serious personal injury W A R N I...

Страница 11: ...nts or accessories not recommended can result in serious personal injury ASSEMBLING THE HANDLE See Figure 3 Remove any packing material that may have been inserted between the upper and lower handles for shipping purposes Align the holes 4 on the upper handle 1 with the holes on the middle handle 2 Insert the bolts 5 and use the wing nuts 6 to tighten them Align the holes 7 on the middle handle 2 ...

Страница 12: ...To turn the Snow Shovel off simply release the lever C A U T I O N Do no attempt to override the operation of this safety switch USING THE SNOW SHOVEL Start the Snow Shovel by following the Starting instructions The depth and weight of the snow will determine the forward speed Push the Snow Shovel forward so that it rides on the scraper Verify that the power cord is attached to the cord retainer a...

Страница 13: ...ely 360 in either direction clockwise or counter clockwise Do not force it Turn the discharge directional control clockwise 360 The vanes will turn approximately 45 to the left Turn the discharge directional control counter clockwise 360 The vanes will turn approximately 45 to the right TIPS FOR BEST SNOW THROWING RESULTS For the most efficient snow throwing keep the vanes parallel and throw the s...

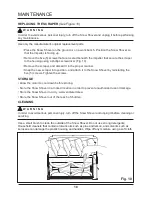
Страница 14: ...the ten 10 screws from the belt cover using a phillips screwdriver Fig 7 Remove the flange lock nut and the three 3 screws Fig 8 Remove the impeller pulley bracket using a washer or nut driver Fig 8 W A R N I N G In order to reduce the risk of electric shock replace the cover before connecting the Snow Shovel to a power source Pull the belt tensioner idler arm away from the drive pulley Remove the...

Страница 15: ...sh the rest of the cover down into the recess and over the rotor shaft Tighten all ten 10 screws NOTE If the flange lock nut is damaged do not replace it with a standard nut Use only the manufacturer s original replacement parts W A R N I N G When fitting the belt back into the main housing verify that the belt is positioned to the right of the Drive Belt Retainer If the belt is positioned to the ...

Страница 16: ...ve the 10 screws from the side cover Remove the 3 screws holding the pulley support plate Remove the 2 screws and 2 washers Remove the impellor shaft nut from the right hand side Insert the impellor shaft in the new impellor and place the 2 washers on the right hand side Be sure not to lose the 2 springs Remove the plate and the two spacer washers Withdraw the impellor shaft from the left hand sid...

Страница 17: ...e impellor shaft washer and nut Replace and tighten the remaining screws and the nut and washer Replace the 2 spacer washers on the impellor shaft Place the upper spring into position and then finger tighten the cover plate into place as shown Re install the impellor shaft nut and washer on the right hand side and tighten Place the impellor and shaft back into the front scoop Replace the 2 screws ...

Страница 18: ...r into position and attach it to the Snow Shovel by reinstalling the five 5 screws Tighten the screws STORAGE Allow the motor to cool down before storing Store the Snow Shovel in a locked location in order to prevent unauthorized use or damage Store the Snow Shovel in a dry well ventilated area Store the Snow Shovel out of the reach of children CLEANING W A R N I N G In order to avoid serious pers...

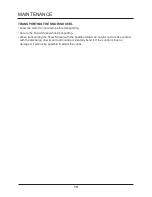
Страница 19: ...porting Secure the Snow Shovel while transporting When transporting the Snow Shovel with the handles folded be careful not to make contact with the discharge directional control and accidentally bend it If the control is bent or damaged it will not be possible to adjust the vanes 19 ...

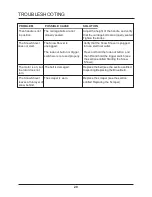
Страница 20: ...ed into an electrical outlet The lock out button or trigger Press and hold the lock out button and switch were not used properly then lift and hold the trigger switch see the section entitled Starting the Snow Shovel The motor is on but The belt is damaged Replace the belt see the section entitled the rotor does not Inspecting Replacing the Drive Belt turn The Snow Shovel The scraper is worn Repla...

Страница 21: ...suse commercial use abuse neglect accident improper maintenance or alteration or 2 The unit if it has not been operated and or maintained in accordance with the owner s manual or 3 Normal wear except as noted below 4 Routine maintenance items such as lubricants blade sharpening 5 Normal deterioration of the exterior finish due to use or exposure GREENWORKS HELPLINE 1 888 90WORKS Warranty service i...

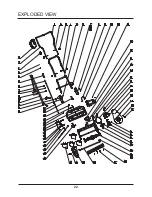
Страница 22: ...22 EXPLODED VIEW ...

Страница 23: ...l support 1 18 3220999 Screw 2 19 3411535 Press cord board 1 20 3390198 Tension spring 1 21 3290198 Belt 1 22 3111198 Tension wheel assembly 1 23 3390298 Spring 2 24 3330999 Left cover 1 25 3220298 Screw 10 26 3290499 Gasket 3 27 3220998 Nut 2 28 3220236 Nut 1 29 3330198 Impeller pulley bracket 1 30 3220898 Gasket 5 31 3111298A Impeller pulley assembly 1 32 3410399 10 Down cover 1 33 3111399A Impe...

Страница 24: ...crew 6 54 3410299 10 Transparent panel 1 55 3420299 Sealing ring 1 56 3420102 Strain relief 1 57 3330799 Axle Down 1 58 3411799 20 Right wheel combination 1 59 32262198 Gasket 2 60 3320643 Loop 1 61 31100199 Wire 1 62 3330499 Screw 1 63 3420199 Rubber washer 1 64 3290299 Gasket 1 65 3290599 Nut 1 66 3330599 1 Axle Upper 1 67 3410499 10 Handle 1 68 3330211 Gasket 1 69 32901251 Loop 1 70 3411135 Pow...

Страница 25: ...25 NOTES ...

Страница 26: ...TOLL FREE HELPLINE 1 888 90WORKS 888 909 6757 Rev 02 05 08 12 Printed in China on 100 recycle material ...

Отзывы: