6
PROPOSITION 65
WARNING
This product contains a chemical known to the state of
California to cause cancer, birth defects or other
reproductive harm. Some dust created by power sanding,
sawing, grinding, drilling, and other construction activities
contains chemicals known to cause cancer, birth defects or
other reproductive harm. Some examples of these chemicals
are:
•
Lead from lead-based paints;
•
Crystalline silica from bricks and cement and other
masonry products;
•
Arsenic and chromium from chemically treated lumber.
Your risk of exposure to these chemicals varies depending
on how often you do this type of work. To reduce your
exposure to these chemicals, work in a well-ventilated area,
and work with approved safety equipment, such as dust
masks that are specially designed to filter out microscopic
particles.
Save these instructions.
7
INSTALLATION
7.1
UNPACK THE MACHINE
WARNING
Make sure that you correctly assemble the machine before
use.
WARNING
•
If the parts are damaged, do not use the machine.
•
If you do not have all the parts, do not operate the
machine.
•
If the parts are damaged or missing, speak to the service
center.
1. Open the package.
2. Read the documentation in the box.
3. Remove all the unassembled parts from the box.
4. Remove the machine from the box.
5. Discard the box and package in compliance with local
regulations.
7.2
ADD THE BAR AND CHAIN OIL
Examine the amount of oil in the machine. If the oil level is
low, add the bar and chain oil as follows.
IMPORTANT
Use bar and chain oil that is only for chains and chain
oilers.
NOTE
The machine comes from the factory without bar and chain
oil.
12
13
11
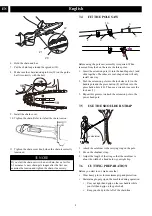
1. Loosen and remove the cap (11) from the oil tank.
2. Put the oil (12) into the oil tank.
3. Monitor the oil indicator (13) to make sure that no dirt
gets into the oil tank while you add the oil.
4. Put the oil cap on.
5. Tighten the oil cap.
6. The whole oil tank will last for approximately 20- 40
minutes.
IMPORTANT
Do not use dirty, used or contaminated oil. Damage can
occur to the bar or chain.
7.3
ASSEMBLE THE GUIDE BAR AND
SAW CHAIN
1. Loosen the chain cover by turning the chain cover knob
(14) counterclockwise.
2. Remove the chain cover (15).
14
15
3. Put the chain drive links (21) into the bar groove (20).
4. Put the chain cutters (22) in the direction of the chain
operation.
5. Put the chain in position and make sure that the loop is
behind the guide bar.
7
English
EN


