Greenlee GATOR EK06FT Скачать руководство пользователя страница 2

Greenlee Textron / Subsidiary of Textron Inc.

2

4455 Boeing Dr., Rockford, IL 61109-2988  815/397-7070

EK06FT Battery-Powered Crimping Tool

Table of Contents

Description

The EK06FT Battery-Powered Crimping Tool is a hand-
held, self-contained, dieless crimping tool intended to
crimp aluminum and copper connectors onto electrical
cable.

Purpose

This instruction manual is intended to familiarize opera-
tors and maintenance personnel with the safe operation,
troubleshooting and repair procedures for the Greenlee
EK06FT.

Keep this manual available to all personnel.

Replacement manuals are available upon request
at no charge.

 and 

 are registered trademarks

of Greenlee Textron.
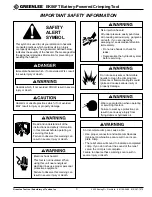
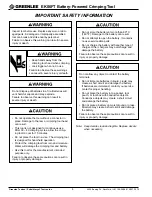
Safety

Safety is essential in the use and maintenance of
Greenlee tools and equipment. This instruction manual
and any decals on the tool provide information for
avoiding hazards and unsafe practices related to the
use of this tool. Observe all of the safety information
provided.

KEEP THIS MANUAL

Description ..................................................................... 2

Purpose .......................................................................... 2

Important Safety Information ...................................... 3-4

Identification ................................................................... 5

Location of Decals ......................................................... 6

Specifications ................................................................. 6

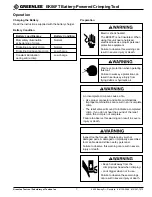
Operation .................................................................... 7-8

Periodic Pressure Relief Valve Check ........................... 8

Maintenance .................................................................. 9

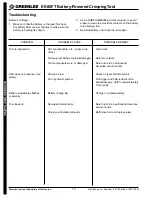
Troubleshooting ........................................................... 10

Service

Disassembly .......................................................... 11

Assembly ............................................................... 12

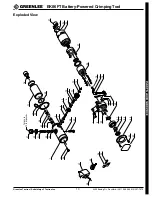
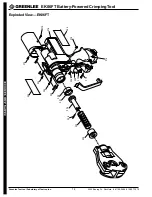
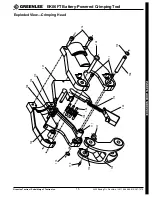
Exploded Views ...................................................... 13-15

Parts List ................................................................. 16-18

Содержание GATOR EK06FT

Страница 1: ...RY POWERED CRIMPING TOOL INSTRUCTION MANUAL Read and understand all of the instructions and safety information in this manual before operating or servicing this tool 999 3091 9 2001 Greenlee Textron I...

Страница 2: ...this manual available to all personnel Replacement manuals are available upon request at no charge and are registered trademarks of Greenlee Textron Safety Safety is essential in the use and maintenan...

Страница 3: ...OL Skin injection hazard Oil under pressure easily punctures skin causing serious injury gangrene or death If you are injured by escaping oil seek medical attention immediately Do not use hands to che...

Страница 4: ...ger when not in use Failure to observe these warnings can result in severe injury or death Do not operate the tool without a connector in place Damage to the ram or crimping tool head can result This...

Страница 5: ...ron Inc 5 4455 Boeing Dr Rockford IL 61109 2988 815 397 7070 EK06FT Battery Powered Crimping Tool Identification EK06FT 1 Trigger 5 Hand Guard 2 Trigger Lock 6 Flip Top 3 Crimping Head 7 Reservoir Cov...

Страница 6: ...00 Mass Weight with battery 4 9 kg 10 lbs 12 oz Sound Level 75 dB A at 1 Meter Vibration or 2 5 m s2 Motor Type DC Permanent Field Motor Motor Voltage 12 VDC Hydraulic Oil ml pint of Shell Tellus T15...

Страница 7: ...r and cable combinations Improper combinations can result in an incomplete crimp The relief valve will sound to indicate a completed crimp If you do not hear the sound of the relief valve the crimp is...

Страница 8: ...vice center If the test slug fits into the GO slot the pressure relief valve is set correctly If the test slug fits into the NO GO slot the pressure relief valve is set too low Send the crimping tool...

Страница 9: ...es clean with a damp cloth and mild detergent 2 Fully retract and lock the trigger Place the crimping tool in the carrying case Store in a cool dry place 3 Charge the battery Monthly 1 Thoroughly clea...

Страница 10: ...l trigger and hold retract button simultaneously Hold for approximately 10 seconds Battery load display flashes Battery charge low Charge or replace battery constantly Tool loses oil Damaged internal...

Страница 11: ...ver 18 15 Remove three hex head cap screws 7 and sepa rate the gear housing motor subassembly from pump housing Pump 1 Use a hooked tool to remove the reservoir O ring 38 Gently tug it over the reserv...

Страница 12: ...until snug 6 Install reservoir 17 Slip the O ring 38 over the reservoir Using a hooked tool carefully slip the O ring over the lip of the pump housing Insert the plug 16 into the reservoir Main Compo...

Страница 13: ...rd IL 61109 2988 815 397 7070 EK06FT Battery Powered Crimping Tool Exploded View 39 40 38 34 35 37 6 1 47 46 48 49 16 4 5 32 25 26 33 44 45 41 42 43 58 17 36 29 52 54 53 50 51 31 19 7 30 57 18 15 28 2...

Страница 14: ...Subsidiary of Textron Inc 14 4455 Boeing Dr Rockford IL 61109 2988 815 397 7070 EK06FT Battery Powered Crimping Tool Exploded View EK06FT 213 218 224 222 225 223 221 220 204 203 215 205 212 209 203 21...

Страница 15: ...idiary of Textron Inc 15 4455 Boeing Dr Rockford IL 61109 2988 815 397 7070 EK06FT Battery Powered Crimping Tool Exploded View Crimping Head 103 105 104 112 111 115 102 107 104 112 103 106 115 105 113...

Страница 16: ...e Valve 1 15 500 4203 3 Screw Flat Head M4 x 6 1 16 500 4122 3 Reservoir Plug 1 17 500 5861 4 Hydraulic Reservoir 1 18 500 5879 7 Release Lever 1 19 500 4125 8 Relief Lever Spring 1 20 500 5872 0 Scre...

Страница 17: ...6 9 14 1 61 500 5904 1 Seal Kit 4 9 13 14 38 42 47 48 52 220 221 1 100 500 6126 7 Head Cover Set w Decal 1 101 500 6125 9 Cam Yoke Assembly 1 102 500 6117 8 Latch 1 103 500 6127 5 Moving Side Jaw 2 10...

Страница 18: ...500 6381 2 Piston 1 224 500 6382 0 Sleeve 1 225 500 6340 5 Dowel Pin 1 250 500 6308 1 10 Test Slugs 251 500 6309 0 Test Gage 252 500 6130 5 10 Slugs w Gage 253 500 6076 7 Decal Serial Number 1 254 50...

Отзывы: