background image

6

VGN Technology

®

BMS Communication


(hard wire connections)

Nozzle Feedback

 will report the position of the nozzle 

during operation. It is necessary to maintain minimum 
required nozzle outlet velocity. Each nozzle has two 
feedback outputs, one for each blade of the nozzle. 
Connect BMS to 1NZFB1 and COM. Connect BMS to 
1NZFB2 and COM.

Wire Landing Points

•  Fan 1:  1NZFB1 and COM and 1NZFB2 and COM on 

the terminal strip

•  Fan 2:  2NZFB1 and COM and 2NZFB2 and COM on 

the terminal strip,

 if applicable

•  Fan 3:  3NZFB1 and COM and 3NZFB2 and COM on 

the terminal strip,

 if applicable

•  Fan 4:  4NZFB1 and COM and 4NZFB2 and COM on 

the terminal strip,

 if applicable

Fan Flow


This feature is not required for system 

operation. This feature allows the BMS to record and 
display the CFM of the fan during operation. Connect 
BMS to 1SURAR and COM.

Wire Landing Points

•  Fan 1:  1SURAR and COM on the terminal strip
•  Fan 2:  2SURAR and COM on the terminal strip,


if applicable

•  Fan 3:  3SURAR and COM on the terminal strip,


if applicable

•  Fan 4:  4SURAR and COM on the terminal strip,


if applicable

Alarm


will notify the BMS of issues with the VGN 

control system by closing a dry relay contact within 
the VGN Carel controller. Connect BMS to ALM1 and 
ALMCOM.

Wire Landing Points

•  Entire System: ALM1 and ALMCOM on the  

terminal strip

NOTE:

  There is only one alarm contact for the entire 

VGN control system regardless of the number of fans.

Variable Geometry Nozzle (VGN) Controller to VFD and BMS Hardwiring 
Instructions

Make sure the numbering of the fans is consistent 
during the entire wiring installation; fan 1 will require 
wiring specific to fan 1, fan 2 will require specific wiring, 
along with fans 3 and 4 if applicable.

Fan Run Signal


(hard wire connections)

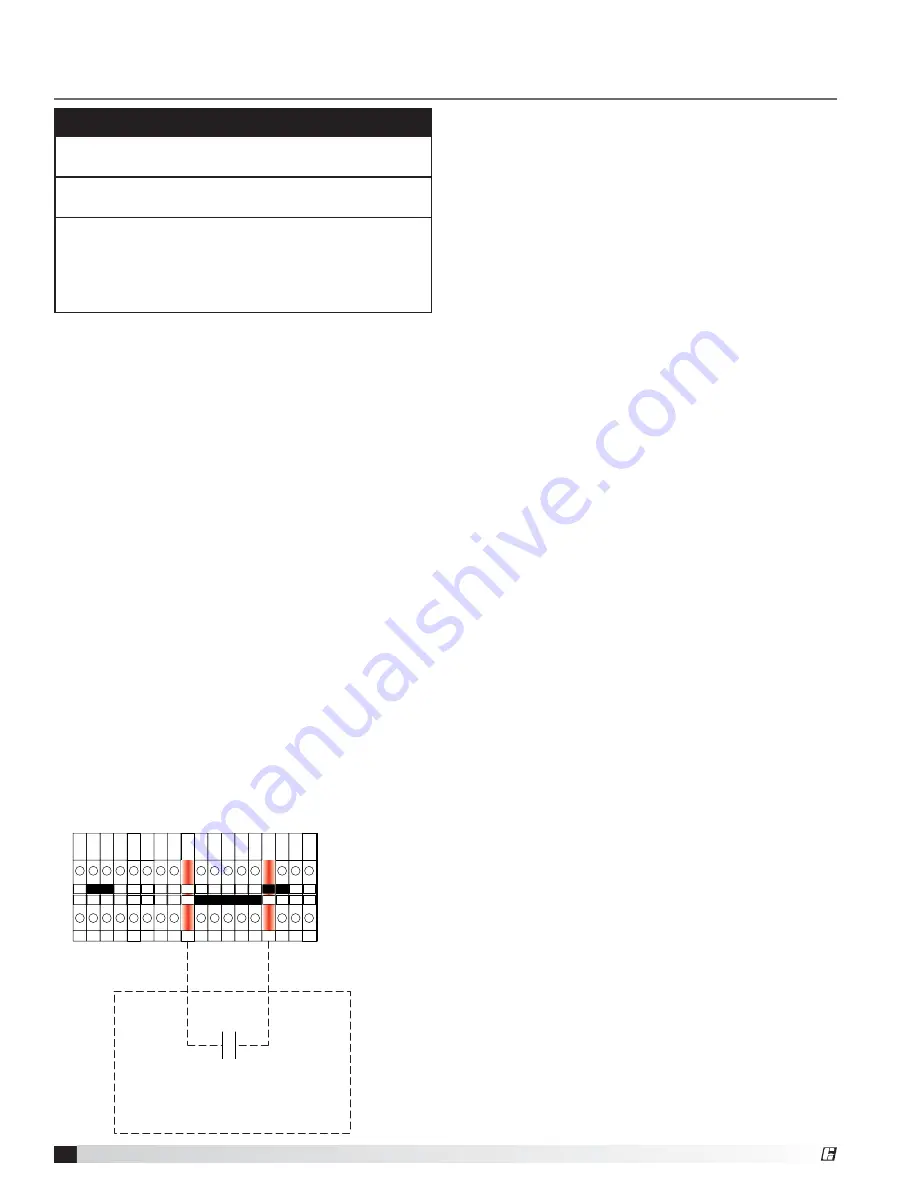
The VGN controller requires a 24 VAC fan run input 
signal to communicate to the VGN controller that the fan 
is running. The VGN controller will supply the 24 VAC 
voltage required, but it will need to be switched on 
and off by the Building Management System (BMS) or 
Variable Frequency Drive (VFD) based on the fan run 
status. Use a relay contact controlled by the VFD or 
BMS to control the fan run signal; the contact should 
be closed when the fan is running. Connect the +24V 
terminal in the VGN controller to the input of the relay 
contact. Connect the normally closed (NC) switched 
side of the relay contact to the 1FNRUN terminal in the 
VGN controller. The VGN controller will not function 
without the 24 VAC fan run signal.

Wire Landing Points
•  Fan 1:  +24 V and 1FNRUN on the terminal strip
•  Fan 2:  +24 V and 2FNRUN on the terminal strip,  

if applicable

•  Fan 3:  +24 V and 3FNRUN on the terminal strip,  

if applicable

•  Fan 4:  +24 V and 4FNRUN on the terminal strip,  

if applicable

NOTE

All field installation and wiring of electrical equipment 
must be done to meet NEC, CEC and local codes.

Be sure to use appropriately sized wire for the full load 
amp draw.

Once the following hardwiring is complete, please 
refer to the BMS Communication Programming 
section for details on programing the BMS to 
communicate with the VGN controller via the hard 
wire connections.

COM

COM

1FNRUN

COM

COM

COM

1SURAR

GND

GND

1SURAR

1NZVDC

1NZFB1

1NZFB2

+24V

+24V

ALM1

ALMCOM

TEST

VFD BY OTHERS:

Relay output on VFD to close when 
fan is running.  

Содержание VEKTOR-CS

Страница 1: ...applicable Follow the Canadian Electrical Code CEC in Canada 2 Do not allow the power cable to kink or come in contact with oil grease hot surfaces or chemicals Replace cord immediately if damaged 3...

Страница 2: ...damage during storage These suggestions are provided solely as a convenience to the user INDOOR The ideal environment for the storage of units and accessories is indoors above grade in a low humidity...

Страница 3: ...ure transducer for duct pressure 1 to 4 Fan motor VFD System Components Multiple Fan VGN Controller Pressure Transducer Box Factory mounted on fan 5 Pin Cables 1 per fan Shipped in Pressure Transducer...

Страница 4: ...onduit to VGN controller box 24 VAC fan run contact BMS communications Proper incoming power 4 All wiring by others per local codes Field Wiring GFC Provided Cables NOTE Duct pressure modulation fan s...

Страница 5: ...cable shipped in the pressure transducer box mounted on the fan to the 5 pin threaded bulkhead on the bottom of the nozzle connect the other end to the 5 pin threaded bulkhead on bottom of the pressu...

Страница 6: ...s is consistent during the entire wiring installation fan 1 will require wiring speci c to fan 1 fan 2 will require speci c wiring along with fans 3 and 4 if applicable Fan Run Signal hard wire connec...

Страница 7: ...V REF U4 GND U5 GND VG VG0 Y1 Y2 Y3 Y4 ID1 ID2 ID3 ID4 ID5 ID6 ID7 ID8 IDC1 U6 U7 U8 GND ID9 ID10 ID11 ID12 IDC9 ID13H ID13 IDC13 ID14 ID14H J1 J24 J2 J3 J4 J5 J7 J8 J20 J21 J14 J10 J13 J12 J22 J16 J...

Страница 8: ...llowing equation SURAIR Voltage 10 15 b J is air density which is job site speci c a universal number to use is 075 lbm ft3 c K Factor is listed on a data plate located on the fan body or refer to the...

Страница 9: ...user can set the maximum and minimum nozzle velocities anywhere between 2000 to 4000 FPM and use the BMS to adjust the nozzle outlet velocity User Set Maximum Outlet Velocity 3000 FPM User Set Minimu...

Страница 10: ...10 VGN Technology Wiring Diagram Single Fan COM COM GND 1FNRUN COM COM COM 1SURAR L2 120V 208V 240V 480V GND GND 1SURAR 1NZVDC 1NZFB1 1NZFB2 24V 24V ALM1 ALMCOM TEST FUSE CAREL CONTROLLER FAN 1 FAN 1...

Страница 11: ...1FNRUN 24V 24V COM COM COM 1SURAR FAN 1 FAN 2 FAN 3 FAN 4 L2 120V 208V 240V 480V 2FNRUN 3FNRUN 4FNRUN GND GND GND GND 1SURAR 2SURAR 2SURAR 3SURAR 3SURAR 4SURAR 4SURAR 1NZVDC 2NZVDC 3NZVDC 4NZVDC 1NZF...

Страница 12: ...dure the fan speed will be increased decreased and there will be periods of time when the entire fan system will be shut down prior arrangements must be made with the lab to accommodate these times of...

Страница 13: ...nd balance mode on the Carel 5 Perform desired test and balancing procedures 6 Upon completing the test and balance of the fan system turn the Test and Balance mode off in the Carel NOTE Test and Bala...

Страница 14: ...user to exit the current menu jumping to the Main Menu Up Down The arrow buttons allow the user to scroll through different screens and adjust parameters Alarm Button will blink red indicating an alar...

Страница 15: ...ed in the configuration Fan Run reports the on off status of the fun run input Flow represents the volumetric airflow of the fan U1 Input is the DC voltage measured at universal input 1 associated wit...

Страница 16: ...osition of the nozzle during testing The user may edit this position as needed during the test mode K Value Adjustment allows the user to apply an offset to the factory K Value The result of such an o...

Страница 17: ...nter key to advance the cursor Then use the arrow keys to adjust the setting Press enter Additional fields are provided that allow the user to enter the specifics pertaining to daylight savings time a...

Страница 18: ...00 to 10 00 VDC Analog Output 2 Output 2 94vdc Analog Output 1 Output 2 94vdc Analog Output 3 Output 2 94vdc Analog Output 4 Output 2 94vdc Alarm History ALARM HISTORY The alarm history records and di...

Страница 19: ...obe Adjustment menu only the end screen is displayed Control Loops Because no content exists under the Control Loops menu only the end screen is displayed MANUAL MANAGEMENT Analog Inputs Because no co...

Страница 20: ...econds Restore is used to retrieve the factory settings from memory and overwrite the current configuration Auto Restore is not used and should remain as NO Though almost never used the Factory Delete...

Страница 21: ...not operating and is at minimum area Check actuator power and signal System has an unfavorable negative pressure condition BMS fan control not working properly Check BMS control and determine if condi...

Страница 22: ...ns Look for loose or broken terminals Tighten to required torque for each or replace as necessary Quarterly Inspect Weather Proof Gaskets Inspect all gaskets and look for moisture Replace if necessary...

Страница 23: ...__________________ _________________________________________________ _________________________________________________ Date ___________________Time _____________ AM PM Notes __________________________...

Страница 24: ...dditional safety information This publication can be obtained from AMCA International Inc at www amca org As a result of our commitment to continuous improvement Greenheck reserves the right to change...

Отзывы: